- Home
- Free Quilt Block Patterns
- Brave World Quilt Block
Brave World Quilt Block Unit Variation
From our Free Quilt Block Patterns Library
This post contains affiliate links, for which I receive compensation.
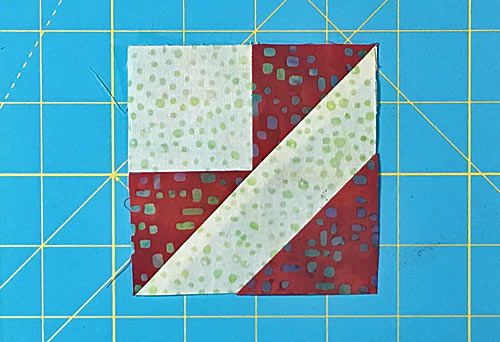
Our Brave World quilt block tutorial concludes by adding a simple variation—a half square triangle shape in the corner.
We've used this same variation on a Birds in the Air block, too.
On this page you'll find:
- Paper piecing patterns that are free to download and print
And if you find this tutorial helpful, please remember to 'Like' the page at the bottom.
Let's get started!

General Instructions

Please read all the instructions before beginning.
Two different methods to piece the unit are shared on this page. You'll need to choose the one that best fits your needs.
Pressing instructions are highlighted in yellow throughout this tutorial.
Seams are all pressed away from the previous patch. For traditional piecing you must do it on purpose; in PP you don't have a choice.
I like to starch my quilt fabrics before cutting for both piecing methods. They're easier to cut and stitch.
If you've never tried starching your fabrics, learn how to do it here.
These abbreviations are used in this tutorial:
- SA - Seam allowance
- RST - right sides together
- PP - paper piecing
Download and print the PP pattern
If you are using traditional methods click here to skip down to Cutting. For PP continue on here.
You'll need the most current version of Adobe installed on your computer to download the pattern.
On the Adobe Print Menu page, under 'Page Size and Handling' set 'Custom Scale' to 100% before printing for accurate results. Click here to see what it looks like on the Print Menu page.
Print the Brave World Variation - Paper Piecing Units | |
|---|---|
| Click on the Finished Block Size | Print this many copies for each block |
| 2" | 1 |
| 3" | 1 |
| 4" | 1 |
After printing, use the 1" square graphic on the printed pages to confirm they are printed accurately.

Not sure which paper to use?
Take a look at my review of several of the most popular brands available to us quilters on the market.
You want a super-easy paper to tear away—less stress on the stitches.
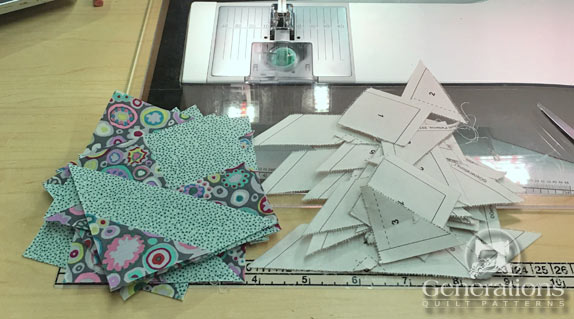
New quilt fabrics to tickle your fancy...
Click the images below to see the full collection. We share any commercial and/or free patterns that showcase them, too. (For inspiration, of course!)


Step 1: Cutting for a Brave World block
, light #1 and #4") Variation #1
Variation #1 dark #1 and #4") Variation #2
Variation #2For the 3" finished sample blocks, we've used Variation #1 with a light #1 and #4. The fabrics are identified as 'A' and 'B'.
Click here to print a copy of the block design and the cutting charts.
To help tame the bias edges in this design, I like to starch my fabric before cutting with a 50/50 mix of StaFlo Liquid Starch concentrate to water.
Best Press will also help if you prefer that—it's not quite as stiff a starch-job.
Choose your technique and cut your patches.
Paperpieced
 | Cutting Chart for a~ PaperPiecing ~ | |||||
|---|---|---|---|---|---|---|
| Patch | Fabric | Qty | Finished Block Size | Sub Cut | ||
| 2" | 3'' | 4'' | ||||
| 1 | A | 1 | 1¾" x 1¾" | 2¼" x 2¼" | 2¾" x 2¾" | --- |
| 2, 3, 5 | B | 2 | 2⅜" x 2⅜" | 2⅞" x 2⅞" | 3⅜" x 3⅜" | |
| 4 | A | 1 | 3⅜" x 3⅜" | 4⅜" x 4⅜" | 5⅜" x 5⅜" | |
| Unfinished Block Size | 2½" | 3½" | 4½" | na | ||
| Grid Size | 1" | 1½" | 2'' | na | ||
| NOTE: You will have a leftover #4 and #5 triangle shape. | ||||||
Traditionally Pieced with a Connector Corner
 | Cutting Chart for a~Traditional Piecing ONLY ~ | |||||
|---|---|---|---|---|---|---|
| Patch | Fabric | Qty | Finished Block Size | Sub Cut | ||
| 2" | 3'' | 4'' | ||||
| 1 | A | 1 | 1½" x 1½" | 2'' x 2'' | 2½" x 2½" | --- |
| 2, 3 | B | 1 | 1⅞" x 1⅞" | 2⅜" x 2⅜" | 2⅞" x 2⅞" | |
| 4 | A | 1 | 2⅞" x 2⅞" | 3⅞" x 3⅞" | 4⅞" x 4⅞" | |
| 5 | B | 1 | 1½" x 1½" | 2'' x 2'' | 2½" x 2½" | --- |
| Unfinished Block Size | 2½" | 3½" | 4½" | na | ||
| Grid Size | 1" | 1½" | 2'' | na | ||
| NOTE: You will have a leftover #4 triangle shape. | ||||||

Step 2: Assemble the Brave World unit
If you've cut from the green Traditional cutting chart, click here to go straight to those instructions, otherwise continue on here for PP instructions.
Brave World - PP
General Sewing Machine Setup for Paperpiecing
- Reduce your stitch length to 16–20 stitches per inch (1.3-1.6 mm). This perforates the paper and stabilizes the seam when you remove the pattern. [Learn more about stitch length here.]
- Reduce your machine's speed or just plain slow down. Sew only as fast as you can stay on the stitching lines.
- Install an open toe appliqué foot (sometimes called an 'embroidery' or 'satin stitch' foot) if you have one (it's easier to see where you're stitching with one installed).
- Use a larger needle (90/14) if you have problems removing the pattern.
- If your machine has a needle stop up, use it. The stitching goes faster when you don't have to lift the presser foot with every seam.
- As you stitch each seam, start and stop a generous 1/4” before and after the solid stitching lines. ALWAYS. Future lines of stitching secure the ends.
After adding each patch, press the unit as it was sewn to set the seam and then open. The SA is automatically pressed towards the last patch added.
Before adding the next patch, take a look to make sure the one you just added covers the space plus seam allowance that it is supposed to.
Steam is optional and usually curls the pattern.
If that bothers you, don't use steam. Sometimes I do. Sometimes I don't.
It truly depends on my mood.
Remember, as you follow this paper piecing tutorial, the printed and the fabric sides of this block are mirror-images of each other.
At last!
Let's sew!
Cut out one of the patterns from the copy you printed. Just a bit past the outside dashed line will do. No brownie points for neatness as we'll trim to perfection after stitching.
With the tiniest dab of Elmer's Washable Glue Stick stick the backside of #1 to the unprinted side of your pattern. Align two of its edges with the dashed placement lines around #1.
With RST, line up the short edge of #2 with #1.
")
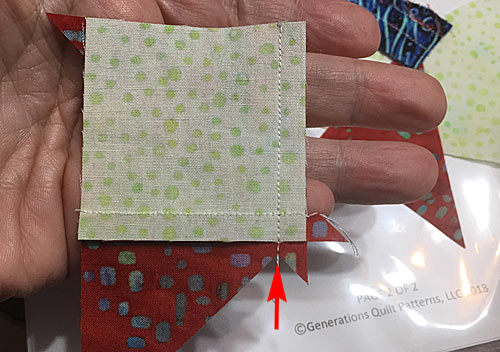
Sew, starting from a good 1/4" before and ending a good 1/4" after the solid line between #1 and #2 begins and ends (white arrows). This SA is secured with the third one.
Sew all your seams in this manner.

Press.
With RST, align the short edge of #3 with the adjacent side of #1 as shown below (white arrow).
 I haven't bothered to trim the thread tail in the center...that'll happen in the next step with my rotary cutter.
Stitch as before.
Press.
 ...off to your cutting mat for a little haircut!
Time to trim #2/#3 to a 1/4" SA to help us position the next patch.
At your cutting mat, lay the pattern down printed side up.
With your ruler aligned with the solid line between #2/#3 and #4, pull back the pattern and crease at this line with your fingernail.
 Your thumbnail is the perfect tool for this 'creasing'.
You will need to pull the stitches away from the pattern a bit (red arrows below) and then fold the paper back on itself along the crease.

Position the 1/4" marking on your ruler with the crease and trim with your rotary cutter.
An Add-A-Quarter PLUS ruler is a good tool for this job if you have one. If you find yourself mis-cutting in this step, it'd be a good investment.

You've created the perfect positioning line for #4—a 1/4" away from the fold/seamline.
With RST, align the long edges of #4 with the freshly cut edge.
From the paper side stitch as before, starting well before and ending well after the solid stitching line. Because the stitches run from edge to edge you can chain piece this step to save a bit of time.
Press.
Trim #4 the same way we did #2/#3—creasing on the lines, folding back the pattern and trimming to 1/4"—the only difference is there are no stitches to pull away.

Finally, with RST, add #5. Again, you can chain piece this step.
")
Press.
Trim this Brave World quilt block unit to size by aligning the 1/4" mark on your ruler with the solid outline of the unit. Trim with your rotary cutter.
 The 1/4" mark on the ruler is directly over the solid stitching mark
Repeat for all for four sides.
Remove the paper and our Brave World unit is complete! (Click here to see a happy little bunch of Brave World units after the paper is removed.)
NOTE: You will have a leftover #4 and #5 triangle shape.
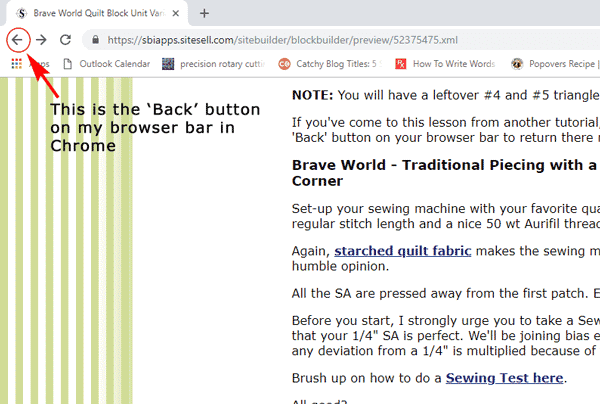
If you have come to this lesson from another tutorial, click the 'Back' button to return.
If you're not sure where / what the 'Back' button is, click here to see it.
Brave World - Traditional Piecing with a Connector Corner
Set-up your sewing machine with your favorite quarter inch foot, your regular stitch length and a nice 50 wt 100% cotton thread like Aurifil or Superior Threads' Masterpiece.
Again, starched quilt fabric makes the sewing more accurate, in my humble opinion.
All the SA are pressed away from the first patch. Every.Single.One.
Before you start, I strongly urge you to take a Sewing Test to ensure that your 1/4" SA is perfect. We'll be joining bias edges together and any deviation from a 1/4" is multiplied because of the diagonal seams.
Brush up on how to do a Sewing Test here.
All good?
Let's begin.
With RST, align a short edge of #2 with #1.
 The seam is stitched from the top side of this pairing.
Stitch starting at the square edge...not the pointy one.
Press.
With RST align a short side of #3 with the adjacent side of #1. Before stitching, double check that when opened, #2 and #3 form a long, straight diagonal line.
 Again, the seam is along the top side of this grouping.
Again, stitch starting from the square side.

Your stitching should end up right in the valley between the two patches (click here to see it).
Press.

If you want to get rid of those dogs ears now, you can trim them off with a scissor.
With RST, match the #4 with this stitched #1/#2/#3. If your stitching and cutting is accurate up to this point, these patches will be identical in size.
Let's check out our sample...
 Not too bad for this old, blonde Norwegian! :)
Both edges for this next seam are on the bias.
I like to pin to hold the edges even. Then let the machine pull the patches through. We're merely guiding them through.
No pushing.
No pulling.
Let the feed dogs do the work.
 The seam should be a thread or two to the right of the 'X' made by the previous lines of stitching.
Give the patches a press with the SA toward #4.
Check that your unit is the correct size using the chart below.
Brave World Finished/Unfinished Sizes | |
|---|---|
| Finished Block Size | Unfinished Size |
| 2" | 2-1/2" |
| 3" | 3-1/2" |
| 4" | 4-1/2" |
Make any adjustments now.
On the back side of #5 draw a diagonal line from corner to corner. Here I've used my favorite Bohin Mechanical chalk pencil.

With RST, layer the #5 in the corner of #4, the diagonal marking ends touching two adjacent sides.
I've switched to my open toe applique foot. Its much easier to see where to place my stitches.

For an accurate unit, stitch on the side of the line closest to the corner. This gives us just enough for the 'turn of the cloth' in the seam allowance for an accurate Brave World quilt block.
 You can just make out that these stitches are on the side of the marking closed to the corner.
Trim away the excess fabric leaving behind a 1/4" SA.

One last press (SA toward #5) and your Brave World quilt block unit is complete.
If you have come to this lesson from another tutorial, click the 'Back' button to return.
If you're not sure where / what the 'Back' button is, click here to see it.
Blocks that use this Brave World variation
So now that you know how to make this variation on a Brave World quilt block, where do you use it?
Here are three options for you:


At the time of this writing, a tutorial is available on this site for the Medieval Walls block.
What about a different quilt block?
For a list of all the 260+ quilt block patterns on this site, start here.
If you know the name of the block, shorten your search by using these links:
Click here if you're looking for blocks with at least some paper piecing.
Click here if you're looking for the basic building blocks of quilting, i.e., Flying Geese, half square triangles, quarter square triangles, etc., along with several techniques to make each.
And finally, use these links to find blocks in these finished sizes:


Yummy fabrics
to drool over
Click any image below to see the full collection and find pricing and ordering information.


By Julie Baird
Copyright © 2008-2026 Generation Quilt Patterns, LLC
All Rights Reserved
Generations-quilt-patterns.com does not sell any personal information. (See Privacy Policy)