Unlock the Mysteries of Stitch Length: Convert SPI to Metric and Back Again!
This post contains affiliate links, for which I receive compensation.
The quilt pattern says use a stitch length of 12.
Your sewing machine says otherwise—there's anything from 0.0 to 6.0—but no '12'.
What's a quilter to do?
On this page, you'll find:
- Discover the suggested stitch lengths for different types of quilting and piecing
To make things easier, you can download and print the charts to keep right at your sewing machine.
Pretty sweet, eh?!!
Let's get started.
How is stitch length measured?
There are two ways we, quilters, use to describe stitch length.
Stitches per Inch (spi)
Quite simply stated a setting of 12 stitches per inch is exactly that.
Your sewing machine lays down 12 stitches for every inch of fabric that is pulled through by the feed dogs.
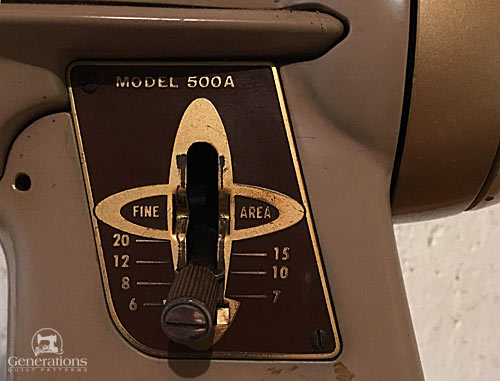 Only on my oldest sewing machine, a Singer Slant-o-matic from the 1960s, do I have a control for stitch length.
Ponder that with this short story problem: My Juki DX-2000-QVP's maximum speed is 1,050 stitches/minute for a straight stitch. The stitch length is set to 12 stitches per inch (SPI).
That means in one minute you can sew a seam 1050 ÷ 12 = 87½"—that's a seam that's more than 2 YARDS long.
That's a lotta seam in a New York minute!
Metric Stitch Length (mm)
This is shown as a number usually with 1 decimal place, like 1.6. It refers to the actual stitch length.
So, a setting of 1.6 means each stitch is 1.6 millimeters long.
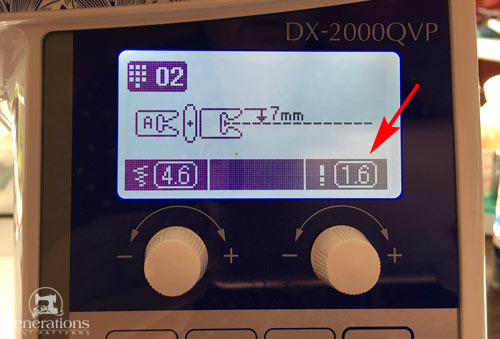 This control allows me to adjust my stitch length in 0.2 increments.
Now I've been sewing for over 50 years. Quilting for about half of that.
Egad! That's a long time. Since before I could cross the street by myself even...
...and while I can just about visualize what 12 spi looks like, I do have a wicked time picturing 2.2mm. (It figures—'m an American.)
Guess what?
They're the same.
So let's take the mystery out of converting between the two descriptions. Quilting shouldn't make your head hurt.
Converting SPI to metric and vice versa
You start out knowing what the recommended spi (stitches per inch) or mm (millimeters) setting is for your project or the type of sewing you're doing.
The first thing to remember is there are 25.4mm in one linear inch.
Then it's a matter of simple division on your calculator using these formulas.
You know spi and want to find mm
The formula is:
25.4 ÷ spi = mm
You know mm and want to find spi
The formula is:
25.4 ÷ mm = spi
Easy peasy lemon squeezy!
Two things to watch out for.
- These equations result in numbers with a bunch of decimal places. (Don't worry, I've got that covered.)
- Most of the newer sewing machines have 1 decimal place, so you'll need to round.
Some machines are programmed in 0.1mm increments (1.1, 1.2, 1.3, etc.), while others are set in 0.5mm increments (1.0, 1.5, 1.5, etc.), others are somewhere in between.
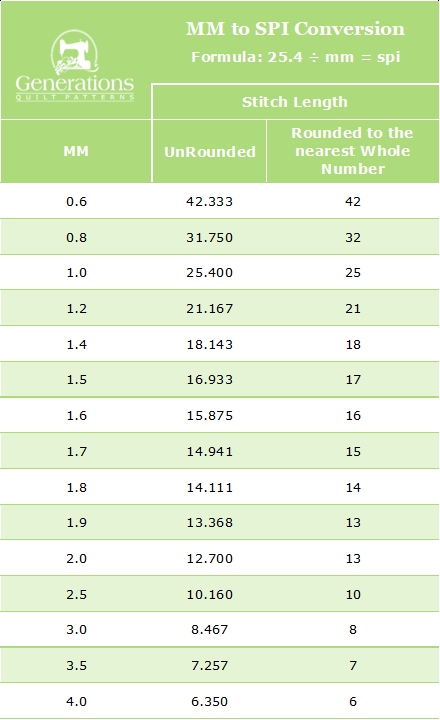
Since we, quilters, would much rather play at our sewing machines and not on the calculator, these charts show the results from the formulas.
First up is converting spi to mm.
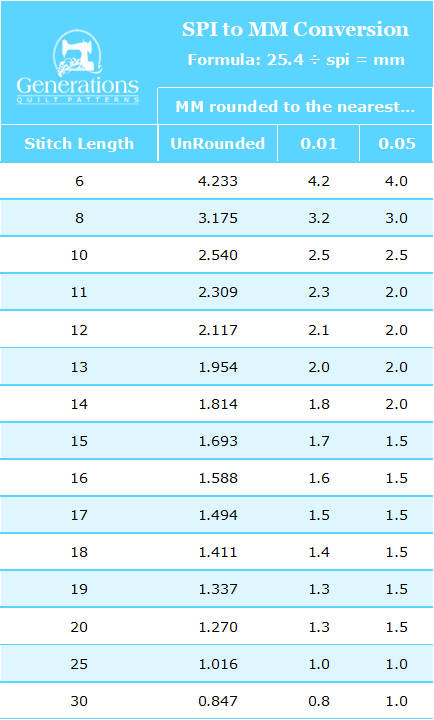
Print your own copy of this chart for use at your sewing machine.
My machine only has a select number of stitch length settings...now what?
You may have an older or lower-priced machine that has only 3 or so stitch lengths to choose from...and they're labeled '1', '2' and '3' (or something like that).
The charts won't do you any good.
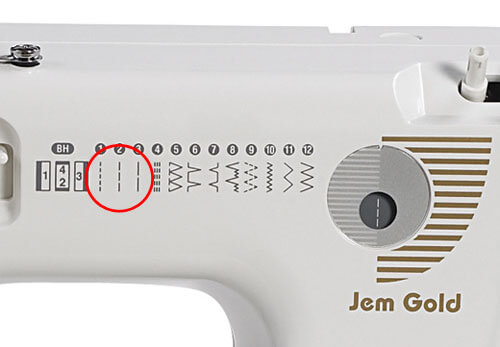 Janome's Jem has 3 stitch length settings
Check your sewing machine's instruction manual. It probably has the actual stitch lengths listed.
Can't find the manual?
Simply mark two lines, 1" apart, on a piece of fabric. Stitch from line to line on each setting and count the number of stitches. Write this down so you can refer to it as needed.
Since it's your sewing machine, after doing the counting, why not take a Sharpie and mark it on your machine next to the appropriate stitch length icon so you don't have to remember it.
Problem solved!
Did you know...
...that stitch length is determined by the feed dogs?
Yep. Those bumpy rows just below your throat plate.
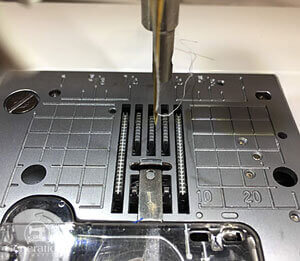 The Feed Dogs—workhorses of your sewing machine. I've removed the presser foot so you can get a good look at all of them.
Set your machine for a stitch length of 12 and it automatically pulls through just enough fabric each time the feed dogs move backward to form those 12spi.
That's why you don't want to push or pull your fabric through your machine—you'll change the stitch length!
You are simply the guide.
Apply what you've learned...
Recommended stitch lengths for different types of sewing
These are suggestions. Fine-tune as you need to adapt to your particular project.
For standard piecing, anywhere from about 12-14spi or 1.8-2.0mm.
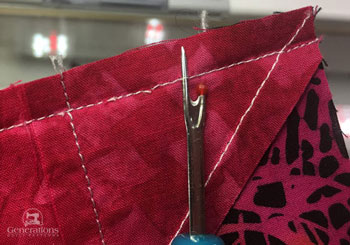 It's helpful to choose a stitch length that your favorite seam ripper can easily rip out.
For paper piecing a shorter stitch length helps perforate the paper and make it easier to remove. Anywhere from 16-20spi or 1.3-1.6mm.
For machine quilting with a walking foot somewhere from 8-12spi or 2.5-3.0mm.
For the micro stitching used to secure a machine quilted seam 24-30spi or 0.5mm. This stitching occurs at the beginning and end of a line of quilting.
For free motion quilting 0.0—there's no need to move the feed dogs at all because YOU are in charge depending on how fast or slow you move the quilt sandwich.
Notable exceptions—'cause there's always exceptions in quilting—if you're using a particularly fine, thin thread, use a shorter length. For a thicker thread, a longer stitch is called for.
The best way to fine tune it?
Try several settings on a practice quilt sandwich before beginning on your actual patchwork.
And finally, if you're using one of those luscious, sexy metallic or rayon threads, you'll want a longer one. The light needs something to reflect off for all that lusciousness to actually sparkle and shine.
For more information on stitch length...
...check out these articles based on questions asked by readers like you.
