- Home
- Free Quilt Block Patterns
- Birds in the Air Quilt Block
Birds in the Air Quilt Block: Choose Your Perfect Piecing Method
🪡 Master this classic block with confidence-building techniques
This post contains affiliate links, for which I receive compensation.
Skill Level: Beginner
The Birds in the Air quilt block is a common unit found within many, many other patchwork designs.
If you are making just a few blocks, traditional piecing methods work just fine.
For larger quantities, when concentration is tempted to wander, I prefer paperpiecing for two reasons:
- Accuracy—as long as you stay on the line at the beginning and the end, you're golden, and...
- Taming bias edges—the paper stabilizes all the edges during construction
🧭Welcome to your Birds in the Air block journey!
We've organized this tutorial into clear segments, making it easy to find exactly what you need. Whether you're gathering supplies, choosing your piecing method, or ready to start sewing, just click the links below to navigate directly to that section. Want to download the free patterns first? They're right at your fingertips! Remember—you can always return to this menu to jump to any part of the tutorial.
- Trimming the finished block to the perfect size
If you'd like to print the whole tutorial, click here for instructions. Remember that you'll need to print the paper piecing patterns separately.
Hate paperpiecing?
Click here for traditional piecing directions for a Birds in the Air quilt block pattern.
Examples of designs that include the Birds in the Air unit in their construction are:


📋 General Instructions
Machine Set-Up:
- Set your stitch length to 15-18 stitches per inch to help perforate the paper.
- Install an open toe applique foot if you have one for an unobstructed view of the stitching line.
- Insert a 90/14 needle IF you have trouble removing the paper.
I use starch in all my piecing—paperpiecing, too!
With it, I find that finger pressing is almost always good enough between patches, especially when they are small, reducing the number of times I need to go to the iron.
To learn more about starching your quilt fabric, click here.
If you use an iron at each step, when you see the instruction 'Press', first press the unit in the closed position. This melds the stitches with the fabric. Then press the patch open. (Otherwise, just finger press the patch open.)
Pressing instructions are highlighted in yellow.
I do not use steam for paperpiecing, but that choice is up to you. In my experience, steam has a tendency to 'curl' the pattern...which is terribly annoying.
For unbelievably flat Birds in the Air quilt blocks, use the Best Technique for Pressing Quilt Blocks.
It works just as well for foundation piecing as it does for traditional. I think you'll like it!
New quilt fabrics to tickle your fancy...
Click the images below to see the full collection. We share any commercial and/or free patterns that showcase them, too. (For inspiration, of course!)


📥 Download and print the paper piecing pattern
You'll need the most current version of Adobe installed on your computer to download the pattern.
On the Adobe Print Menu page, under 'Page Size and Handling' set 'Custom Scale' to 100% before printing for accurate results. Click here to see what it looks like on the Print Menu page.
After printing, use the 1" square graphic on the printed pages to confirm they are printed accurately.
Print the Birds in the Air pattern | |
|---|---|
| # of Units per Copy | Link to PDF Download |
| 12 | 1½" |
| 6 | 2" |
| 4 | 2½" |
| 4 | 3" |
| 2 | 4" |
| 1 | 5" |
| 1 | 6" |

Not sure which paper to use?
Take a look at my review of several of the most popular brands available to us quilters on the market.
You want a super-easy paper to tear away—less stress on the stitches.
✂️ Cut the fabric patches for a Birds in the Air
📢Updated Tutorial Note:
Since first publishing this pattern, I've now updated the pattern to include:
- The Finished/Unfinished Size is now in the seam allowance to make it easier to store any leftover patterns
- The prefix 'BitA' appears before the number. The numbers haven't changed positions. When you come across this unit in another quilt block tutorial, the patches are easier to identify.
- Since this block appears as a unit is so many quilt blocks, it's been added to the Basic Beginner Quilt Blocks section on this website.
Other than that, everything else is the same. The piecing order has not changed. If you have previously printed patterns, they still work.
 and the fabric side (right)")
Sample Block Size: 3" finished / 3½" unfinished
Grid: 2x2
Design Type: Basic quilt block | 4-patch | Paper Piecing
Notice that when you flip from the pattern side (left above) to the fabric side (right above), the BitA-3 and -4 patches change position. It makes no difference in this tutorial. However, if you were using different fabrics for each patch, you'll want to be aware of this movement.
 | Cutting Chart for a~ Paper Piecing ~ | |||||||||
|---|---|---|---|---|---|---|---|---|---|---|
| Patch | Fabric | Qty | Finished Block Size | Sub Cut | ||||||
| 1½'' | 2'' | 2½'' | 3'' | 4'' | 5" | 6" | ||||
| BitA-1 | A | 1 | 1⅝'' x 1⅝'' | 1⅞'' x 1⅞'' | 2⅛'' x 2⅛'' | 2⅜'' x 2⅜'' | 2⅞'' x 2⅞'' | 3⅜'' x 3⅜'' | 3⅞'' x 3⅞'' | |
| BitA-2, BitA-3, BitA-4 | Bac | 2 | 2⅛'' x 2⅛'' | 2⅜'' x 2⅜'' | 2⅝'' x 2⅝'' | 2⅞'' x 2⅞'' | 3⅜'' x 3⅜'' | 3⅞'' x 3⅞'' | 4⅜'' x 4⅜'' | |
| BitA-5 | A | 1 | 2⅞'' x 2⅞'' | 3⅜'' x 3⅜'' | 3⅞'' x 3⅞'' | 4⅜'' x 4⅜'' | 5⅜'' x 5⅜'' | 6⅜'' x 6⅜'' | 7⅜'' x 7⅜'' | |
| Unfinished Block Size | 2" | 2½" | 3" | 3½" | 4½" | 5½" | 6½" | na | ||
| Grid Size | ¾" | 1" | 1¼" | 1½" | 2" | 2½" | 3" | na | ||
Subcutting
These are the subcut patches. You will use three of the black and white triangles, and one each of the large and small blue ones. The rest are extras.

🪡 Assemble the Birds in the Air quilt block
Cut a single block from the page you printed. There's no need to be exact, just cut outside the dotted line that marks the unfinished edge of each block.
You trim it to size in the last step.
With a just a dab of Elmer's Washable Glue Stick—the one that goes on purple and dries clear—position the back side of BitA-1 on the unprinted side of your paper pattern. The edges of the patch touch the dashed placement lines.

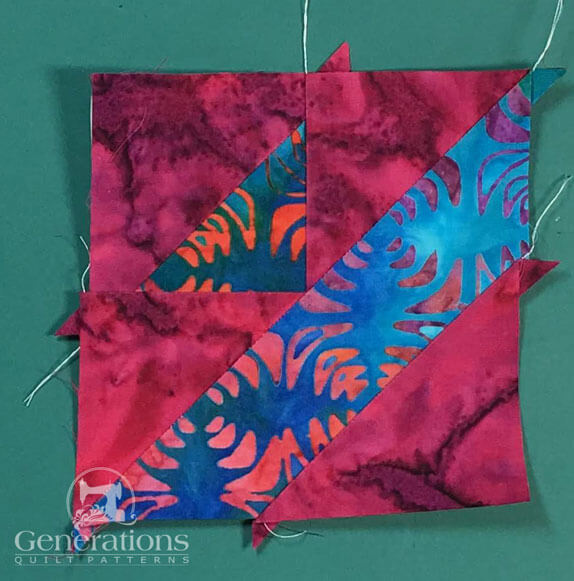
With RST, align and center the long bias edge of BitA-2 over BitA-1.
Stitch a generous seam by starting before the solid line between BitA-1 and BitA-2, and after it ends by approximately 1/4". For this seam, you'll start and stop past the dashed lines that surround the block.
 BitA-1 is completely hidden by the larger BitA-2
💡 Pro Tip: When adding a lighter patch to a darker one, nudge the edge a few threads past the dark edge (blue arrow above) to prevent the darker fabric from shadowing through your finished quilt top.
Press.
With RST, match a short side of BitA-3 to Bita-1. Again, because this is a lighter fabric, I've nudged it a few threads past BitA-1. (blue arrow)

Sew the seam with a generous SA.
Press.
Repeat for BitA-4.
You've noticed the BitA 3 and 4 are the same. It really doesn't matter which you stitch first...in case you were wondering. 🤔 💡
 You guessed it! I've nudged the lighter patch again. (blue arrow)
Press.
We need to trim the excess away from BitA-3 and -4. To accomplish this, at your cutting mat, pull the pattern away from your stitches a bit in the center (left, blue arrow).
Now, pattern side up, match the edge of your ruler with the solid line between BitA-5 and the rest of the block. (below right)
Use your thumbnail to crease the pattern on the line.

Fold the paper back on itself on this line, and match the 1/4" marks on your ruler with the fold.
(You might like an 'Add-a-Quarter' ruler for this type of trimming.)

Back at your sewing machine, align the long bias edge of BitA-5 with this fresh cut.

Sew this final seam, starting and stopping past the outside dashed lines.
After stitching, now trim any thread tails in the center of the block. Don't worry about any on the outside edges.
Press.
Trimming to the exact size
All that's left is to trim the Birds in the Air, taking this hot mess to perfection in 4 cuts.
Pattern right side up on your cutting mat, match the 1/4" markings on your ruler with one side of the solid square that surrounds your Birds in the Air quilt block.
Cut away the excess with your rotary cutter.

Turn the unit a 1/4 turn and repeat. Continue until all four sides are trimmed.
, Side 3 (center), and Side 4 (right)") Voila! Any pesky thread tails on the outside edges are gone.
Voila! Any pesky thread tails on the outside edges are gone.Remove the paper pattern now.
All the patches you cut were calculated to ensure that the outside edges are all on the straight of grain—just like any traditionally pieced block.
Your finished Birds in the Air quilt block or unit looks like this.

If you came to these instructions from another quilt block tutorial...
...click the 'Back' button in your browser to return to that tutorial now.
For traditional piecing instructions to make this Birds in the Air block, click here.
To see blocks that have the same name, but look entirely different, click here.
📌 Birds in the Air Success! 🎯
Master this classic quilt block with confidence — crystal clear steps for perfect points, no specialty rulers required. #QuiltersGottaQuilt

Variation on a Birds in the Air block
 Birds in the Air design variation
This paper pieced variation adds one extra patch, #6. It is used in several other blocks. (For traditional piecing of this unit, click here.)
I'm using a different sample to stitch on for this unit.
Use the cutting chart below. You'll have the same leftover #1, #2, #5 plus one #6.
You can download and print a copy of this design and its cutting chart here for use at your cutting table.
| Cutting Chart for a~ Paperpiecing ~ | ||||||
|---|---|---|---|---|---|---|---|
| Patch | Fabric | Qty | Finished Block Size | ||||
| 2" | 2 1/2" | 3" | 4" | ||||
| 1 | A | 1 | 1⅞" x 1⅞" | 2⅛" x 2⅛" | 2⅜ x 2⅜" | 2⅞" x 2⅞" | |
| 2, 3, 4 | Bac | 2 | 2⅜ x 2⅜" | 2⅝" x 2⅝" | 2⅞" x 2⅞" | 3⅜" x 3⅜" | |
| 5 | A | 1 | 3⅜" x 3⅜" | 3⅞" x 3⅞" | 4⅜" x 4⅜" | 5⅜" x 5⅜" | |
| 6 | Bac | 1 | 2⅜ x 2⅜" | 2⅝" x 2⅝" | 2⅞" x 2⅞" | 3⅜" x 3⅜" | |
| Unfinished Block Size | 2½" | 3" | 3½" | 4½" | --- | ||
| Grid Size | 1" | 1¼" | 1½" | 2" | --- | ||
Download and print the paper piecing variation pattern
Print the pattern to match your chosen Finished Block Size.
Print the Birds in the Air Variation Units | |
|---|---|
| Finished Block Size | Link to PDF Download |
| 2" | 2" |
| 2 1/2" | 2-1/2" |
| 3" | 3" |
| 4" | 4" |
Piecing together this variation
To make it follow the instructions for Patches #1-#5, just leave out the last trimming to size—we've got one more patch to add.
At your cutting mat, paper side up, line up your ruler with the solid line between #5 and #6. Crease the paper along this line with your thumbnail.
Fold the paper back on itself and place the 1/4" line of the ruler on the fold. Trim away the excess leaving behind a quarter inch seam.

After trimming #5 this is what it looks like from the fabric side.

Align the long bias edge of a #6 with the cut edge of #5. Stitch as before starting and ending a generous 1/4" from the solid line.

Give your block a press before trimming.
Now to create our perfectly sized block and get rid of thread tails.
To trim, lay the quarter inch markings of your rule (red arrow) on the solid outside line and trim. Repeat for the remaining three sides.

Our finished Birds in the Air variation after trimming all four sides.

Here is our Birds in the Air variation from the back.

For even MORE blocks to make… 🧩🎨

...visit our Free Quilt Block Pattern Library, with over 260+ blocks to choose from in multiple sizes.
Free downloads are included in all sizes for any blocks require paper piecing patterns or templates.
- Home
- Free Quilt Block Patterns
- Birds in the Air Quilt Block


Yummy fabrics
to drool over
Click any image below to see the full collection and find pricing and ordering information.


By Julie Baird
Copyright © 2008-2026 Generation Quilt Patterns, LLC
All Rights Reserved
Generations-quilt-patterns.com does not sell any personal information. (See Privacy Policy)