- Home
- Free Quilt Block Patterns
- Star Chain Quilt Block
Star Chain Quilt Block
From our Free Quilt Block Patterns Library
This post contains affiliate links, for which I receive compensation.
Skill Level: Confident Beginner
The Star Chain quilt block is a blending of the Sun Rays and Double Irish chain quilt blocks.
It is constructed from the basic units of a planned nine patch and a triangle in a square.
The chain portion adds a bit of extra pizazz with no increase in piecing difficulty.
This block is based on a 3x3 grid and is made with three fabric choices.
The instructions that follow include directions for paper piecing the 'triangle in a square' unit, and strip piecing for the nine patch units.

📋 General Instructions
The directions in this tutorial are for a 9" finished block.
The layout and color placement guide is to the right.
However, if you would choose to draft your own block and plan to rotary cut the patches, choose the finished size of an individual square in the nine patch first. This measurement must be divisible by .25 to be rotary cutter friendly.
EXAMPLE:
You want a 4" finished 9 patch unit for a 12" finished block.
You would need to cut strips that are 1.833" wide. BLECHH!!
4" divided by 3 = 1.333" (finished size of each square in the 9-patch)
+ 0.5 for seam allowances
______________________
1.833" is the cut measurement of each square
This number IS NOT rotary cutter friendly and if this is the required size, you will need to make templates for it.
Step 1: Download the paper piecing patterns/template
The Triangle in a Square (TiaS) units are paper pieced for accuracy. Click on each of the links below. This takes you to the PDF page where you can print.
On the Adobe Print Menu page, under 'Page Size and Handling' set 'Custom Scale' to 100% before printing for accurate results. Click here to see what it looks like on the Print Menu page.
Click here for more information on downloading patterns from this website.
After printing, measure the blocks to confirm they printed at the proper size.
New quilt fabrics to tickle your fancy...
Click the images below to see the full collection. We share any commercial and/or free patterns that showcase them, too. (For inspiration, of course!)


Step 2: Cutting patches for a Star Chain

Sample Size: 9" finished / 9½" unfinished
Grid: 9x9
AKA: Yankee Star, Yankee Star Chain
Design Type: Even 9-patch

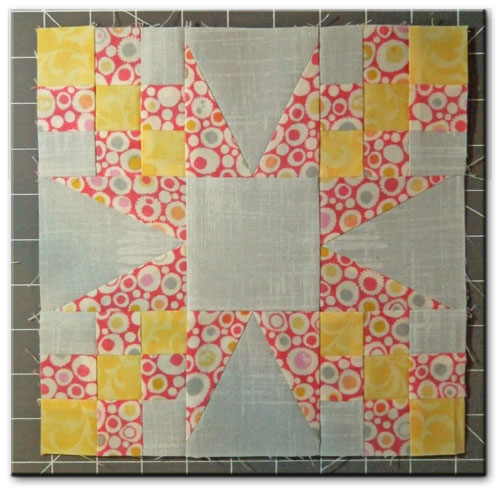
You need three fabrics to make this 9" Star Chain quilt block:
- A background (B), we used a pale gray;
- A dark for the star points/chains (D), we used a funky pink circle print, and;
- A medium for the center chain (M), we used soft yellow.
The strips are all cut with a smidge extra so that the edges can be straightened if needed.
For the center square, cut:
Background: One 3-1/2" square
For the nine patches, cut:
Background:
- One 1½" x 13"
Medium:
- One 1½" x 13"
- One 1½" x 7"
Dark:
- One 1½"x 13"
- Two 1½"x 7"
For the TiaS, cut:
- Background: Four Template A
- Dark: Four 3" x 4" rectangles.
Layer the rectangles in two sets of right sides together, then stack the sets on top of each other with the paper template on top, all edges aligned. Cut along the solid diagonal line with a rotary cutter and ruler to create your star point shapes. This creates 4 left and 4 right star points.
CAUTION: If you stack these rectangles all right sides up, you'll end up with all 'right' triangles point...not good! Remember to stack in pairs of right sides together!


Step 3: Assembling the units
Corner Nine Patches
Make 4
Sew the 1-1/2" x 13" dark strip to the 1-1/2" x 13" background strip.
Sew the 1-1/2" x 13" medium strip to the dark strip of the previous group. This creates a strip set 3-1/2" x 13". Set it aside.
Next, sew a 1-1/2" x 7" dark strip to each side of the 1-1/2" x 7" medium strip. This strip set measures 3-1/2" x 7".
Press the seams in both strip sets. First flat to set the seam, and then to towards the dark fabric. This creates seam allowances that will nest to make piecing the 9 patches easier.
Cut the longer, three fabric set into eight 1-1/2" wide units. Cut the shorter, two fabric set into four 1-1/2" wide units. In the photo below, on the left shows how these subcuts are arranged to form the nine patch.
 Subcutting strip sets
Stitch the subcuts together to form nine patches.
Gray background squares are in one set of diagonal corners. Yellow medium squares form a chain through the other diagonal. Double check before stitching...it's easy to get this swapped around incorrectly.
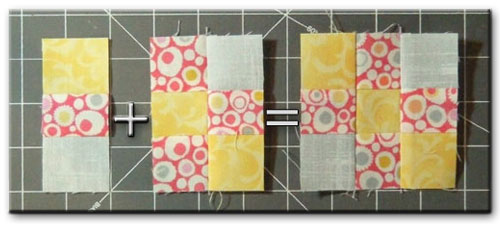
Repeat for the remaining three 9 patch blocks.
TiaS
Make 4
General Sewing Machine Setup for Paperpiecing
- Reduce your stitch length to 16–20 stitches per inch (1.3-1.6 mm). This perforates the paper and stabilizes the seam when you remove the pattern. [Learn more about stitch length here.]
- Reduce your machine's speed or just plain slow down. Sew only as fast as you can stay on the stitching lines.
- Install an open toe appliqué foot (sometimes called an 'embroidery' or 'satin stitch' foot) if you have one (it's easier to see where you're stitching with one installed).
- Use a larger needle (90/14) if you have problems removing the pattern.
- If your machine has a needle stop up, use it. The stitching goes faster when you don't have to lift the presser foot with every seam.
- As you stitch each seam, start and stop a generous 1/4” before and after the solid stitching lines. ALWAYS. Future lines of stitching secure the ends.
After adding each patch, press the unit as it was sewn to set the seam and then open. The SA is automatically pressed towards the last patch added.
Before adding the next patch, take a look to make sure the one you just added covers the space plus seam allowance that it is supposed to.
Steam is optional and usually curls the pattern.
If that bothers you, don't use steam. Sometimes I do. Sometimes I don't.
It truly depends on my mood.
Remember, as you follow this paper piecing tutorial, the printed and the fabric sides of this block are mirror-images of each other.
At last!
Let's sew!
Trim the our block patterns you printed in Step 1 to just outside the dotted line. No need to be precise. A rough cut will is just fine.
Do cut the templates out exactly on the line. It will make aligning edges, etc., easier.
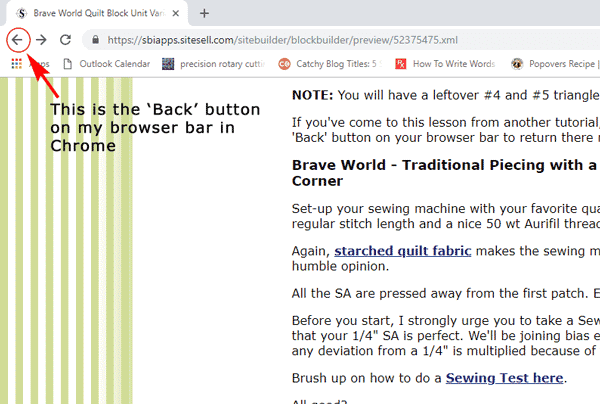
To make this basic quilting unit, follow our Triangle in a Square tutorial. Click the 'Back' button on your browser bar to return here.
To trim to size, lay all four of the TiaS on your mat. (If you've got a small 12"x18" mat, this is a great use for it!)
Align the 1/4 inch line of the ruler with the solid outside line of a block (this is the sewing line) and then trim with your rotary cutter. Repeat for the same side of the other three. Now turn the MAT a quarter turn and repeat the process. Trim and turn and trim until all the sides of all the blocks are trimmed. I've found this manner of trimming to be very efficient.
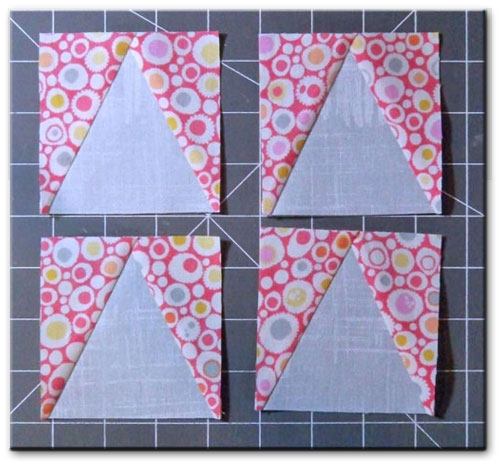

The paper piecing is complete. From this point forward, return your stitch length to the one you regularly use for piecing and install your favorite 1/4" presser foot.
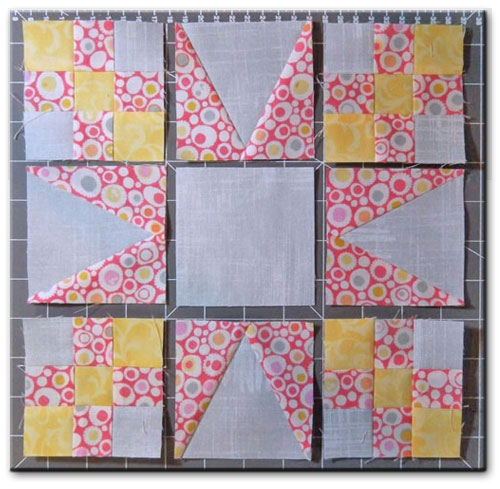
Step 4: Assembling the Star Chain quilt block
Arrange the finished units for your Star Chain quilt block as illustrated below.
Pay special attention to the orientation of the medium fabric (soft yellow) squares in the nine patch units. The yellow chains form a line pointing toward the center of the block.
Sew the units in each row together. The arrows in the photo below indicate the direction to press the seam allowances—basically press away from the TiaS units.
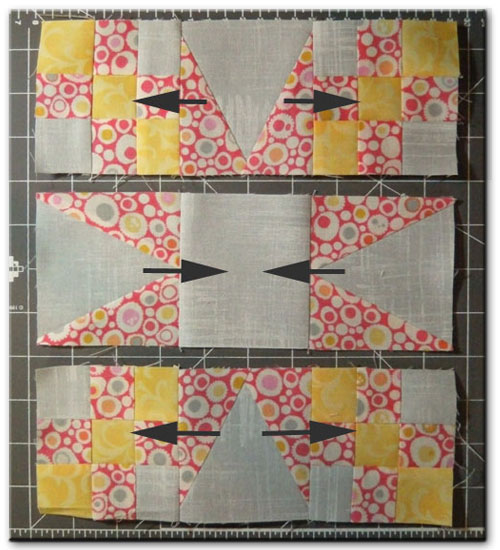
Sew the rows together. Press these seam allowances toward the center row. Your Star Chain quilt block is finished!
In these fabrics this is such a sweet block.
Fabric choice can really transform a block. In this next photo, Civil War Reproduction fabrics were used...
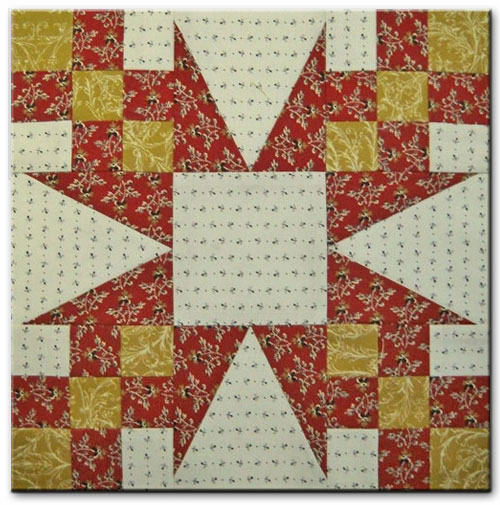
The same three fabric quilt block, but with a different, more traditional look.
But now the question is how to set this block...we want those nine patches to work for us, right?!
Go to Star Chain Quilt Pattern to see how the layout dilemma is solved!

Done with your Star Chain quilt block? Or looking for another block?
Just bookmark this page and then visit our Free Quilt Block Patterns Library.
You're sure to find something to tempt you!
What about a different quilt block?
For a list of all the 260+ quilt block patterns on this site, start here.
If you know the name of the block, shorten your search by using these links:
Click here if you're looking for blocks with at least some paper piecing.
Click here if you're looking for the basic building blocks of quilting, i.e., Flying Geese, half square triangles, quarter square triangles, etc., along with several techniques to make each.
And finally, use these links to find blocks in these finished sizes:
For even more blocks to make...

For you, are quilt block designs like potato chips...
...you can't have just one?!!
Check the amazing resources I rely on for all the quilt block designs you see on this website.
To see if they're worthy of a spot in YOUR quilting library, CLICK HERE.


Yummy fabrics
to drool over
Click any image below to see the full collection and find pricing and ordering information.


By Julie Baird
Copyright © 2008-2026 Generation Quilt Patterns, LLC
All Rights Reserved
Generations-quilt-patterns.com does not sell any personal information. (See Privacy Policy)