- Home
- Free Quilt Block Patterns
- Bachelors Puzzle Quilt Block
Bachelor's Puzzle Quilt Block
From our Free Quilt Block Patterns Library
This post contains affiliate links, for which I receive compensation.
Skill Level: Confident Beginner
Grid: 5x5
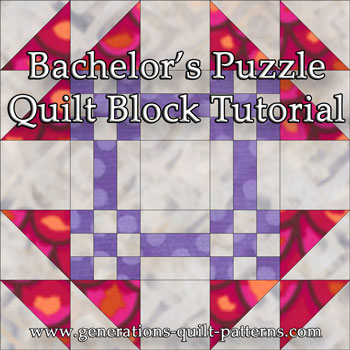
The simple Bachelor's Puzzle quilt block. Just 3 fabrics. Quick pieced triangle squares, Rail Fence and 9-patches. Perfect for the beginning quilter!
This block is a kissin' cousin of the Goose in the Pond and the New Mexico quilt block—instructions for both of those blocks are on this website.
Just click the names to find them.
Made in reds and greens this is a terrific block for a Christmas quilt. Or try other colors for different holidays.
Choose a 15" finished block, it won't take that many for a right-sized quilt! With our easy piecing techniques, it'll be finished in no time!
General Instructions
These abbreviations are used in this tutorial:
- SA - seam allowance
- RST - right sides together
- HST - half square triangle
- BAC - background fabric
SA are 1/4" unless noted otherwise.
Patches are first pressed closed (just as they are stitched) to set the seam, then open with the SA to the dark unless otherwise indicated.
The fabrics used in the sample block were prewashed and starched. While this adds a bit of extra time to the process, I believe the finished results are well worth the effort.
To insure that the seams of this Bachelor's Puzzle block match where they need to, I always pin.
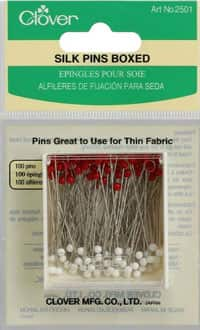
In my humble opinion, the best pins for the job are IBC's Glass Head Silk Pins. They are 1-3/8" long with a glass head and a super-fine 0.5mm shaft. Because they're so fine, there's little distortion when you pin match your points and intersections.
Yes, they ARE expensive as pins go.
Yes, you must replace them periodically because they eventually bend with repeated use.
All the same, they ARE the perfect pin for the job.
New quilt fabrics to tickle your fancy...
Click the images below to see the full collection. We share any commercial and/or free patterns that showcase them, too. (For inspiration, of course!)
Step 1: Cutting patches for a Bachelor's Puzzle
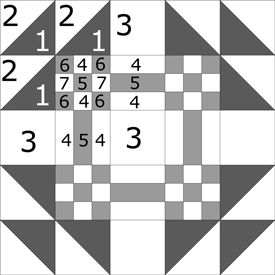 Bachelor's Puzzle design
Sample Size: 15" finished / 15½" unfinished
Grid: 15x15
Attribution: Nebraska Collections
Design Type: Uneven 9-patch, small center, 25 squares
Choose fabrics with plenty of contrast so that your points are well-defined. Larger prints are fine for the larger blocks. For the smaller, 7-1/2" finished one, choose solids or fabrics that 'read' as solids for the best results.
The strips for #4-#7 are cut 1" longer than needed so you'll be able to straightened the edges.
Before cutting, see my note after the the chart about the size to cut the HST squares.
 |
Cutting Chart for a~ Traditional Piecing ~ | ||||
|---|---|---|---|---|---|
| Patch | Fabric | Qty | Finished Block Size | ||
| 7-1/2" | 15” | 30” | |||
| 1** | A | 2 | 2-3/8” x 2-3/8” | 3-7/8” x 3-7/8” | 6-7/8” x 6-7/8” |
| 2** | BAC | 2 | 2-3/8” x 2-3/8” | 3-7/8” x 3-7/8” | 6-7/8” x 6-7/8” |
| 3 | BAC | 5 | 2” x 2” | 3-1/2” x 3-1/2” | 6-1/2” x 6-1/2” |
| 4 | BAC | 2 | 1” x 13” | 1-1/2” x 21” | 2-1/2” x 37” |
| 5 | C | 1 | 1” x 13” | 1-1/2” x 21” | 2-1/2” x 37” |
| 6 | C | 2 | 1” x 9” | 1-1/2” x 13” | 2-1/2” x 21” |
| 7 | BAC | 1 | 1” x 9” | 1-1/2” x 13” | 2-1/2” x 21” |
| Unfinished Block Size | 8” | 15-1/2” | 30-1/2” | ||
| Trim HSTs to... | 2” x 2” | 3-1/2” x 3-1/2” | 6-1/2” x 6-1/2” | ||
| Grid Size | 1-1/2” | 3” | 6” | ||
**I added an additional 1/4” to these patches for the half square triangles and then cut them, i.e. the 3-7/8”x3-7/8” square was cut at 4-1/8”x4-1/8”. Trim the HSTs to the measurement in the 'Trim HSTs to...' row after stitching.
Step 2: Assemble the Bachelor's Puzzle units
Half Square Triangle Units (HST)
Make 12
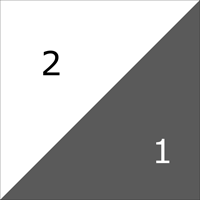
We're using the Quick Pieced method for making these HSTs with a slight variation on the original instructions.
For this block I'm using a Quick Quarter Ruler to mark the diagonal stitching lines on the backs of the light #2 squares.
If you don't have this ruler, you can mark the back of each with a single diagonal line and then stitch a 1/4" away from both sides of the line. (Click here for more those instructions if needed.)
With right sides together (RST), layer a marked #2 with a #1 square. Stitch on the drawn lines. I like to use an open toe applique foot—it's so much easier to see the lines.
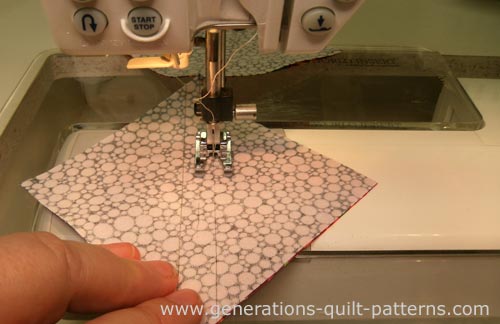 It's easy to see the lines when you use an open toe applique foot.
Cut the squares in half between the stitched lines.
Press.
If you started with oversized patches as I did, you'll trim to the size indicated in the cutting chart in the 'Trim HSTs to...' row. If you cut the patches exactly, then after stitching they should be equal to that same measurement.
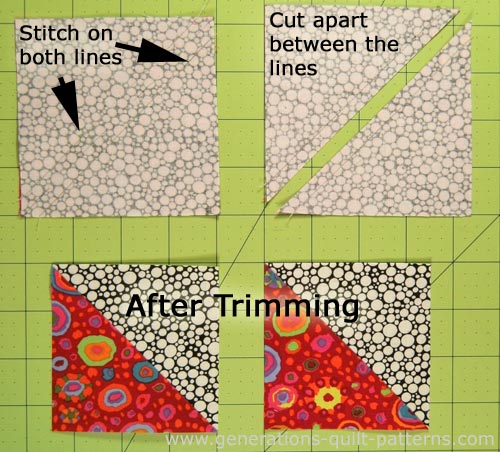 My bad! The stitching lines (upper left) are marked almost too light to see. Remember they need only be as dark as YOU need to see them.
Rail Fence (RF)
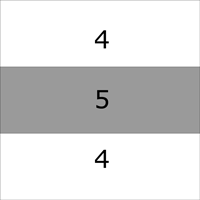
Make 4
With RST, stitch a #4 to a #5 strip, pressing first to set the seam and then from the front with the SA to the darker fabric.
Add the second #4 to this strip set, pressing as before.
Straighten one of the short edges by aligning one of the ruler lines with a seam line(white arrow below).
Here I've cut off the entire selvedge.
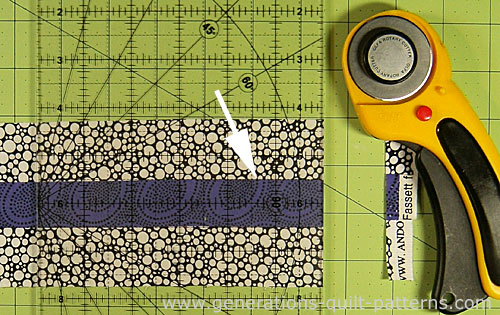
Selvedge should never be included in a SA.
It's a much tighter, closer weave. It shrinks differently that the rest of your fabric—not good if it causes a problem when the quilt is washed after it's finished.
At the same time I don't bother trimming it off before I cut my strips. Just remember to add the width of the selvedge to the length of the strip you need to cut so there's enough for the patches. Then trim off the ugly selvedge to straighten the edge just as I've done here. Sweet!
Using the chart below, subcut this strip set into the patches you'll need for both the Rail Fence and part of the 9-patches.
| SUBCUTS for #4/#5/#4 Strip Set | ||||
|---|---|---|---|---|
| Cut | Finished Size of the Bachelor's Puzzle Quilt Block | |||
| 7-1/2” | 15” | 30” | ||
| 4 | 2” x 2” | 3-1/2” x 3-1/2” | 6-1/2” x 6-1/2” | |
| 4 | 1” x 2” | 1-1/2” x 3-1/2” | 2-1/2” x 6-1/2” | |
Nine Patches
Make 4
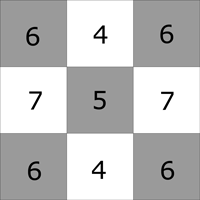
Construct a strip set from the #6 and #7 pieces just like you did with the #4/#5's.
After you've pressed and straightened a short edge, use the chart below to subcut it into the eight units you'll need.
| SUBCUTS for #6/#7/#6 Strip Set | ||||
|---|---|---|---|---|
| Cut | Finished Size of the Bachelor's Puzzle Quilt Block | |||
| 7-1/2” | 15” | 30” | ||
| 8 | 1” x 2” | 1-1/2” x 3-1/2” | 2-1/2” x 6-1/2” | |
Lay out the pieces using two #6/#7/#6 and one #4/#5/#4 for each nine patch.
With RST, sew a pair together, press in the direction of the arrow.
Add the final #6/#7/#6 in the same manner.

Repeat for a total of 4.
Step 3: Assemble the Bachelor's Puzzle combo-units
Just like the Goose in the Pond, this block is assembled like an uneven 9-patch. To do so, first make the corner and side combo-units.
Corners

Make 4
Using the photo below as a guide, with RST, sew two HST together.
With RST, sew the dark edge of one HST to a nine patch.
Press both with seam allowances in the direction of the arrows.
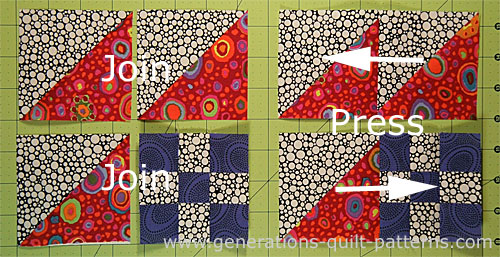
With RST, sew this pair of patches together. The seams nest which makes matching easier.
Below you can see that I've used a pin to match the valley of the two HST unit to the point of the HST on the other pair of patches.
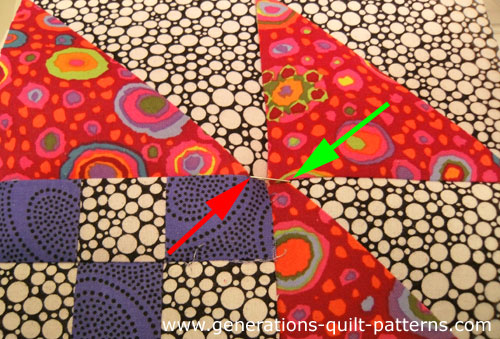 The pin comes up at the green arrow and goes back down at the red arrow.
Repeat for a total of four corners.
Press with the last SA toward the nine patch.
Sides

Make 4
With RST, stitch a #3 to the #4 side of a Rail Fence, press with the SA toward #3.
Step 4: Assemble your Bachelor's Puzzle
Arrange the corners, sides and center cut square into three rows, Rail Fences and 9-patches toward the center of our Bachelor's Puzzle quilt block.
With RST, stitch the pieces in each row together, pinning if needed, your SA will nest.
Press, SA toward the Rail Fence—to the center for the top and bottom rows and away from the center for the middle row.
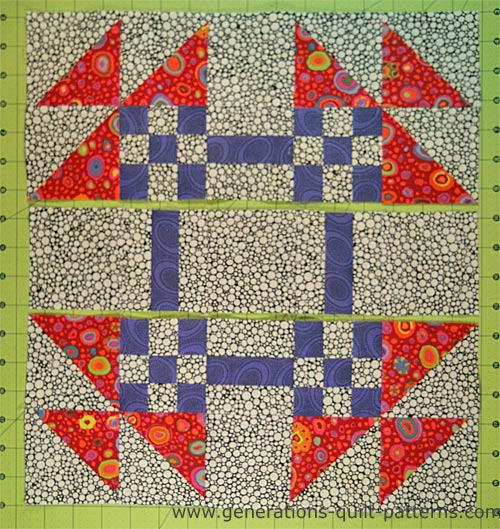
With RST, stitch the rows together. Again, pin if needed for a good match at the seams. I always do! :D
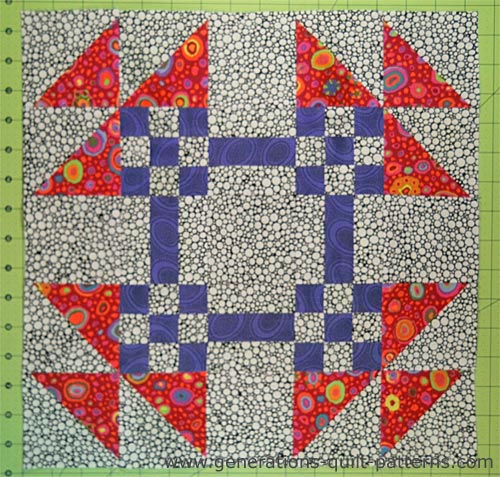 Our completed Bachelor's Puzzle!
After one last press, your Bachelor's Puzzle quilt block is finished and ready to be pieced into a quilt!
Behind every quilter is a huge pile of fabric...
The only way to whittle it down is to MAKE MORE QUILTS!!!
Look to our free Quilt Block Patterns Library for inspiration for your next quilting project!
What about a different quilt block?
For a list of all the 220+ quilt block patterns on this site, start here.
If you know the name of the block, shorten your search by using these links:
Click here if you're looking for blocks with at least some paper piecing.
Click here if you're looking for the basic building blocks of quilting, i.e., Flying Geese, half square triangles, quarter square triangles, etc., along with several techniques to make each.
And finally, use these links to find blocks in these finished sizes:
