- Home
- Free Quilt Block Patterns
- Goose in the Pond Quilt Block
Goose in the Pond Quilt Block
From our Free Quilt Block Patterns Library
This post contains affiliate links, for which I receive compensation.
Skill Level: Confident Beginner
A Goose in the Pond quilt block is much simpler to make than it looks at first glance.
It's a wonderful block to practice the basics—9-patches, quick pieced half square triangles and Rail Fences—blocks you learned to make in our Beginner Quilt Blocks series or other beginning quilting classes.

It's time to get busy before this Goose is cooked! :)
📋 General Instructions

All seam allowances (SA) are 1/4" and are pressed toward the darker fabric unless otherwise noted.
I choose to pre-wash and starch my quilt fabrics before cutting. This removes any dirt and gunk left from overseas shipping or the quilt shop and makes the fabric especially easy to sew with.
New quilt fabrics to tickle your fancy...
Click the images below to see the full collection. We share any commercial and/or free patterns that showcase them, too. (For inspiration, of course!)


Step 1: Cut the Goose in the Point patches
 Goose in the Pond design
Sample Size: 15" finished / 15½" unfinished
Grid: 15x15
Attribution: Ladies Art Company
AKA: Gentleman's Fancy (Modern Priscilla), Geometric Garden (Grandma Dexter), Mrs. Wolf's Red Beauty (Scioto Imhoff Danner), Patchwork Fantasy (Household Magazine), Scrap Bag (KC Star), Unique Nine Patch (Wallaces' Farmer)
Design Type: Uneven 9-patch, large center, 25 squares
As the block size increases, you can use larger and larger prints more effectively.
For a 7-1/2" Goose in the Pond, I suggest using fabrics with small scale patterns or tone-on-tones that 'read' as a solid or just plain solids. That way you don't loose any of the points in this patchwork design.
Strips for the Rail Fence and 9-patches are cut 1" longer than needed so you can straighten the edges for cutting.
Squares for HSTs in the chart are the exact measurement and are noted with **. (See my note below the chart before cutting.)
 |
Cutting Chart for a~ Traditional Piecing ~ | ||||
|---|---|---|---|---|---|
| Patch | Fabric | Qty | Finished Block Size | ||
| 7½" | 15” | 30” | |||
| 1 | Background | 5 | 2” x 2” | 3½" x 3½" | 6½" x 6½" |
| 2** | Background | 6 | 2⅜" x 2⅜" | 3⅞" x 3⅞" | 6⅞" x 6⅞" |
| 3** | A | 6 | 2⅜" x 2⅜" | 3⅞" x 3⅞" | 6⅞" x 6⅞" |
| 4 | A | 2 | 1” x 13” | 1½" x 21” | 2½" x 37” |
| 5 | Background | 1 | 1” x 13” | 1½" x 21” | 2½" x 37” |
| 6 | Background | 2 | 1” x 9” | 1½" x 13” | 2½" x 21” |
| 7 | A | 1 | 1” x 9” | 1½" x 13” | 2½" x 21” |
| Unfinished Block Size | 8” | 15½" | 30½" | ||
| Trim HSTs to... | 2” x 2” | 3½" x 3½" | 6½" x 6½" | ||
| Grid Size | 1½" | 3” | 6” | ||
**I added an extra ¼” to these patches and then cut them, i.e. for the 15" finished block the 3⅞" x 3⅞" square was cut at 4⅛"x4⅛”. After stitching the HSTs are trimmed to the measurement in the 'Trim HSTs to...' row.
Step 2: Assemble the basic units
Half Square Triangle (HST)

Make 12
Since we're using the Quick Pieced Half Square Triangle method, mark a diagonal line on the back of the light #2 squares with a pencil.
Layer a marked #2 and a #3 square with right sides together (RST). Stitch a 1/4" away from the line on both sides.
For larger squares, it's helpful to pin the layers together to keep them from shifting as you sew.
 I like to use my standard quarter inch presser foot for this step.
Cut each pair of squares apart between the two lines of stitching. Press, with SA to the dark.
If you cut your patches oversized, you'll need to trim them. Use the 'Trim HSTs to...' row in the Cutting Chart to find this measurement.
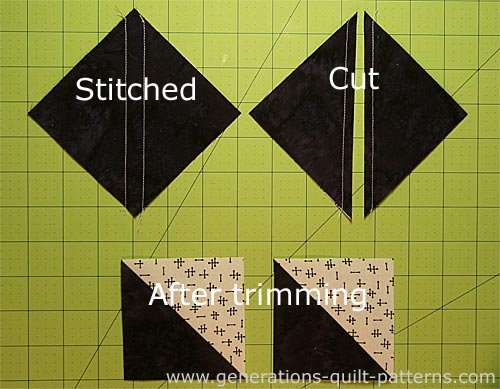
Repeat for the remaining #2 and #3 squares for a total of 12 HSTs.
Rail Fence

Make 4
For this step, you can see in the photo below that I've switched to my 1/4" foot with a guide. Between this guide and using starched fabric, sewing a perfect quarter inch SA is a breeze!
With RST stitch the #4 and #5 strips together.
I prefer to press after adding each strip because it's so much easier. If you find yourself frequently getting tucks at the seam allowance try fingerpressing the seam allowance before using your iron.
 Sewing with my quarter inch foot with a guide—perfect for piecing strips!
Add the third strip, alternating lights and darks. Press.
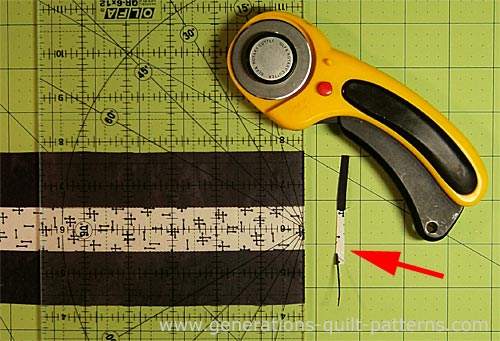
Straighten one short edge of the #4/#5/#4 strip set by aligning a line on your ruler with one of the seam lines. Trim away only as much as needed for a straight cut.
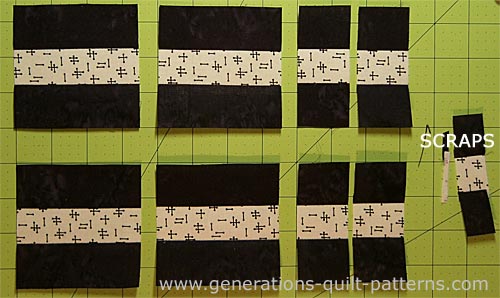
Using the chart below, find your Goose in the Pond's finished size. Subcut the needed patches.
| SUBCUTS for #4/#5/#4 Strip Set | ||||
|---|---|---|---|---|
| Cut | Finished Size of the Goose in the Pond Quilt Block | |||
| 7-1/2” | 15” | 30” | ||
| 4 | 2” x 2” | 3-1/2” x 3-1/2” | 6-1/2” x 6-1/2” | |
| 4 | 1” x 2” | 1-1/2” x 3-1/2” | 2-1/2” x 6-1/2” | |
After subcutting, we have 4 Rail Fences (left), four centers for our nine-patches in the next step and a wee bit of scrap.
Nine Patches

Make 4
With right sides together, stitch the #6 and #7 strips together. Alternate light and dark. Press after adding each strip.
Straighten the short end of the strip set. (See below)
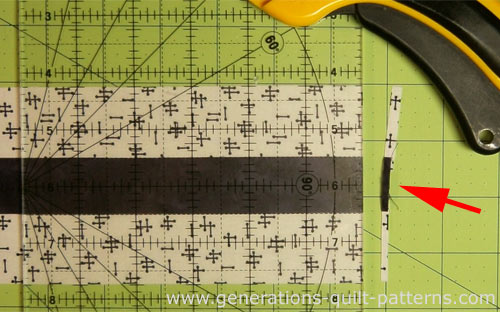
Using the chart below, find the finished block size. Make your subcuts.
| SUBCUTS for #6/#7/#6 Strip Set | ||||
|---|---|---|---|---|
| Cut | Finished Size of the Goose in the Pond Quilt Block | |||
| 7-1/2” | 15” | 30” | ||
| 8 | 1” x 2” | 1-1/2” x 3-1/2” | 2-1/2” x 6-1/2” | |
These are the patches with just a bit left over.

Lay out two #4/#5/#4 and a #6/#7/#6 as show below.
With RST stitch one of each together, press with the SA toward the center.
Add the remaining #4/#5/#4. Press again with SA to the middle.
Repeat with the remaining units to make 4 nine patch blocks.

Step 3: Assemble the Goose in the Pond units
We assemble our Goose in the Pond as an uneven 9 patch. To do so, first we much construct corner and side subunits.
Corners

Make 4
Each corner is stitched and pressed exactly the same—I promise, the seams will nest for easy matching.
With RST, stitch two HSTs together, pressing the SA toward the dark.
With RST, stitch the dark edge of a HST to a nine patch, pressing the SA toward the nine patch.
 Press the seams in the direction of the red arrows.
With RST, join the two units together to form a corner. The seams nest.

To make sure the points match, I always use pins.
My favorites are IBC Glass Head Silk Pins. They are 1-3/8" long with a glass head and a super-fine 0.5mm shaft. Because they're so fine, there's little distortion when you pin match your points.
Yes, they ARE expensive as pins go (but not as expensive as 'Magic Pins').
Yes, you will need to replace them periodically. Since they're so fine, they will bend over time.
However, they ARE the perfect pin for the job.
To finish this corner unit, press with the SA toward the nine-patch. Repeat for a total of four corners.
 Make 4
Sides
Make 4
With RST, stitch a #1 background square to the dark side of a Rail Fence unit.
Press the SA away from the Rail Fence.
Repeat for the three remaining pairs.
Step 4: Assemble your Goose in the Pond quilt block
Lay out the corners, sides and cut patch into three rows—this is an uneven 9-patch formation—to form the Goose in a Pond design.
Stitch the pieces in each row together, pressing the SA toward the Rail Fences...in on the top and bottom rows and out in the center.
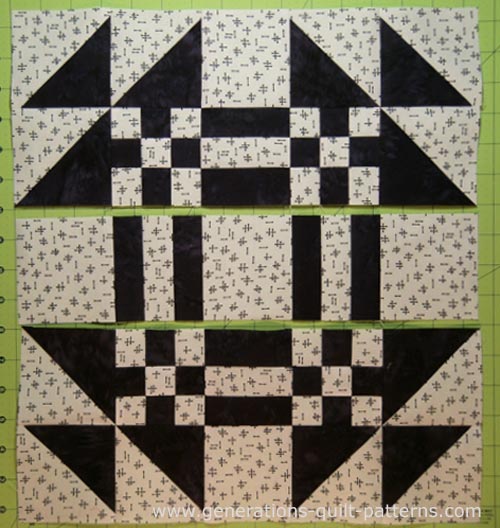
And finally, stitch the three rows together.
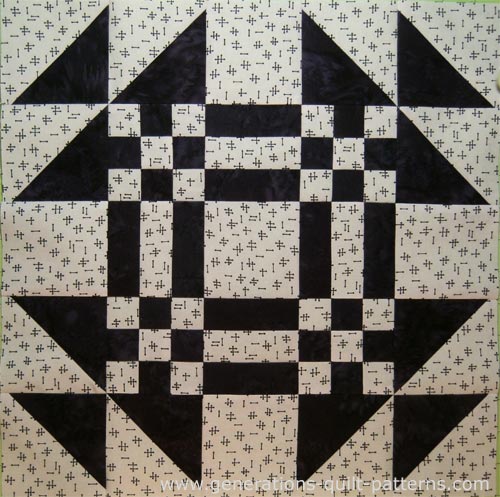
After one final press (check out this wickedly simple pressing technique—it tames even the lumpiest of blocks!) your Goose in the Pond quilt block is finished!
Quilters have pressing matters!
Like most quilters, once your current quilt is bound, you're surely itchin' to start the next one.
Use our Free Quilt Block Patterns library to help you brainstorm for your next project.
What about a different quilt block?
For a list of all the 220+ quilt block patterns on this site, start here.
If you know the name of the block, shorten your search by using these links:
Click here if you're looking for blocks with at least some paper piecing.
Click here if you're looking for the basic building blocks of quilting, i.e., Flying Geese, half square triangles, quarter square triangles, etc., along with several techniques to make each.
And finally, use these links to find blocks in these finished sizes:
For even more blocks to make...

For you, are quilt block designs like potato chips...
...you can't have just one?!!
Check the amazing resources I rely on for all the quilt block designs you see on this website.
To see if they're worthy of a spot in YOUR quilting library, CLICK HERE.


Yummy fabrics
to drool over
Click any image below to see the full collection and find pricing and ordering information.


By Julie Baird
Copyright © 2008-2026 Generation Quilt Patterns, LLC
All Rights Reserved
Generations-quilt-patterns.com does not sell any personal information. (See Privacy Policy)