- Home
- Free Quilt Block Patterns
- New Mexico Quilt Block
New Mexico Quilt Block
From our Free Quilt Block Patterns Library
This post contains affiliate links, for which I receive compensation.
Skill Level: Confident Beginner
The beginner friendly New Mexico quilt block is truly a cinch to make!
Easy connector corners. Quick pieced half square triangles. A little basic strip piecing.
Child's play!
The pattern is offered in three sizes: 7-1/2", 15" and 30" finished.
At 15", the New Mexico quilt block makes for a cute table topper. Stitch a giant 30" block to whip up a darling baby quilt.

Add a border or two to customize the size and you've got a terrific gift!
It's time to get busy!
📋 General Instructions

A 1/4" seam allowance (SA) is used throughout our New Mexico quilt block. Keep your eyes peeled on the specialty presser feet that are used for the different units—a standard 1/4", and open toe applique, and a 1/4" with a guide.
Must you have them?
No.
Yet, they do make the job easier...and I'm all for making quilting easier! ;)
My fabrics are all prewashed and starched prior to cutting. I believe this makes for more accurate results. Ultimately, though, that choice is up to you.
When pressing your SA, press first with the unit closed to set the seam and then open with the SA is the direction as indicated.
New quilt fabrics to tickle your fancy...
Click the images below to see the full collection. We share any commercial and/or free patterns that showcase them, too. (For inspiration, of course!)


Step 1: Cut New Mexico patches
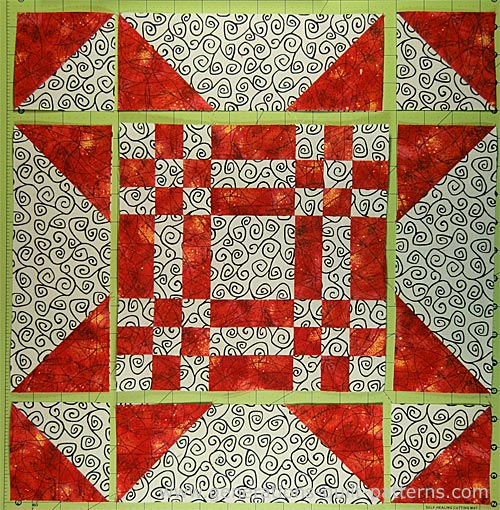
 New Mexico pattern
Sample Size: 15" finished / 15½" unfinished
Grid: 15x15
Attribution: Hearth & Home
AKA: Missouri Puzzle (Scioto Imhoff Danner), Mexican Block (The Country Gentleman)
Design Type: Uneven 9-patch, small center
While larger prints will work for the 15" and 30" blocks, at 7-1/2" finished you'll want to choose fabrics with small scale designs or ones that are tone-on-tone or solids.
The SAs are nested throughout to make matching your seams a breeze. Just follow the pressing directions.
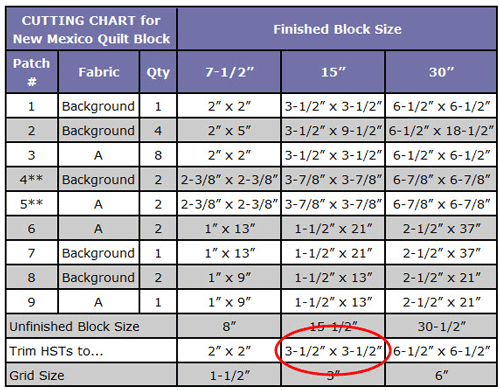
I prefer to cut the patches for the half square triangles bigger than listed in the chart below and trim those units to the perfect size after stitching.
 |
Cutting Chart for a~ Traditional Piecing ~ | ||||
|---|---|---|---|---|---|
| Patch | Fabric | Qty | Finished Block Size | ||
| 7-1/2” | 15” | 30” | |||
| 1 | BAC | 1 | 2” x 2” | 3-1/2” x 3-1/2” | 6-1/2” x 6-1/2” |
| 2 | BAC | 4 | 2” x 5” | 3-1/2” x 9-1/2” | 6-1/2” x 18-1/2” |
| 3 | A | 8 | 2” x 2” | 3-1/2” x 3-1/2” | 6-1/2” x 6-1/2” |
| 4** | BAC | 2 | 2-3/8” x 2-3/8” | 3-7/8” x 3-7/8” | 6-7/8” x 6-7/8” |
| 5** | A | 2 | 2-3/8” x 2-3/8” | 3-7/8” x 3-7/8” | 6-7/8” x 6-7/8” |
| 6 | A | 2 | 1” x 13” | 1-1/2” x 21” | 2-1/2” x 37” |
| 7 | BAC | 1 | 1” x 13” | 1-1/2” x 21” | 2-1/2” x 37” |
| 8 | BAC | 2 | 1” x 9” | 1-1/2” x 13” | 2-1/2” x 21” |
| 9 | A | 1 | 1” x 9” | 1-1/2” x 13” | 2-1/2” x 21” |
| Unfinished Block Size | 8” | 15-1/2” | 30-1/2” | ||
| Trim HSTs to... | 2” x 2” | 3-1/2” x 3-1/2” | 6-1/2” x 6-1/2” | ||
| Grid Size | 1-1/2” | 3” | 6” | ||
**I added an extra 1/4” to these squares and then cut them, i.e. for the sample 15" block the 3-7/8”x3-7/8” squares were cut at 4-1/8”x4-1/8”. After stitching, the HSTs are trimmed to 3-1/2"x3-1/2", the measurement in the 'Trim HSTs to...' row.
Step 2: Assemble the units for the New Mexico quilt block
Half Square Triangles (HST)

Make 4
Draw a diagonal line on the back of the two #4.
With a standard 1/4" foot installed on your machine and right sides together (RST), stitch a 1/4" away from both sides of it.
You can see that I wasn't too picky about the size of the dark #5 square.

I'd planned to cut these squares 1/4" larger than listed in the
cutting chart—I prefer to cut them to size after stitching.
I must have had a brain-fart (heavy sigh). The darker
squares are even bigger than planned.
That happens sometimes!
Since the HSTs are trimmed to size anyway, there was no reason to re-cut the squares...might as well save a step.
After stitching and trimming (see the chart for the 'Trim HSTs to...' row, they are the perfect for piecing!

Connector Corner Units (CC)
Make 4

The Connector or Folded Corners technique (CC) makes piecing the sides easy as pie!
No funky shapes to cut. No bizarre measurements to worry about. Just a bit of extra fabric.
For this technique we sew on the drawn line. I've switched to an open toe applique foot so it's easier to see it.
Mark the diagonal on the back of each of the eight #3 squares...just dark enough to see. I prefer a mechanical pencil because the line stays nice and fine.
If you use an ink pen, double check that it doesn't bleed through to the front. If it does, it can noticeably darken the seam line. Not good.
With RST, align a marked #3 with a #2 rectangle . Sew on the line.
Add another marked square, RST, to the other end of the #2 . Both squares are positioned so that the marking goes from the lower corner to the upper center. Stitch on the line.
Now you have a choice to make.
You can add another line of stitching a 1/2" past the first stitching and closest to the corner to create a bonus HST from each corner as shown below. (The 7-1/2" finished New Mexico quilt block is too small to make a salvageable HST.)
 To make a bonus HST, draw a line 1/2" away from the first line of sewing. Then stitch it. (Note the open toe applique foot.)
Or you can simply trim the seam allowance to 1/4" from the sewing as shown in the photo below, bottom unit.
 You can either make bonus HSTs from the excess fabric in the corners (top), or simply trim away the excess from the small square leaving a 1/4" seam allowance (bottom).
After you've stitched, press the units flat to set the seam and then open the patch, pressing from the front, SA toward the outside corner.
Repeat for the three remaining sides.
Strip Sets
Make 1 of each
These are used for both the Rail Fence and the nine patches.
 Subcut 4
Sew the #6/#7 strips together and the #8/#9 strips together, alternating lights and darks to make two stripsets (show below).
I prefer to sew a pair of strips together and press with the SA to the dark. Then add the final strip. It's simply easier for me to give each SA a good press without tucks.
Square up one short edge of each strip set by aligning a line on your ruler with one of the seams.
The strip sets are longer than you'll need, remove only as much as you need to straightened the ends.
 I trimmed each one separately for more accuracy
Refer to the chart below to find the subcuts to make for your finished block size. The first number refers to the width of the cut, the second to the width of the strip set.

After cutting you have this...

Set aside the four Rail Fence squares (left above).
Nine Patches

Make 4
For this unit and the rest of the New Mexico quilt block construction, I use a 1/4" foot with a guide.
Arrange the patches for the nine patches, the outside corners are the lighter fabric (below, left).

With RST, sew a #8/#9/#8 to a #6/#7/#6 (above, center). Press, SA towards the unit with the two darker patches.
With RST, stitch the final #8/#9/#8 to the opposite side. Again, pressing towards the center (above, right).
Repeat for the three remaining groups of patches.
Step 3: Assemble the units for our New Mexico block
Though this is a 5x5 grid block, it's much easier to assemble it as an uneven nine patch, but first we'll need to construct the large center unit.
Lay out the nine patches and Rail Fence and solid center squares to form the New Mexico design.

Stitch the units in each row together. Use pins if it helps you match the seams. Since all the SAs are pressed to the dark, they nest together.
All the SAs are pressed towards the Rail Fence units.
Stitch the rows together and give it one more press.
Lay out this center combo-unit and the remaining patches into rows.
With RST, stitch the units in each row together, pinning if needed to
help you match the seams. The seams of the side CCs and the corner HSTs
nest together (top and bottom rows).
Press the SA toward the CC units.

Voila! Your New Mexico quilt block is finished!
 Our finished New Mexico block. Ole!
A bed without a quilt is like the sky without stars!
You're sure to find the perfect blocks for your next quilt in our Free Quilt Block Patterns library.
Just click the image to the left and go there now.
Strapped for time?
Then Pin It without delay and come back when you have time to indulge your creativity!
What about a different quilt block?
For a list of all the 260+ quilt block patterns on this site, start here.
If you know the name of the block, shorten your search by using these links:
Click here if you're looking for blocks with at least some paper piecing.
Click here if you're looking for the basic building blocks of quilting, i.e., Flying Geese, half square triangles, quarter square triangles, etc., along with several techniques to make each.
And finally, use these links to find blocks in these finished sizes:


Yummy fabrics
to drool over
Click any image below to see the full collection and find pricing and ordering information.


By Julie Baird
Copyright © 2008-2026 Generation Quilt Patterns, LLC
All Rights Reserved
Generations-quilt-patterns.com does not sell any personal information. (See Privacy Policy)