- Home
- Free Quilt Block Patterns
- Missouri Puzzle Quilt Block
Missouri Puzzle Quilt Block
From our Free Quilt Block Patterns Library
This post contains affiliate links, for which I receive compensation.
The Missouri Puzzle quilt block is a veritable playground for the beginner quilter!

Half square triangles, 9-patches and Rail Fence units. Enough to practice on, but not enough to gag a maggot!
Cutting instructions for three sizes are included. The 30" block size offered is large enough to be a table-topper on its own.
Quick pieced half square triangles and a bit of strip piecing. What could be simpler than that?
Let's begin.
Construction Instructions
Seams are all 1/4" and pressed toward the darker fabric unless otherwise noted.
Several common abbreviations are used in this tutorial:
- RST - right sides together
- SA - seam allowance
- HST - half square triangle
- RF - Rail Fence
- SS - Strip sets
Starching your quilt fabric before cutting helps, in my humble opinion, with more accurate cutting, piecing and pressing.
For this block, it's so much easier to fingerpress open seams when the fabric is starched. [Learn more about it here.]
When instructed to 'press', first press the patches in the closed position—just as they were sewn. Then open the patches and give them another good pressing.
For even flatter blocks, try my favorite pressing technique. It's ridiculously simple, but worth the extra step.
New quilt fabrics to tickle your fancy...
Click the images below to see the full collection. We share any commercial and/or free patterns that showcase them, too. (For inspiration, of course!)


Step 1: Cutting patches for a Missouri Puzzle block
 Missouri Puzzle design
Sample Size: 15" finished / 15½" unfinished
Grid: 15x15
Attributed to: Mrs. Danner
AKA: Mexican Block (The Country Gentleman), New Mexico (Hearth & Home)
Design Type: Uneven 9-patch, small center, 25 squares
Patches #1 and #2 in the Cutting Chart are used for HST. If you have a reliably accurate 1/4" seam allowance use the measurement in the chart.
Personally, I like to cut my HST a 1/4"-3/8" larger, sew the unit and trim it down to perfection. I've noted those patches with an asterisk (*) in the chart.
Choose the size that works best for you.
Patches #3-#6 are used in stripsets. They are a bit longer than needed so that you have enough to straighten the edges before subcutting.

Step 2: Assemble the units
Half Square Triangles
Make 12
 Make 12
For the sample Missouri Puzzle, I've used a Quick Quarter ruler to draw both the center line (dashed) and stitching lines (solid), once on the diagonal of all the light #1 patches.
If you don't have a Quick Quarter, you can use your everyday ruler to draw a single diagonal line.
 The center line is dashed. The stitching lines are solid.
Stitch on all the drawn solid lines. (If you drew only one line on each, install your quarter inch foot and stitch a quarter inch away from both sides of the line.)

Press.
Cut all six #1/#2 pairs apart between the stitching on the dashed line.
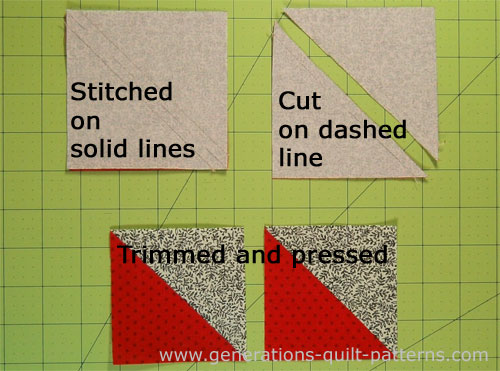
Use the chart below. If you cut generous patches (like I do), you'll need to trim to the size indicated for your finished block size. (For the 15" finished sample, the HSTs are trimmed to 3-1/2" square.)
If you cut the exact dimensions in the Cutting Chart, use this same measurement to check that your units are accurate. Trim away any dog ears.
HST Dimensions | ||
|---|---|---|
| Finished Block Size | Trim HST to… | |
| 7½" | 2" | |
| 15" | 3½" | |
| 30" | 6½" | |
Nine Patch
Make 4
 Make 4
To create a nine patch, we sew two different stripsets (SS).
One is made from two #3 strips and one #4. The other is made from two #5 strips and one #6.
I prefer to sew a pair together, then press to set the seam and then press the unit open. Finally, add the third strip. I find there's less chance of creating a tuck at the seam allowance.
If you starched your quilt fabric before cutting, you can fingerpress open this seam before the second pressing. That virtually eliminates any chance of a tuck.
In the photo below, I'm adding the second #3 to the #3/#4/#3 SS.
 That hairy little thing behind my presser foot is a 'spider'—it's a scrap of fabric I sew onto first before sewing onto my patches.
Give your units a good press.
Find your finished block size in the chart below and it's corresponding 'Strip Width'. Measure your SSs to confirm they are, indeed, the correct width.
Make any adjustments you need before subcutting.
Strip Set Dimensions | |||
|---|---|---|---|
| Finished Block Size | Width after stitching | SubCut Width | |
| #3/#4/#3 | #5/#6/#5 | ||
| 7½" | 2" | Eight - 1" | Four - 1" Four - 2" |
| 15" | 3½" | Eight - 1½" | Four - 1½"Four - 3½" |
| 30" | 6½" | Eight - 2½" | Four - 2½" Four - 6½" |
It's time to straighten one short end on each.
The photo below is a bit deceptive.
Line up a straight line on your ruler with ONE of the seamlines in ONE of the SSs.
Then trim off a complete slice.
Repeat for the second SS.
 Unfortunately this photo looks like I trimmed both at the same time. That is incorrect. Each was trimmed by itself. They were just both on the mat at the same time.
Referring to the chart above, now find the widths to subcut your units. There are TWO different widths for the #5/#6/#5 SS.
After cutting you have the units below.
 In total you'll have eight #3/#4/#3 (left), four #5/#6/#5 rectangles (middle) and four #5/#6/#5 RF squares (right).
With RST sew a #3/#4/#3 to a #5/#6/#5.
Press.
Add another #3/#4/#3 to the other side of the #5/#6/#5.
Press.
Repeat for a total of four nine-patch units.
I do pin to hold everything together as I stitch.
 Adding the second #3/#4/#3. Can you tell—pins are my friends!
 Make 4
There is no additional sewing needed to make the the RF units. They were already cut from the #5/#6/#5 SS—Ahhhh! The magic of strip-piecing!
Step 3: Assemble the side and corner units
Sides
Make 4
With RST, sew a RF to a #7 square.
Press with SA toward the #7.
Repeat for a total of 4.
Set aside.

Corners
Make 4
With RST, stitch two HSTs together (below, upper left). The seams nest together to make it simple to get a pointy-point.
Press.
With RST together, stitch a HST to a 9 patch (see below, lower left for positioning).
Press.
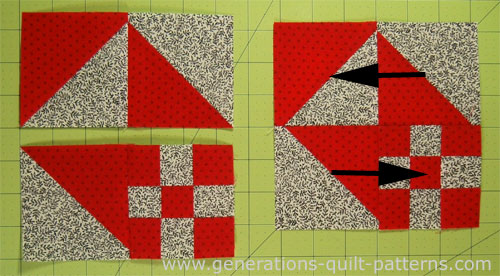 SA are pressed in the direction of the black arrows.
With RST, join these two pairs. The SAs nest together. Use this to help you match everything up.
Pin, if needed to help you hold things together in place.
This last seam that joins the two pairs together is pressed toward the nine patch.
Repeat for a total of four.
 Press this last seam toward the nine patch side for all four corners for our Missouri Puzzle.
Step 4: Assemble the Missouri Puzzle quilt block
Arrange the cut and pieced sections as shown below. Pay special attention to the HSTs. They form both the 'points' of the star and the corners of the block.
 Our Missouri Puzzle is ready to assemble.
Stitch the rows together, pinning as needed. If you followed the pressing directions, the seams in the Rail Fence units will nest to make matching them a snap.
Press SA in the direction of the arrows, towards the RF units in each row.

The Missouri Puzzle after all the stitching is complete.
 The Missouri Puzzle is a puzzle no longer!
Quilt Blocks related to our Missouri Puzzle
There is a whole family of blocks with similar layouts to our Missouri Puzzle block.
If the title is underlined you can click the image for instructions to make that particular patchwork design.


What about a different quilt block?
For a list of all the 260+ quilt block patterns on this site, start here.
If you know the name of the block, shorten your search by using these links:
Click here if you're looking for blocks with at least some paper piecing.
Click here if you're looking for the basic building blocks of quilting, i.e., Flying Geese, half square triangles, quarter square triangles, etc., along with several techniques to make each.
And finally, use these links to find blocks in these finished sizes:


Yummy fabrics
to drool over
Click any image below to see the full collection and find pricing and ordering information.


By Julie Baird
Copyright © 2008-2026 Generation Quilt Patterns, LLC
All Rights Reserved
Generations-quilt-patterns.com does not sell any personal information. (See Privacy Policy)