- Home
- Free Quilt Block Patterns
- Illinois Quilt Block
Illinois Quilt Block
From our Free Quilt Block Patterns Library
This post contains affiliate links, for which I receive compensation.
Skill Level: Beginner
Grid: 6x6
The Illinois quilt block is made of half squares triangles and pairs of Flying Geese...all basic units...which makes it a great practice block for the beginning quilter.
For perfectly-pieced Geese, we'll use a paper piecing technique. You'll find the free pattern downloads within the cutting chart.

Ready?
Choose a size and two fabrics. We're ready for the Illinois quilt block!
📋 General Instructions

These abbreviations are used in this tutorial:
- SA - seam allowance
- RST - right sides together
- HST - half square triangle
- FGU - Flying Geese units
SA are 1/4" and pressed toward the darker fabric unless noted otherwise.
When you are instructed to press, first press the pieced unit flat to set the seam. Then open the patch, pressing from the front.
Starching your quilt fabric makes everything easier. Learn about it here.
Step 1: Printing the patterns
To open and print the Flying Geese units (FGU) you need the Adobe Reader installed on your computer. You can get Adobe Reader here (a new window will open so you can download it without leaving this page) if you need it.
Open the downloaded file at the intersection of 'Print FGUs' and your finished block's size. You'll find these downloads in the Cutting Chart in Step 2 below in the row highlighted in yellow.
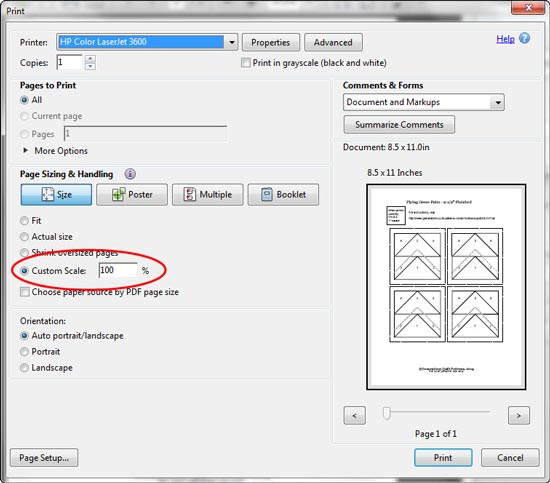
Select the "Print" option. Under 'Page Sizing and Handling' in the Adobe print menu, set 'Custom Scale' to 100%. You must do this for the pattern to print correctly.
Click here to see what it looks like on the Print Menu page.
After printing one page, measure to confirm that it printed correctly, then continue with any remaining copies.
New quilt fabrics to tickle your fancy...
Click the images below to see the full collection. We share any commercial and/or free patterns that showcase them, too. (For inspiration, of course!)


Step 2: Cutting for an Illinois block
 Illinois design
Sample Size: 7½" finished / 8" unfinished
Grid: 6x6
Attribution: Hearth & Home
Design Type: Even 9-patch
We'll use two different techniques—traditional piecing for the HSTs and paperpiecing for the Flying Geese Units(FGU).
#5 and #6 are cut exactly to size. However, I prefer to sew larger and trim to perfection, so before I cut those patches, I add a 1/4" to each dimension.
The remainder of the patches are oversized to make paperpiecing a breeze.
Make fabric choices with good contrast so that you don't lose any of the points in your Illinois block. (See my note after the finished block!)
 |
Cutting Chart for a~ Paper Piecing ~ | ||||||
|---|---|---|---|---|---|---|---|
| Patch | Fabric | Qty | Finished Block Size | Sub Cut | |||
| 4-1/2” | 6” | 7-1/2” | 12” | ||||
| 1, 3 | A | 2 | 3-1/8” | 3-5/8” | 4-1/8” | 5-5/8” | |
| 2, 4 | Background | 8 | 2-1/8” | 2-3/8” | 2-5/8” | 3-3/8” | |
| 5 | Background | 2 | 2-3/8” | 2-7/8” | 3-3/8” | 4-7/8” | no |
| 6 | A | 2 | 2-3/8” | 2-7/8” | 3-3/8” | 4-7/8” | no |
| 7 | Background | 1 | 2” | 2-1/2” | 3” | 4-1/2” | no |
| Unfinished Block Size | 5” | 6-1/2” | 8” | 12-1/2” | -- | ||
| Print FGUs | 1-1/2" | 2" | 2-1/2" | 4", print 2 | -- | ||
| Grid Size | 3/4” | 1” | 1-1/4” | 2” | -- | ||

Step 3: Assemble the units
HST

Make 4
Using the Quick Pieced method of making HST, draw a diagonal line on the back of the #5 squares.
Layer each with right sides together (RST) with a #6.
Sew a 1/4" away from both sides of the diagonal mark. Repeat for the other pair.
 A 'spider'—that little piece of cloth at the end—prevents my machine from eating the corners as I stitch
Cut apart on the line.
Press.
If you've cut oversized patches as I did, trim these units to size.
HST Dimensions | |
|---|---|
| Finished Block Size | Trim HST to… |
| 4-1/2" | 2" |
| 6 " | 2-1/2" |
| 7-1/2" | 3" |
| 12 " | 4-1/2" |
For the 7-1/2" finished Illinois quilt block in this example the HSTs were trimmed to 3" x 3".
 Align the 45 degree mark on your ruler with the seamline
After trimming, these are our HSTs.
 Trimmed to perfection!
If you need more detailed instructions, click here to go to Technique #1: Creating Quick Pieced Half Square Triangles.
Hate paper piecing?
Click here for alternative methods for constructing Flying Geese units.
Flying Geese Units (FGU)
Make 4

For paper piecing, set your stitch length to 15-18. If you have one, install an open to applique foot. It gives you an unobstructed view of where your needle pierces the fabric.
Cut out the patterns. Don't bother cutting exactly on the outside dashed lines. They are trimmed in the last step.
Using a little dab of Elmer's Glue Stick (goes on purple, dries clear) position #1 on the unprinted side of the pattern.
 Use the dashed placement guides to quickly position #1
With RST, align a #2 with the #1. You can choose either side first. My recommendation is to be consistent so that you can develop a piecing rhythm— especially if you're making more than one block.
 Align this edge (red arrow) for perfect placement
Stitch on the line between #1 and #2, both starting before and ending after the solid line. As the units are sewn together, that stitching secures these seamlines.
Press.
To establish the next placement line, place this patch on your cutting mat, paper-side up.
Line-up the edge of your ruler with the solid line between #1-2 and #3. Crease the paper along your ruler's edge. Fold back the paper on this line.
Now position the 1/4" mark on the folded edge and cut the excess fabric away with your rotary cutter. You've now established the next placement line.
 The quarter inch mark is on the folded edge of the paper.
With RST, align the long edge of a #3 with the cut edge. Sew on the line, starting and stopping outside the dashed lines.
Press.
Continue on in this manner for the remaining #4 patches.
Press.
Trim to the same dimensions as the HST.
For more detailed instructions for these FGUs, visit our Arrowhead Quilt Block, Step 3. (Hit your back arrow to return here.)
Step 4: Assemble the Illinois quilt block
Return your sewing machine to a normal, piecing stitch length. Install your quarter inch foot.
Lay out the units into the Illinois design. Pay particular attention to the FGUs pointing out from the center. The dark side of the HST is in each corner.

Sew the units into rows. Press with the SA away from the FGUs.

Stitch the rows together. Use pins to ensure a good match at the seam allowances. The inner Geese form the illusion of a square-in-a-square block.
If your Illinois quilt blocks are going to be set with sashing strips, I prefer to press these final seams away from the Flying Geese. If they'll be set edge-to-edge, then I'll press these SAs to the center.
This is our finished Illinois quilt block.
 Illinois quilt block
The truth be told...
...this is a seriously funky block! Lot's of motion, but to my traditional eye...much, much, much too busy.
To tone it down, I could choose a smaller scale in the black and white print. Then the contrast in the size of both prints would tell your eyes what to look at. Right now, your eye is constantly moving. Dizzy!
What about a different quilt block?
For a list of all the 220+ quilt block patterns on this site, start here.
If you know the name of the block, shorten your search by using these links:
Click here if you're looking for blocks with at least some paper piecing.
Click here if you're looking for the basic building blocks of quilting, i.e., Flying Geese, half square triangles, quarter square triangles, etc., along with several techniques to make each.
And finally, use these links to find blocks in these finished sizes:


Yummy fabrics
to drool over
Click any image below to see the full collection and find pricing and ordering information.


By Julie Baird
Copyright © 2008-2026 Generation Quilt Patterns, LLC
All Rights Reserved
Generations-quilt-patterns.com does not sell any personal information. (See Privacy Policy)