- Home
- Free Quilt Block Patterns
- Honeymoon Quilt Block
Honeymoon Quilt Block
From our Free Quilt Block Patterns Library
This post contains affiliate links, for which I receive compensation.
The Honeymoon quilt block, with all this pointy-goodness, doesn't have to be hard.
Quick-pieced QST and 8-at-a-time HST are the techniques we use to get'er done!
🧭 Quick Navigation
In this tutorial, you'll find:
- Find out what my secret weapon is for trimming QSTs
- A good image to Pin for later
📋 General Instructions
⚡ PRINTING TIP: Need help printing this tutorial? Click here for easy instructions!
Several abbreviations are used in our tutorial. They are:
- SA - seam allowance
- RST - right sides together
- HST - half square triangle
- QST - quarter square triangle
1/4" SA are used in the block construction.
Preferred Pressing Technique
First press the patches closed—just as they came off your sewing machine. This sets the seam, melding the fibers of the threads into the fibers of the fabric.
Then press the SA to the dark unless otherwise noted.
Pressing instructions are highlighted in yellow.
For a super-flat block, try this simple trick.
New quilt fabrics to tickle your fancy...
Click the images below to see the full collection. We share any commercial and/or free patterns that showcase them, too. (For inspiration, of course!)


✂️ Cutting for a Honeymoon quilt block
Sample Block Size: 9" finished / 9½" unfinished
Grid: 6x6
Design Type: Even 9-patch | Star
You need three fabrics—a background, a light, and a dark—for the Honeymoon block.
Good contrast is essential between the fabrics so that all the points show.
 | Cutting Chart for a~ Traditional Piecing~ | ||||
|---|---|---|---|---|---|
| Patch | Fabric | Qty | Finished Block Size | ||
| 6'' | 9'' | 12'' | |||
| 1** | Light | 2 | 3¼'' x 3¼'' | 4¼'' x 4¼'' | 5¼'' x 5¼'' |
| 2** | Dark | 2 | 3¼'' x 3¼'' | 4¼'' x 4¼'' | 5¼'' x 5¼'' |
| 3 | Light | 1 | 4¼'' x 4¼'' | 5¼'' x 5¼'' | 6¼'' x 6¼'' |
| 4 | Dark | 1 | 4¼'' x 4¼'' | 5¼'' x 5¼'' | 6¼'' x 6¼'' |
| 5 | Light | 4 | 1½'' x 1½'' | 2'' x 2'' | 2½'' x 2½'' |
| 6 | Med | 4 | 1½'' x 1½'' | 2'' x 2'' | 2½'' x 2½'' |
| 7 | Med | 1 | 2½'' x 2½'' | 3½'' x 3½'' | 4½'' x 4½'' |
| Unfinished Block Size | 6½'' | 9½'' | 12½'' | ||
| Grid Size | 1'' | 1½'' | 2'' | ||
| **I prefer to cut my patches extra large for quarter square triangles, stitch, and then trim them to size. If you prefer to do the same, add a bit extra to the measurements for Patches #1 and #2 above (I've added 1/2" before cutting the patches for the sample block). There is a chart in the instructions where you need it for trimming them to size. If your SA is reliably perfect, then use the dimensions in the chart. | |||||
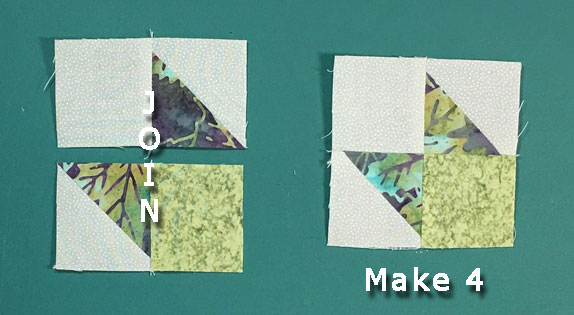
🪡 Assemble the units for a Honeymoon block
QSTs
Make 4

Mark one diagonal line on the back of either the #1 or #2 patch. Here I've used a mechanical lead pencil which is easier to see on the light fabric.
Layer a #1 and a #2 RST and stitch 1/4" away from both sides of the marking.
 Here I've used a mechanical lead pencil to mark
Give the sewn pair a quick press to set the seam. Then cut in half along the pencil mark (below, right).

Press the units open with SA towards the dark.
Time to mark again.
Position a straight line of your rule on the stitching line (red line) with the cutting edge of the ruler through the center. This ensures that you're quarter triangles are truly 90° at the center.
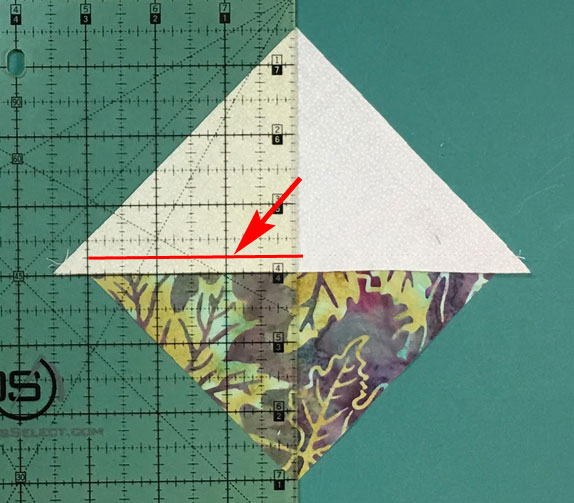 If you've cut over-sized patches and the ruler doesn't bisect the corners exactly, don't worry. You've got a little wiggle room.
If you stitch perfect seams, the ruler will cut right through the middle of the points at the top and bottom.
Me? This first pair wasn't too bad.
But rarely do I stitch perfectly...especially not on the 14th, 15th or 100th pair. That's why I added an extra 1/2" to the cutting measurements of the #1 and #2 patches for these QSTs.
Trimming to size is my secret weapon.
Yours, too?
Back to the task at hand. You only need to mark one of the two units.
Draw one diagonal line with a mark that shows along this center edge.
Now layer the two pairs, light fabric to dark fabric. I prefer to have the SA pressed and pointing toward the presser foot on top as I stitch—less chance the seam gets twisted as I sew.
Sew, again, 1/4" away from the marking on both sides.
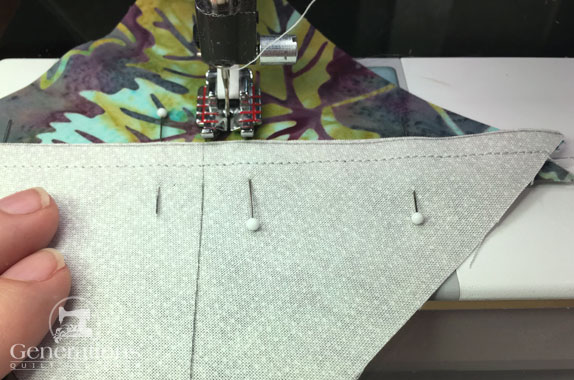 Pins are going in opposite direction on each side of the line because I'll stitch back the other way for the second seam
I take a quick check at the sewing machine to make sure the center seams match.
 Yep! That works!
If they do, it's off to the cutting mat. If not, a quick visit with my seam ripper and re-sew the seam.
At the cutting mat, cut the units in half between the two lines of stitching.
Press the SA to one side at your ironing board.
Repeat these steps for second #1 and #2.
Just a bit of trimming and we'll be ready to put our Honeymoon block together.
Use the chart below to find the Center Measurement that corresponds to your finished size.
For our 9" sample it's 1 3/4".
QST Dimensions | ||
|---|---|---|
| Finished Block Size | Center/Midpoint Measurement | Trim QST to… |
| 6" | 1 1/4" | 2 1/2" |
| 9" | 1 3/4" | 3 1/2" |
| 12" | 2 1/4" | 4 1/2" |
To trim, you'll want a square ruler with a diagonal line through its corner. (I'm using my brand-spankin' new Quilters Select.)
Align this line with the diagonal seam in your QST. Adjust the ruler so that the Center Measurement is positioned over the center of the QST were all the points match.
Trim the two sides.
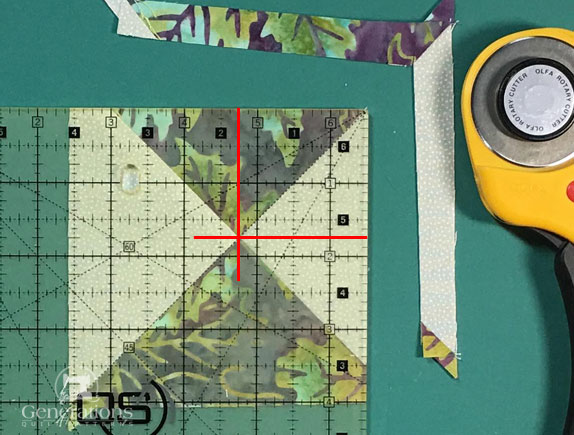 Our 1-3/4" Center measurement is shown in red in this photo
Now re-position your patch so the edges you just trimmed are aligned with the 3 1/2" lines, the 'Trim to' size in the chart, on your ruler (red arrows). The diagonal ruler mark is directly on top of the diagonal SA (blue arrow).
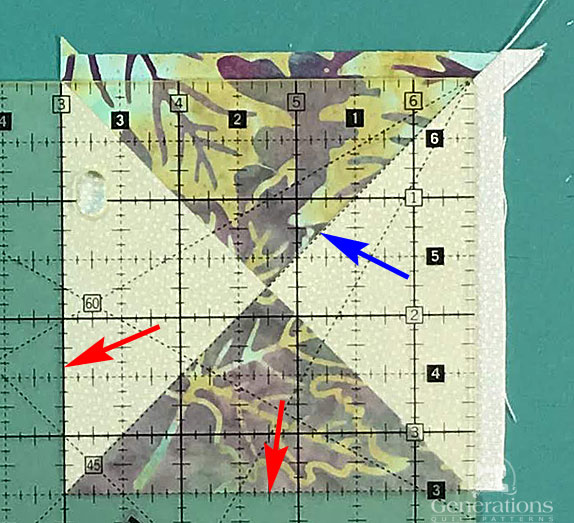
Trim the last two sides.
If you'd cut your patches exactly to the dimensions in the chart, you'll use this 'Trim to' size to check that your blocks came out just right. Trim as needed.
One perfectly trimmed QST—three more to go.After trimming, here are your QSTs.
 Perfectly sized little beauties. :)
My new secret weapon for trimming QSTs 🕵️
I admit, making QSTs is not one of my favorite things to do. Not because they're hard, but because they're kinda finicky. Lots of lining up the ruler.

And rulers like to slip...
...until I found this one.
This is a Quilters Select 6-1/2" square by Alex Anderson. You remember her—the 'Simply Quilts' lady.
Well, this standard ruler is GREAT for trimming QSTs.
Why?
Simply put. It.Does.NOT.Slip.
Once you put a bit of pressure on the ruler, a special 'grippy' coating on the backside really grabs the fabric and doesn't budge.
It's nice for a change not to have to buy a specialty ruler to get the job done. The coating makes all the difference!
And it's good for trimming HSTs, too!
And everyday cutting!
HSTs
Make 8

For more detailed instructions on making HST 8-at-a-time, click here.
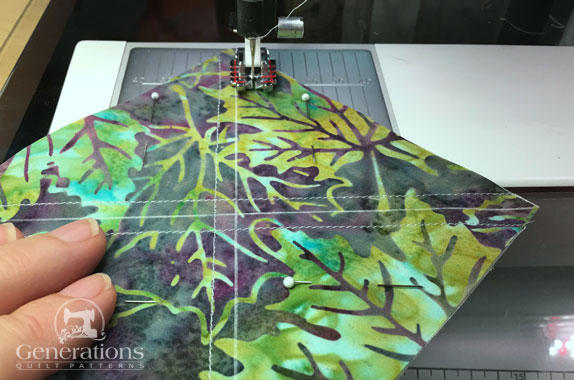
Draw two diagonal lines on the backside of either the #3 or #4 patch, whichever is easier to see your marks on.
With RST, layer your #3 and #4 patches with the marked square on top.
 This time I've marked the dark #4 fabric is my trusty Bohin Mechanical Chalk Pencil
Stitch 1/4" away from both sides of both markings for a total of four lines of stitching.
 Finishing up the fourth seam
Referring to the chart below, find the Center Measurement that corresponds to your chosen Finished Block Size.
HST Dimensions | ||
|---|---|---|
| Finished Block Size | Center/Midpoint Measurement | Trim HST to… |
| 6" | 2 1/8" | 1 1/2" |
| 9" | 2 5/8" | 2" |
| 12" | 3 1/8" | 2 1/2" |
At your cutting mat, cut the #3/#4 in half vertically and horizontally using this center measurement to create four equal squares.
Then cut each square in half along the line you drew.
You now have eight HSTs.

Press with SA towards the dark.
Referring to the chart again, trim your HSTs to the perfect size. Here four are already trimmed.
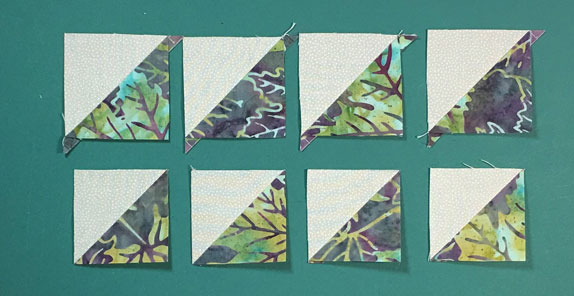 Untrimmed in top row. Trimmed in bottom. Dog ears gone-o!
Corner Units
Make 4

Using the photos below for a reference add a light #5 to four of the HST and medium #6 to the remaining four.
SA are pressed towards the #5s and #6s to reduce bulk.
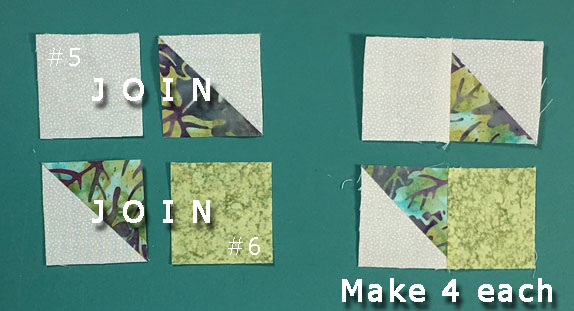
With RST join the pairs as shown below.
The trick to seam allowances that swirl or fan all in the same direction is to stitch the patches together all exactly the same...
...for these units stitch with #6 on top, SA pointing towards the presser foot. Every.Single.Time.
Press with the units closed, then twirl the SA around the center.
You will probably need to loosen a few stitches—don't cut them, just loosen—so that the seam will lay flat.
This is what it looks like close up.
 Our twirled or fanned seams form a teeny little 4-patch on the backside.
Twirl the SAs by loosening the stitches at the center. This helps distribute bulk at center of these corner units.
Twirling SAs has another benefit. If you choose to make a quilt out of Honeymoon quilt blocks set edge to edge, then all the SAs nest making construction so much easier. So much less bulky.
And finally, after these four corners are sewn, check your accuracy using the chart below.
Corner Dimensions | |
|---|---|
| Finished Block Size | Dimension from edge to edge |
| 6" | 2 1/2" |
| 9" | 3 1/2" |
| 12" | 4 1/2" |
🧩 Assemble the Honeymoon quilt block
Lay out all your patches to create the Honeymoon patchwork design. Background patches are in the four corners and the outside side edges.
 Whoops! That black 'thing' you see in the upper right corner is the cord to my Ott Light.
Sew the Honeymoon units into rows.
All SA are pressed toward the QSTs.

Stitch the rows together pinning, as needed, to hold the patches in position.
Click here to brush up on your pinning techniques for perfect points.
At last, our Honeymoon quilt block is complete!
 Honeymoon quilt block from the front
The backside of our Honeymoon block so you can see all the seams.
 Honeymoon block from the back
See how the SAs on the top and bottom are pressed in opposite directions? Same for the left and right sides?
If you choose to set your blocks edge-to-edge, those SAs will all nest—making it much easier to assemble the top. That's the added advantage of swirling the SAs.
Sweet!
More related 8-pointed star quilt block patterns
There are several tutorials available to you on this website that start with an Ohio star as its base. Click on any of the images below to go straight to that tutorial.
Aunt Dinah and Twin Star may seem a little suspect.
But look closely. Those are 3-patch quarter square triangles on each side.
You'll find confirmation in Barbara Brackman's BlockBase+ (love the software). These blocks are listed in the '09 Equal Nine Patch' library in '03 Like Ohio Star'.


🔭 Looking for something truly stellar?
You've finished your star quilt block, and you're ready for more!
Browse our collection of 70 stellar star quilt block patterns. All have instructions and cutting charts in multiple sizes. If templates or paper piecing is used in the tutorial, there's a free download for you of those materials.

Eeny. Meenie. Miney. Moe.
Which star quilt block will you sew?
For a star-studded quilting experience, choose from 100+ bedazzling star quilt patterns—for beginners and beyond—click here.
For even MORE blocks to make… 🧩🎨

...visit our Free Quilt Block Pattern Library, with over 260+ blocks to choose from in multiple sizes.
Free downloads are included in all sizes for any blocks require paper piecing patterns or templates.
- Home
- Free Quilt Block Patterns
- Honeymoon Quilt Block


Yummy fabrics
to drool over
Click any image below to see the full collection and find pricing and ordering information.


By Julie Baird
Copyright © 2008-2026 Generation Quilt Patterns, LLC
All Rights Reserved
Generations-quilt-patterns.com does not sell any personal information. (See Privacy Policy)