- Home
- Free Quilt Block Patterns
- Four Corners Quilt Block
Four Corners Quilt Block Tutorial:
6", 9", and 12" finished
From our Free Quilt Block Patterns Library
This post contains affiliate links, for which I receive compensation.
Ready to make a quilt block classic?
If you’re a confident beginner, the Four Corners quilt block is a wonderful place to start.
Follow our easy-peasy tutorial and use traditional piecing techniques for this classic block. No specialty rulers needed - it's so simple that picking between 6", 9" or 12" finished sizes is about as tough as it gets.

In this tutorial, you'll find:
- Links to more tutorials like Four Corners that start with an 8-Pointed star design
- No time to quilt? Pin this for later.
Ready? Cut. SEW!
General Instructions
Several abbreviations are used on this page. They are:
- SA - seam allowance
- RST - right sides together
- HST - half square triangle
- QST - quarter square triangle
1/4" SA are used through this tutorial.
Pressing instructions are highlighted in yellow throughout this tutorial to make them easy to spot.
When instructed to press, first press the patches in the closed position just as they came off your sewing machine. This sets the seam, melding the fibers of the threads into the fibers of the fabric.
Then press the SA to the dark unless otherwise noted.
Step 1: Cutting for a Four Corners quilt block
 Four Corners block design
Sample Block Size: 12" finished / 12½" unfinished
Grid: 6x6
Attribution: Maggie Malone, "5,500 Quilt Block Designs", #246
Design Type: Even 9-patch | Star
For our sample, you'll see a cute directional dinosaur print from Dear Stella, a purple Sheen from Robert Kaufman, and my go-to background fabric, Grunge by BasicGrey for Moda.
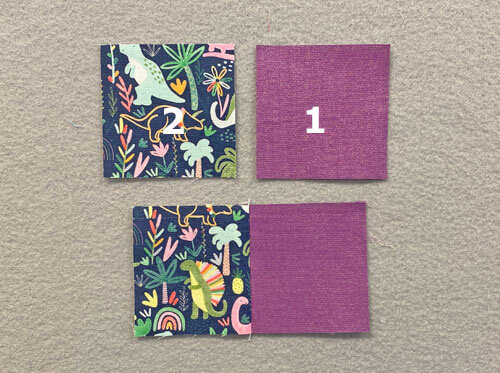
Label all your patches. We use their numbers throughout this tutorial.
To print a copy of the block design and cutting chart to use at your cutting table, click here.
 | Cutting Chart for a~ Traditional Piecing ~ | ||||
|---|---|---|---|---|---|
| Patch | Fabric | Qty | Finished Block Size | ||
| 6'' | 9'' | 12'' | |||
| 1 | Med | 4 | 1½'' x 1½'' | 2'' x 2'' | 2½'' x 2½'' |
| 2 | Dark | 4 | 1½'' x 1½'' | 2'' x 2'' | 2½'' x 2½'' |
| 3 | Dark | 4 | 1½'' x 2½'' | 2'' x 3½'' | 2½'' x 4½'' |
| 4 | Light | 1 | 2½'' x 2½'' | 3½'' x 3½'' | 4½'' x 4½'' |
| QST.1 | Med | 1 | 3½'' x 3½'' | 4½'' x 4½'' | 5½'' x 5½'' |
| QST.2 | Dark | 1 | 3½'' x 3½'' | 4½'' x 4½'' | 5½'' x 5½'' |
| QST.3 | Light | 2 | 3½'' x 3½'' | 4½'' x 4½'' | 5½'' x 5½'' |
| Unfinished Block Size | 6½'' | 9½'' | 12½'' | ||
| Grid Size | 1'' | 1½'' | 2'' | ||

Step 2: Assemble the units for a Four Corners block
QST Units
Make 4
 Side units
It's a two-part process to make these oversized QSTs, kind of like making HSTs twice to get to the desired patches.
On the backside of the QST.3 background squares, draw a diagonal line from corner to corner.

Install your favorite 1/4" presser foot.
With RST, pair a QST.3 square with a QST.1.
Stitch a 1/4" from both sides of the line.
Repeat the process for the second QST.3 paired with a QST.2.
 Finishing up the second line of stitching on the second pair of QST squares
Press.
Cut each pair in half along the drawn line.
Press again with the SAs toward the darker fabrics.
 Halfway through with four HSTs
Time to mark our patches again.
Select the two that are easiest to see a mark on and draw a diagonal line from corner to corner across the SA.
Line up a straight line on your ruler with the seam line (red arrow) to ensure you'll have 90° angles in the center of your QSTs.
Mark the backsides of two of the four HSTs.

If you look closely at the right HST above, you can see that the diagonal line doesn't go straight through the corner at the top. That's OK. These patches are cut oversized. We've got some wiggle room on purpose.
It's more important to have that marked line be perfectly perpendicular through the seam.
With RST, nest the SAs of a QST.1/QST.3 HST and a QST.2/QST.3 HST.
I like to pin to hold the match in the center. Those pins are far enough from the marked line that it isn't necessary to remove them while sewing.
Stitch 1/4" away from both sides of the marking for both pairs of patches.

Before cutting these in half between the stitching lines, check the match at the center.
If you don't like the match, this is your only chance to fix it.
 Yep. I'm good with the match on this one. Ready for trimming.
When you're happy, cut each sewn pair in half along the drawn line.
Loosen the stitches (DO NOT trim them away) in the center of the unit to twirl or fan the SAs around the center. This reduces the lumpiness in the center—one less bump to worry about when you're machine quilting.
Press them the QST flat. I find it helpful to fingerpress these seams around the center and then go back in with my iron.
 They're hard to see, but the thread tails from the loosened seams are there. Do not cut them off. You'll end up with a cute little 4-patch on the backside.
Our four QSTs are ready to be trimmed. I've laid them out to show you that if the direction of the print matters to you, that you'll automatically have the print going in all the right directions.
You just have to look for it and then pay attention as you piece the patches together.
 The little dinosaurs and critters will all have their heads in the sky...without even trying. Sweet!
In the chart below, find your finished block size and it's corresponding Center measurement. For our 12" sample Four Corners, the Center is at 2-1/4".
QST Dimensions | ||
|---|---|---|
| Finished Block Size | Center Measurement | Trim QST to… |
| 6" | 1¼" | 2½" x 2½" |
| 9" | 1¾" | 3½" x 3½" |
| 12" | 2¼" | 4½" x 4½" |
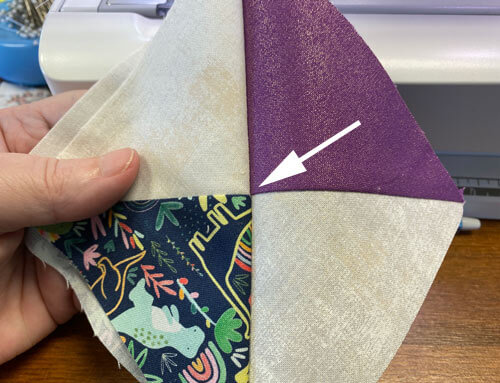
At your cutting mat, block right side up, align the Center measurement with the center of your QST—directly over where the seams meet. (red arrow)
At the same time, the 45° line on your ruler is over one of the diagonal seams. For a right-hander like myself, it's over the diagonal that runs upper right to lower left.
One more thing to check. The 'Trim QST to...' measurement on your ruler is right at the two remaining seams of your QST. (blue arrows)
 Center measurement - red arrow
Unfinished measurement - blue arrows
45° diagonal line over seam
Once all of this is lined up, trim away the excess fabric at the two exposed edges.
Turn your block 180°. Now line up the 'Trim QST to...' measurements (4½" for our 12" finished sample) with the two edges you just cut.
The dashed 45° line is directly over a diagonal seam (upper right corner to lower left below).
Again, trim away the excess on the exposed edges.
 Center measurement - red arrow
Unfinished QST size - blue arrows
45° line over diagonal seam
And Voila!
You now have four perfectly sized QSTs. A diagonal seam cuts each corner in half. A nice match in the center of the seams and QSTs that lay flat.
What's not to love?

A funny thing happened on the way to making these units...
After all that talk about 90° angles, once I'd pressed one of the QST, the little bugger just wouldn't lay flat. It 'bubbled up' in the center.
What the...???
I knew the angles were good, but what the...?????
Turns out that I'd inadvertently pressed a tuck into the seam allowance (red arrow).
 That is some SERIOUS tuck action going on there. What was I thinking?
If that ever happens to you, press the unit flat as it was sewn. Then twirl the seam, fingerpress and finally hit it with your iron.
Problem solved.
Disaster averted!
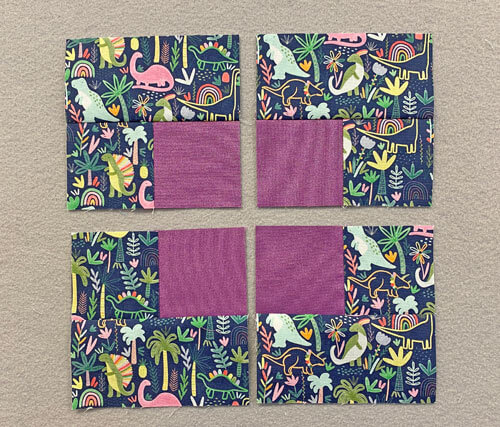
Corner Units
Make 4
 Corners
NOTE: I certainly wish the pictures did the 'Sheen' purple fabric more justice. It's just as sparkly as it can be.
A fun touch, especially if you're making something for a little girl who loves 'parkles', as my Baby Girl used to say! ;)
To get started, with RST, sew #1 to #2 and press, SAs to the dark.
Sew a #3 to #1/#2.
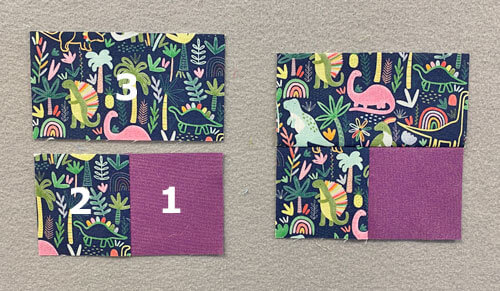
Press SAs toward #3 to minimize bulk.
If you are using a non-directional fabric, make all 4 units the same as shown to this point. When they are added to the block, turn each a 1/4 turn so that the #1 is towards the center of the block.
If you are using a directional fabric like this dinosaur print, and want all the dinosaurs with their heads up, you'll need to play around with the patches to make sure they're all in the proper direction.
My suggestion is to make one at a time to avoid having to rip anything out.
Seriously.
I'd rather lick the back of the refrigerator than rip out stitches.
Here are my four #1/#2/#3 with dinosaur heads all up in the sky.
Step 3: Assemble the Four Corners quilt block
Arrange the corners, the QSTs and center square so that the dark fabrics are around the outside edges, and the lightest fabric forms the star points.
You can see in the photo below that the directional print in the QSTs is all in the proper direction—look for the blue dinosaurs—without any extra effort. Simply pay attention as you arrange the patches.
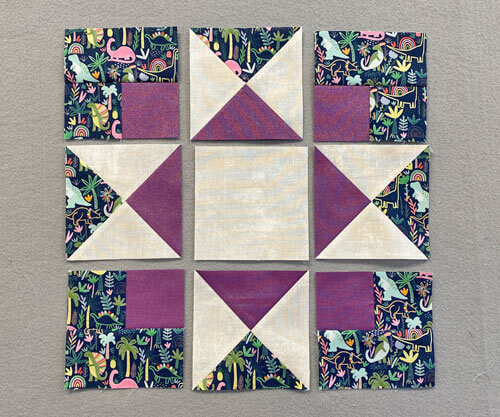
Sew the units into rows with the SAs pressed away from the QSTs in all rows.
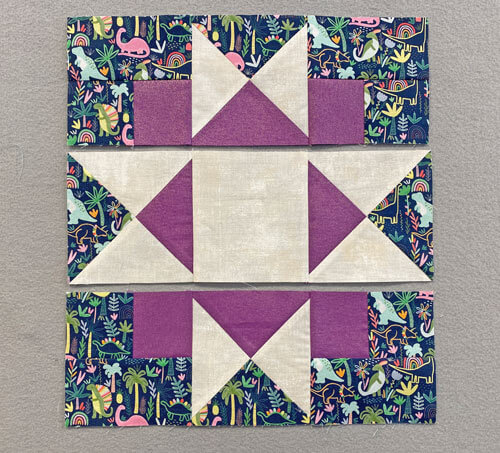
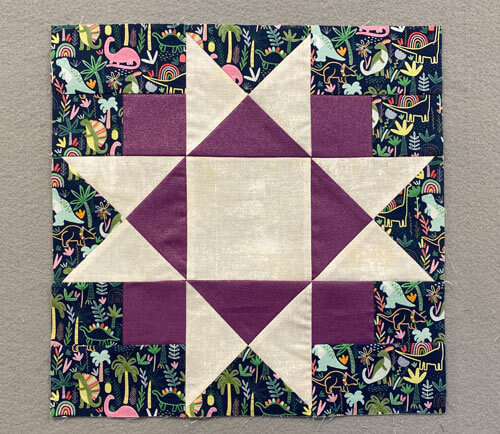
Stitch the rows together to complete your Four Corners quilt block.
I've pressed the SAs away from the center row.
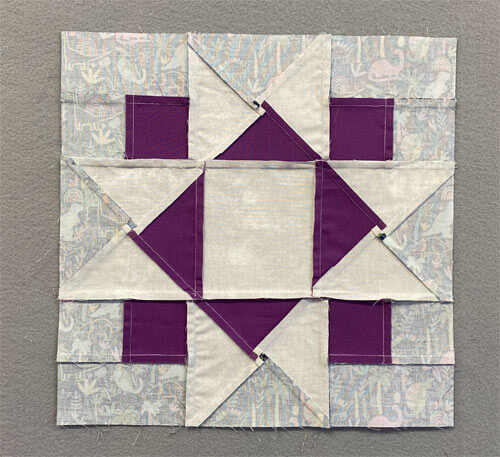
Our Four Corners block from the back side looks like this.
If you were setting these blocks together, edge-to-edge, i.e., no sashing between them, you would press these last two seams in towards the center. That way, the seams would nest.
So much easier to line them up that way.
More related 8-pointed star quilt block patterns
There are several tutorials available to you on this website that start with an Ohio star as its base. Click on any of the images below to go straight to that tutorial.
Aunt Dinah and Twin Star may seem a little suspect.
But look closely. Those are 3-patch quarter square triangles on each side.
You'll find confirmation in Barbara Brackman's BlockBase+ (love the software). These blocks are listed in the '09 Equal Nine Patch' library in '03 Like Ohio Star'.


🔭 Looking for something truly stellar?
You've finished your star quilt block, and you're ready for more!
Browse our collection of 70 stellar star quilt block patterns. All have instructions and cutting charts in multiple sizes. If templates or paper piecing is used in the tutorial, there's a free download for you of those materials.

Eeny. Meenie. Miney. Moe.
Which star quilt block will you sew?
For a star-studded quilting experience, choose from 100+ bedazzling star quilt patterns—for beginners and beyond—click here.
For even MORE blocks to make… 🧩🎨

...visit our Free Quilt Block Pattern Library, with over 260+ blocks to choose from in multiple sizes.
Free downloads are included in all sizes for any blocks require paper piecing patterns or templates.
- Home
- Free Quilt Block Patterns
- Four Corners Quilt Block


By Julie Baird
Copyright © 2008-2026 Generation Quilt Patterns, LLC
All Rights Reserved
Generations-quilt-patterns.com does not sell any personal information. (See Privacy Policy)