- Home
- Free Quilt Block Patterns
- Crowning Glory Quilt Block
Crowning Glory Quilt Block: Where Precision Meets Majesty
Where humble squares become royal heirlooms 📦➡️💎
This post contains affiliate links, for which I receive compensation.
Our Crowning Glory quilt block has humble beginnings as an 8-point or Variable star. Add Brave World units in the corners for a little design pizzazz,
Voilà! You've got yourself a Crowning Glory.
Simply follow the illustrated instructions to cut your fabric patches. Then refer to the printable patterns as you paper piece four quick units. By sewing precisely on the line, perfect points are within your reach.

Finally, assemble your block with traditional piecing. Nest those seams and revel in precise matches.
Before you know it, you'll be crowning your quilt with this stellar block, stitched by your own hands.
Discover the joy of guiding fabric into magnificence as you learn to stitch this queenly Crowning Glory block.
Before we go any further, do you see the crown? If not, click here.
🧭Navigate your way through this royal quilting adventure!
Use these links to quickly find the crown jewels of our tutorial:
- A cutting chart in three sizes, with downloads of the chart and block design
- Forced to abdicate the quilting throne for now? Bookmark or Pin this tutorial to reclaim glory when you're able.
Cut. Sew. Press. Elevate your stitches from basic to breathtaking
📋General Instructions
Several abbreviations are used on this page. They are:
- SA - seam allowance
- RST - right sides together
- HST - half square triangles
- QST - quarter square triangles
- BW - Brave World unit
A 1/4" SA is used in this tutorial.
Highlighted in yellow, pressing instructions are easy to spot.
To press, first press the patches in the closed position as they came off your sewing machine. This sets the seam, melding the fibers of the threads into the fibers of the fabric.
Then press the SA to the dark unless otherwise noted. Paper pieced seams are automatically pressed toward the last patch added.
Download and print paper piecing pattern
To download the pattern, use the most current version of Adobe.
For accurate results, on Adobe's Print Menu page, under 'Page Size and Handling' set 'Custom Scale' to 100%. Then print.
Click here to see what it looks like on the Print Menu page.
Find your finished block size from the chart below. Print the corresponding number of pages for a total of four Brave World units.
Print the Brave World Units | ||
|---|---|---|
| Finished Block Size | # of BW per page | Link to PDF Download BW Finished Size |
| 6" | 6 | 2" |
| 9" | 4 | 3" |
| 12" | 2 | 4" |
| 15" | 1 | 5" |
| 18" | 1 | 6" |
After printing, use the 1" square graphic on the printed page(s) to double check that your patterns printed at the correct size.
Then cut out the required number of patterns from your copies. A rough cut is good enough—an 1/8"-1/4"-ish away from the outside dashed square.
Not sure which paper piecing paper to use?
Click here for "Does it really matter which paper piecing paper you use?" to help you make the best decision for your needs.
New quilt fabrics to tickle your fancy...
Click the images below to see the full collection. We share any commercial and/or free patterns that showcase them, too. (For inspiration, of course!)


✂️Cutting patches for a Broken Heart block
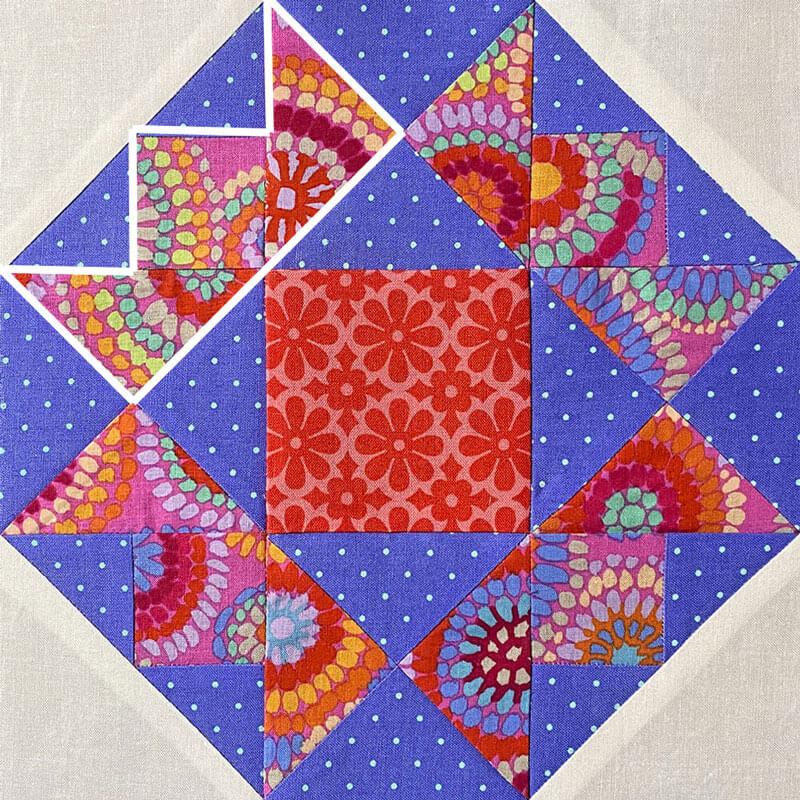
 Crowning Glory block design
Sample Block Size: 9" finished /9 ½" unfinished
Grid: 6x6
Design Type: Star | Even 9-patch | Paper piecing
Sample Fabrics: Tula Pink-True Colors Tiny Dots, Kaffe Fassett Collective-Mosaic Circles, Bella Solid
Label all your patches. We use their numbers throughout this tutorial.
To print a copy of the block design and cutting chart to use at your cutting table, click here.
 | Cutting Chart for a~ Paper & Traditional Piecing ~ | |||||||
|---|---|---|---|---|---|---|---|---|
| Patch | Fabric | Qty | Finished Block Size | Sub Cut | ||||
| 6'' | 9 '' | 12'' | 15 '' | 18'' | ||||
| BW-1 | Light | 1 | 1¾'' x 1¾'' | 2¼'' x 2¼'' | 2¾'' x 2¾'' | 3¼'' x 3¼'' | 3¾'' x 3¾'' | --- |
| BW-2, BW-3 | Dark | 1 | 2⅜'' x 2⅜'' | 2⅞'' x 2⅞'' | 3⅜'' x 3⅜'' | 3⅞'' x 3⅞'' | 4⅜'' x 4⅜'' | |
| BW-4 | Bac | 1 | 3⅜'' x 3⅜'' | 4⅜'' x 4⅜'' | 5⅜'' x 5⅜'' | 6⅜'' x 6⅜'' | 7⅜'' x 7⅜'' | |
| QST-1 | Dark | 1 | 3½'' x 3½'' | 4½'' x 4½'' | 5½'' x 5½'' | 6½'' x 6½'' | 7½'' x 7½'' | --- |
| QST-2 | Light | 1 | 3½'' x 3½'' | 4½'' x 4½'' | 5½'' x 5½'' | 6½'' x 6½'' | 7½'' x 7½'' | --- |
| Center | Medium | 1 | 2½'' x 2½'' | 3½'' x 3½'' | 4½'' x 4½'' | 5½'' x 5½'' | 6½'' x 6½'' | --- |
| Unfinished Block Size | 6½'' | 9½'' | 12½'' | 15½'' | 18½'' | na | ||
| Grid Size | 1'' | 1½'' | 2'' | 2½'' | 3'' | na | ||
🪡Create the units for your Crowning Glory quilt block
Brave World (BW)
Make 4

We need to make a few adjustments to our sewing machine settings to paper piece.
- Reduce your stitch length to 16–20 stitches per inch (1.3-1.6 mm). This perforates the paper and stabilizes the seam when you remove the pattern. [Learn more about stitch length here.]
- Reduce your machine's speed or just plain slow down. Sew only as fast as you can AND stay on the solid stitching line.
- Install an open toe appliqué foot (sometimes called an 'embroidery' or 'satin stitch' foot) if you have one (it makes it easier to see where you're stitching).
- Use a larger needle (90/14) IF you have problems removing the pattern. Personally, I use an 80/12 Microtex Sharp for paper piecing without any issues.
I use a dot of Elmer's Washable Glue Stick to hold Bw-1 in place on the unprinted side of the pattern. No pins to distort the paper.
The key is to use only as much as needed to hold it for a bit.

With RST, match a short edge of BW-2 to BW-1.
If you're new to this unit, take a sec and flip open the patch to make sure you've got it positioned right. It's an easy one to accidentally flip.

Sew the seam between BW-1 and BW-2, starting a good 1/4" before the solid line and ending a good 1/4" past it. This is a good habit to get into. Sew ALL your seams this way.
NEVER, NEVER, EVER sew ONLY on the line. Your stitches will pull out, and you'll end up with holes in your block. Who's got time for that???
Press.
With RST, position BW-3 with the adjacent side of BW-1. Flip it open for a quick check to see it's where you want it.

Press.
On your cutting mat, pattern side up, pull the patch away from the pattern at the center.
Now, lay your ruler with its edge on the line between BW-4 and BW-2/3. (red arrow) Here I'm using an Add-A-Quarter Plus ruler. Your everyday rotary ruler works, too.

Use the ruler to help you crease and fold the pattern back on itself on the line.
Lay the 1/4" mark on your ruler on the fold and cut away the excess fabric.
With the Add-A-Quarter, there's a lip on it that 'catches' the fold with an exact 1/4" extension. It makes creating the perfect 1/4" SA almost foolproof.

After trimming, you've got the perfect placement line for the final patch.

With RST, align the edge of BW-4 with the fresh cut.
When adding a much lighter patch to a darker one, nudge the light one a couple of threads past the edge of the dark fabric. In the photo below, this shows as a brighter bit of the white fabric. (red arrow)
This little bit of insurance prevents the dark fabric from shadowing or showing through the top of the finished quilt block.

Stitch the seam. Since it runs from one side to the other, you can chain piece if you're building these units together all at the same time.
Press.
One last trip to the cutting mat. Line up the 1/4" line on your ruler with one side of the solid outline that surrounds the block. (red arrow)
Trim away the excess.
Rotate the block or mat (I love a rotating cutting mat for this) a quarter turn and repeat.

Keep trimming and turning the mat until all four sides of all four BW are trimmed.
That trim job takes our 'hot mess' (below left) to perfection (below right).
 After sewing (left) and after trimming (right)
So why didn't I use the Add-A-Quarter ruler for the final trim?
There's no folded edge for the lip to grab onto. A standard rotary cutting ruler that fits comfortably in your hand is the best tool for this job.

The paper piecing is complete. From this point forward, return your stitch length to the one you regularly use for piecing and install your favorite 1/4" presser foot.
You can remove the paper now. All the outside edges of our BWs are on the straight of grain. They are as stable as if you'd traditionally pieced this unit.
In fact, if you'd prefer to traditionally piece this unit, you'll find those instructions and cutting chart on our Brave World tutorial page. (The cutting chart on that page is for 4 units, exactly what you need to make the Crowning Glory block.)
Quarter Square Triangles (QST)
Make 4

Use a ruler and pencil or chalk and mark a diagonal line on the backside of each of the lighter QST.2 squares. (below left)
, sew 1/4\" from both sides of the line") I've used a pen to mark the line in the sample to make it easier to see. In my day-to-day quilting. I prefer a Bohin Mechanical chalk pencil for its fine, consistent line.
I've used a pen to mark the line in the sample to make it easier to see. In my day-to-day quilting. I prefer a Bohin Mechanical chalk pencil for its fine, consistent line.Layer a QST.1 and QST.2, RST together.
With your favorite 1/4" presser foot installed on your sewing machine, stitch 1/4" away from both sides of one line on each pair of squares. (above right)
Press flat.
Use a rotary cutter and ruler or scissors and cut each pair in half between the two lines of stitches.
Press, SAs to the dark.
At this point, you have 4 HSTs.
On the backside of two HSTs, draw a single diagonal line from approximately corner to corner.
 For this HST, the drawn line isn't quite from corner to corner. It IS perpendicular to the seam line.
It's more important that this line is perpendicular to the seam line. That way the QST lays flat after stitching because all the angles are 90°.
This is a benefit of starting with oversized patches.
With RST, and dark and light fabrics alternating, layer two of these HST so the SAs nest or abut in the center. Pin as needed to hold the seam in alignment.
Stitch 1/4" away from the line on both sides, for both pairs of HST.
 Finishing up stitching on the second side of the line
Flip open each side of the stitched QST and check that the match meets your standards. If not, rip and resew NOW.

After you're satisfied, cut the patches in half between the stitching lines. Each pair yields two QST.

To reduce the bulk in the center of the QST, pull out or loosen the stitches at the center. DO NOT CUT THEM (to maintain the integrity of the SA). Usually, just by twisting the SA, these stitches will loosen.
Press down the SAs shown here, in a counterclockwise direction.
 This seam twirls in a counterclockwise direction to minimize bulk in the center
Time to trim to size.
Using the chart below, find the Center measurement that corresponds with the Finished Block Size you are working on.
QST Dimensions | ||
|---|---|---|
| Finished Block Size | Center Measurement | Trim QST to… |
| 6" | 1¼" | 2½" x 2½" |
| 9" | 1¾" | 3½" x 3½" |
| 12" | 2¼" | 4½" x 4½" |
| 15" | 2¾" | 5½" x 5½" |
| 18" | 3¼" | 6½" x 6½" |
The Center for our 9" sample Crowing Glory is 1-3/4".
Align this Center measurement with the center of your block (see red arrows below).
Before trimming:
- The dashed 45° line on your ruler should be directly over the seam
- The unfinished measurement of your block (3-1/2" for our sample) matches the seam at the top left and bottom right of your ruler
Once everything is in alignment, trim the two exposed edges.

Flip your block 180°. The two freshly cut edges are now even with the unfinished block measurements (3-1/2") on the left and bottom edges.
Again, the dashed 45° line on the ruler is directly over the seam running from top-right corner to bottom left.
When everything is just right, trim away the exposed excess fabric.

Repeat for the remaining three QST.
🧩Stitching your Crowning Glory quilt block together
Lay out your BWs and QSTs with the solid square in the center. Background fabric in the outside corners. Dark fabric in the QSTs towards the outside edges and center.

With RST, sew the units in each row together.
One seam between the BW and QST will nest. The other will not.
For the one that doesn't, in order to get a good match, use your fingernail to help get the seam lines into the proper position.
Pin diagonally through that seam line.
Pull back that corner to check the match.
Consider sewing this with a basting stitch. Checking to see if it meets your standards. When it does, sew with your usual stitch length.

Perfect paper pieced units and QSTs that are accurately trimmed go a long way to achieving pointy success.
All that quilty-goodness for simply being patient enough to sew on a line!

SAs are pressed away from the QSTs in all three rows.

Finally, with RST, sew the rows together. Your seams nest between rows.
One final visit to the ironing board.
Delighted with how this Crowning Glory turned out. It's even more vibrant in person.
But how could it be anything else with the combined forces of Tula and Kaffe?

A quick look-see from the backside to peek at how all those pressed seams fit together.

Did you catch it?
I failed to twirl the SA in the top QST. Somebody wasn't fully caffeinated! But I'm not telling.
The Royal Decree: Your Crowning Glory Achieved! 👑📜
Remember, every queen was once a princess, and every master quilter started with a single stitch. 🧵👸
This block is more than just a pretty face in your quilting kingdom—it's a symbol of your growth, creativity, and determination. From those first careful cuts to the final press, you've transformed simple shapes into a majestic masterpiece.
What's next for your regal creation? A quilt fit for a palace or a wall hanging to showcase your prowess? Whatever you choose, remember – in the realm of quilting, you now wear the crown. Long live your quilt! 👸🏰🎉
📌From humble pin to royal win!
➡️👑 Save this tutorial and start your journey to quilting nobility.

More related 8-pointed star quilt block patterns
There are several tutorials available to you on this website that start with an Ohio star as its base. Click on any of the images below to go straight to that tutorial.
Aunt Dinah and Twin Star may seem a little suspect.
But look closely. Those are 3-patch quarter square triangles on each side.
You'll find confirmation in Barbara Brackman's BlockBase+ (love the software). These blocks are listed in the '09 Equal Nine Patch' library in '03 Like Ohio Star'.


🔭 Looking for something truly stellar?
You've finished your star quilt block, and you're ready for more!
Browse our collection of 70 stellar star quilt block patterns. All have instructions and cutting charts in multiple sizes. If templates or paper piecing is used in the tutorial, there's a free download for you of those materials.

Eeny. Meenie. Miney. Moe.
Which star quilt block will you sew?
For a star-studded quilting experience, choose from 100+ bedazzling star quilt patterns—for beginners and beyond—click here.
For even MORE blocks to make… 🧩🎨
...visit our Free Quilt Block Pattern Library, with over 260+ blocks to choose from in multiple sizes.
Free downloads are included in all sizes for any blocks require paper piecing patterns or templates.
- Home
- Free Quilt Block Patterns
- Crowning Glory Quilt Block


Yummy fabrics
to drool over
Click any image below to see the full collection and find pricing and ordering information.


By Julie Baird
Copyright © 2008-2026 Generation Quilt Patterns, LLC
All Rights Reserved
Generations-quilt-patterns.com does not sell any personal information. (See Privacy Policy)