- Home
- Free Quilt Block Patterns
- Twin Star Quilt Block
Twinkle! Twinkle! Twin Star Quilt Block
From our Free Quilt Block Patterns Library
This post contains affiliate links, for which I receive compensation.
Skill Level: Beginner
The interwoven points of the Twin Star quilt block are much easier to make than they look.3-patch quarter square triangles make it happen.
Paper piecing is the key to perfect points and seam allowances. All you need to be able to do is stitch on a line.
Easy Peasy!
Let's get started!

Do you hate paper piecing?
Not to worry. If you prefer traditional piecing, there's a cutting chart and instructions for that at the bottom of this page.
📋 General Instructions

I like to use an open toe applique foot for paper piecing because there's nothing between my eyes and the stitching line.
I also prefer to prewash and then starch my quilt fabric. Starched fabric allows you to get a good fingerpress which helps you minimize trips back and forth to the iron.
Step 1: Download and print
If you prefer traditional piecing, click here to go directly to that cutting chart further down on this page and skip printing any patterns.
To download the free patterns, YOU must have Adobe installed on your computer. You can get it here if you don't already have it.
WHY ADOBE?
It's simple.
My patterns have dashed placement guides to make the
positioning of the first patch virtually foolproof. With Adobe, they
show exactly as intended—a dashed line. In other programs they render as
solid lines. That can make it confusing, especially for the beginning
quilter.
Choose your finished block size from the table below and print the corresponding pattern.
| Finished Block Size | # of copies to print | Link to PDF Pattern |
|---|---|---|
| 6” | 1 | 2" unit |
| 7-1/2” | 1 | 2-1/2" unit |
| 9” | 1 | 3" unit |
| 12” | 2 | 4" unit |
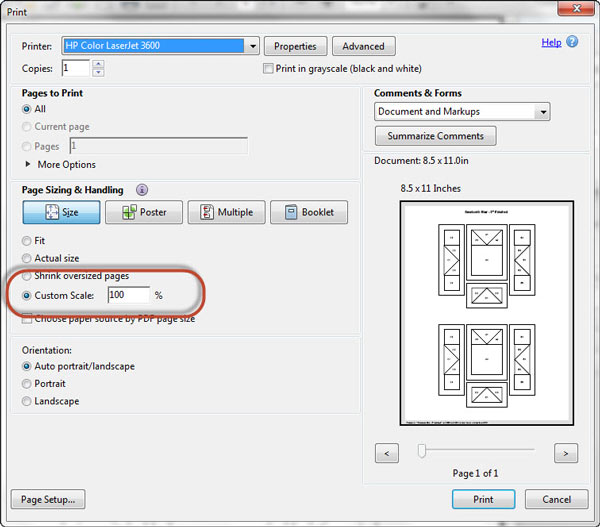
To print blocks at the correct size, under 'Page Sizing and
Handling' in Adobe's print menu, set 'Custom Scale' to 100%. Click here to see where it's at on the Print Menu page.
If you use something other than Adobe, you'll need to set 'Page Scaling' to 'None' to print at '100%'. Printing at 'Actual Size' tends to print blocks at weird sizes. (Don't know why, it just does.)
New quilt fabrics to tickle your fancy...
Click the images below to see the full collection. We share any commercial and/or free patterns that showcase them, too. (For inspiration, of course!)


Step 2: Cut patches for a Twin Star
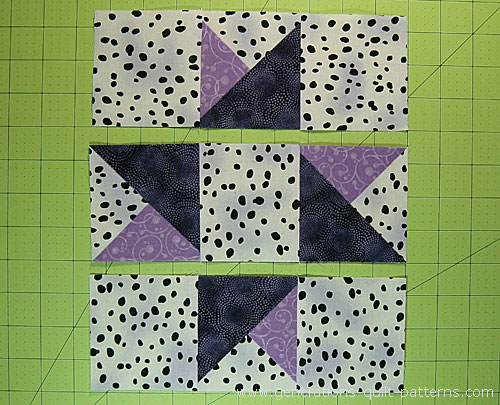
 Twin Star design
Sample Size: 9" finished / 9½" unfinished
Grid: 3x3
Design Type: Star, Even 9-patch
NOTE: If you prefer traditional piecing, click here to skip down to that information further down on this page.
You can use this same pattern and with different placement of the light and medium fabrics create a star that 'spins' in the opposite direction.

In this version, the #1 patch is a light background fabric. This fabric placement is what we'll use for our sample block in the following tutorial.

To make the Twin Star spin in the other direction, swap in a medium fabric for #1. Use a light for the #2 patch. (Click here to see how this changes the design.)
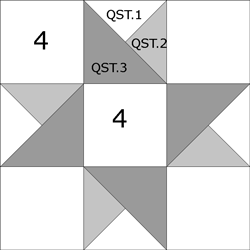
Don't forget to subcut Patches #QST.1-3.
 | Cutting Chart for a~ Paper Piecing ~ | ||||||
|---|---|---|---|---|---|---|---|
| Patch | Fabric | Qty | Finished Block Size | Sub Cut | |||
| 6'' | 7½'' | 9'' | 12'' | ||||
| QST.1 | Bac | 1 | 3¾'' x 3¾'' | 4¼'' x 4¼'' | 4¾'' x 4¾'' | 5¾'' x 5¾'' | |
| QST.2 | Light | 1 | 3¾'' x 3¾'' | 4¼'' x 4¼'' | 4¾'' x 4¾'' | 5¾'' x 5¾'' | |
| QST.3 | Dark | 2 | 3⅜'' x 3⅜'' | 3⅞'' x 3⅞'' | 4⅜'' x 4⅜'' | 5⅜'' x 5⅜'' | |
| 4 | Bac | 5 | 2½'' x 2½'' | 3'' x 3'' | 3½'' x 3½'' | 4½'' x 4½'' | --- |
| Unfinished Block Size | 6½'' | 8'' | 9½'' | 12½'' | na | ||
| Grid Size | 2'' | 2½'' | 3'' | 4'' | na | ||

Step 3: Assemble the quarter square triangle units
Make 4
NOTE: Since this is an asymmetrical design, the paper piecing pattern may look backwards to you.
Don't worry.
The printed side of the pattern is actually the backside of the block and it should look backwards.
General Sewing Machine Setup for Paperpiecing
- Reduce your stitch length to 16–20 stitches per inch (1.3-1.6 mm). This perforates the paper and stabilizes the seam when you remove the pattern. [Learn more about stitch length here.]
- Reduce your machine's speed or just plain slow down. Sew only as fast as you can stay on the stitching lines.
- Install an open toe appliqué foot (sometimes called an 'embroidery' or 'satin stitch' foot) if you have one (it's easier to see where you're stitching with one installed).
- Use a larger needle (90/14) if you have problems removing the pattern.
- If your machine has a needle stop up, use it. The stitching goes faster when you don't have to lift the presser foot with every seam.
- As you stitch each seam, start and stop a generous 1/4” before and after the solid stitching lines. ALWAYS. Future lines of stitching secure the ends.
After adding each patch, press the unit as it was sewn to set the seam and then open. The SA is automatically pressed towards the last patch added.
Before adding the next patch, take a look to make sure the one you just added covers the space plus seam allowance that it is supposed to.
Steam is optional and usually curls the pattern.
If that bothers you, don't use steam. Sometimes I do. Sometimes I don't.
It truly depends on my mood.
Remember, as you follow this paper piecing tutorial, the printed and the fabric sides of this block are mirror-images of each other.
At last!
Let's sew!
Cut out four QST patterns—cut just beyond the outside dashed line.
With a tiny bit of Elmer's Washable glue stick (goes on purple/dries clear) position QST.1, wrong side of the fabric to the unprinted side of the pattern.
 Use the dashed placement guides to make positioning this patch foolproof.
With RST, position QST.2 exactly on top of it.
 Match the edges of the QSTs.
Stitch, starting before the solid line begins and after it ends, on the line between the first two patches.
 Start and stop stitching at the arrows.
Press. If you've starched your fabric, you may be able to simply fingerpress this seam. (I did.)
Trim away this little thread tail, it'll be covered by the next patch.

With RST, align the long edge of QST.3 with the sewn patches.
 Don't bother trimming this thread tail just yet. We'll get it in the final trim.
Stitch on the line, starting and stopping past the outside dashed lines.
Press.
Trim the block to size by positioning the quarter inch line on your ruler with the solid black outline of the block. Trim. Repeat for the other three sides. This also trims away all the thread tails at the outside edge of our Twin Star quilt block.
Repeat for a total of 4.
Remove the paper.

The paper piecing is complete. From this point forward, return your stitch length to the one you regularly use for piecing and install your favorite 1/4" presser foot.
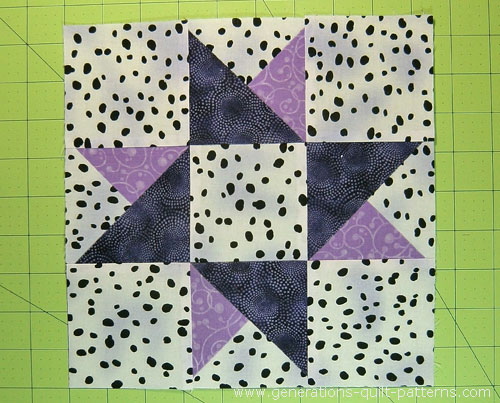
Step 4: Assemble the Twin Star quilt block
Arrange the units into the Twin Star design. The light, background patch is on the outside edge of our Twin Star block. The QSTs are rotated a quarter turn as you move clockwise around the block.

Stitch the rows together. Seams are pressed toward the solid squares.
And finally, stitch the rows together. Use pins to match the seams if needed.

Click here to see what your Twin Star quilt block looks like if you swapped the light and medium patches.
A Traditionally Pieced Twin Star Block
As promised, this is the cutting chart for a Twin Star quilt block with traditionally pieced QSTs.
The measurements in the table are exact. Personally, I prefer to use oversized patches and then after stitching, trim them to a perfect square. I add a 1/4" to each of the QST.1 thru QST.3 patches and then cut them.
 | Cutting Chart for a~ Traditional Piecing ~ | ||||||
|---|---|---|---|---|---|---|---|
| Patch | Fabric | Qty | Finished Block Size | Sub Cut | |||
| 6'' | 7½'' | 9'' | 12'' | ||||
| QST.1 | Bac | 1 | 3¼'' x 3¼'' | 3¾'' x 3¾'' | 4¼'' x 4¼'' | 5¼'' x 5¼'' | |
| QST.2 | Light | 1 | 3¼'' x 3¼'' | 3¾'' x 3¾'' | 4¼'' x 4¼'' | 5¼'' x 5¼'' | |
| QST.3 | Dark | 2 | 2⅞'' x 2⅞'' | 3⅜'' x 3⅜'' | 3⅞'' x 3⅞'' | 4⅞'' x 4⅞'' | |
| 4 | Bac | 5 | 2½'' x 2½'' | 3'' x 3'' | 3½'' x 3½'' | 4½'' x 4½'' | --- |
| Unfinished Block Size | 6½" | 8'' | 9½" | 12½'' | na | ||
| Grid Size | 2'' | 2½'' | 3'' | 4 '' | na | ||
After cutting, click here to go to Step 2: Assemble the units on the Double Pinwheel quilt block tutorial (this page will stay open underneath.)
Use this chart to check the accuracy of your units and trim your units to perfection.
QST Dimensions | ||
|---|---|---|
| Finished Block Size | Center Measurement | Trim QST to… |
| 6" | 1¼" | 2½" x 2½" |
| 7½'' | 1½" | 3" x 3" |
| 9" | 1¾" x 1¾" | 3½" x 3½" |
| 12 '' | 2¼" x 2¼" | 4½" x 4½" |
After completing your QSTs, return to this page with the 'Back' button on your browser bar and continue on with Step 4: Assemble your Twin Star quilt block on this page.
Enjoy!
More related 8-pointed star quilt block patterns
There are several tutorials available to you on this website that start with an Ohio star as its base. Click on any of the images below to go straight to that tutorial.
Aunt Dinah and Twin Star may seem a little suspect.
But look closely. Those are 3-patch quarter square triangles on each side.
You'll find confirmation in Barbara Brackman's BlockBase+ (love the software). These blocks are listed in the '09 Equal Nine Patch' library in '03 Like Ohio Star'.


🔭 Looking for something truly stellar?
You've finished your star quilt block, and you're ready for more!
Browse our collection of 70 stellar star quilt block patterns. All have instructions and cutting charts in multiple sizes. If templates or paper piecing is used in the tutorial, there's a free download for you of those materials.

Eeny. Meenie. Miney. Moe.
Which star quilt block will you sew?
For a star-studded quilting experience, choose from 100+ bedazzling star quilt patterns—for beginners and beyond—click here.
For even MORE blocks to make… 🧩🎨
...visit our Free Quilt Block Pattern Library, with over 260+ blocks to choose from in multiple sizes.
Free downloads are included in all sizes for any blocks require paper piecing patterns or templates.
- Home
- Free Quilt Block Patterns
- Twin Star Quilt Block


Nifty Notions


By Julie Baird
Copyright © 2008-2026 Generation Quilt Patterns, LLC
All Rights Reserved
Generations-quilt-patterns.com does not sell any personal information. (See Privacy Policy)