- Home
- Free Quilt Block Patterns
- Bouquet Quilt Block
Bouquet Quilt Block Tutorial: 7", 10½", 14" and 21" finished
A bouquet of flowers is like a hug and kiss, a reminder of love's tender bliss.
This post contains affiliate links, for which I receive compensation.
At first glance, our Bouquet quilt block looks like it's got some crazy piecing going on.
But on closer inspection, you see it's made mostly from units you use every day—half square triangles, squares, rectangles, and...
...perhaps one unit maybe not quite so familiar, a Corner Beam.
Don't worry.
You could use a specialty ruler—the 'Corner Beam' by Studio 180—to construct them. However, I'm a firm believer in the idea that you shouldn't have to shoot the lock off your wallet to try out a new quilt block pattern.
Paper piecing instructions, templates, and patterns are included for the Corner Beam units. Why not give this technique a try on a simple unit with two seams.
You'll love the perfection.
🧭Navigate through our Bouquet quilt block tutorial with ease!🔍
These handy links will help you find exactly what you need, faster than you can say "rotary cutter." Let's get this quilt party started! 🎉✂️
- Does quilting take a backseat today? Pin or book mark this idea for later.
Let's cut up and sew!
General Instructions
Several abbreviations are used on this page. They are:
- SA - seam allowance
- RST - right sides together
- HST - half square triangles
- CB - Corner Beam unit
- Bac - background fabric
A 1/4" SA is used through this tutorial.
I do prefer to starch my fabric with a 50/50 concentration of water to StaFlo Liquid Starch Concentrate.
It's easier to fingerpress starched fabrics, and the fabric itself is more stable to stitch, especially when we want a very pointy-point.
Pressing instructions are highlighted in yellow.
When pressing, first press the patches in the closed position just as they came off your sewing machine. This sets the seam, melding the fibers of the threads into the fibers of the fabric.
Then press the SA to the dark unless otherwise noted. Paper piecing SAs are always pressed toward the last patch added.
Download and print paper piecing pattern and template
You'll need the most current version of Adobe installed on your computer to download the pattern.
On the Adobe Print Menu page, under 'Page Size and Handling' set 'Custom Scale' to 100% before printing for accurate results. Click here to see what it looks like on the Print Menu page.
Choose your finished block size from the chart below and print the corresponding number of pages for a total of 4 Corner Beam units and one template shape.
Print Corner Beam | |||
|---|---|---|---|
| Pattern | Templates Print 1 copy | ||
| Finished Bouquet Block Size | # of Copies to Print | Corner Beam Finished Size | |
| 7" | 1 | 2" | 2" and 3" |
| 10½" | 1 | 3" | |
| 14" | 2 | 4" | 4" |
| 21" | 4 | 6" | 6" |
After printing, use the 1" square graphic on the printed page(s) to double check that your patterns printed at the correct size.
Click here to see what that looks like.

Not sure which paper to use?
Take a look at my review of several of the most popular brands available to us quilters on the market.
You want a super-easy paper to tear away—less stress on the stitches.
New quilt fabrics to tickle your fancy...
Click the images below to see the full collection. We share any commercial and/or free patterns that showcase them, too. (For inspiration, of course!)


Step 1: Cut patches for a Bouquet block
 Bouquet quilt block design
Sample Size: 10½" finished / 11" unfinished
Grid: 7x7
Attribution: Laura Wheeler
AKA: Saint Nicholas' Adventures (Old Chelsea Station)
Design Type: Uneven 9-patch, small center | Paper Piecing
Remember to label your patches. You use their numbers throughout the tutorial.
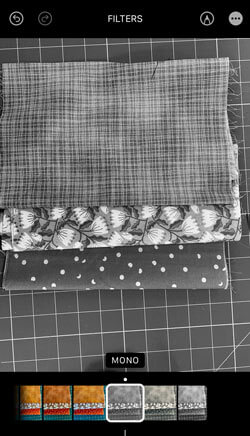
Does this ever happen to you? You find the perfect fabrics for your project, but couldn't quite decide which is the 'dark' and which is the 'medium' or 'light'.
What to do?
I took a picture with my phone and the edited it to a black and white...presto! It was easy to see that the burnt orange with the polka dot was the dark. The print is definitely the light.
 In black and white it's so much easier to see the value of each fabric
Easy Peasy. Lemon-squeezy!
 | Cutting Chart for a~ Paper & Traditional Piecing ~ | ||||||
|---|---|---|---|---|---|---|---|
| Patch | Fabric | Qty | Finished Block Size | Sub Cut | |||
| 7'' | 10½'' | 14'' | 21'' | ||||
| 1 | Bac | 1 | 4¼'' x 4¼'' | 5¼'' x 5¼'' | 6¼'' x 6¼'' | 8¼'' x 8¼'' | --- |
| 2 | Dark | 1 | 4¼'' x 4¼'' | 5¼'' x 5¼'' | 6¼'' x 6¼'' | 8¼'' x 8¼'' | --- |
| 3 | Medium | 8 | 1½'' x 1½'' | 2'' x 2'' | 2½'' x 2½'' | 3½'' x 3½'' | --- |
| 4 | Light | 5 | 1½'' x 1½'' | 2'' x 2'' | 2½'' x 2½'' | 3½'' x 3½'' | --- |
| 5 | Bac | 4 | 1½'' x 3½'' | 2'' x 5'' | 2½'' x 6½'' | 3½'' x 9½'' | --- |
| Beam | Light | 4 | 2¾'' x 2¾'' | 3¾'' x 3¾'' | 4¾'' x 4¾'' | 6¾'' x 6¾'' | yes |
| Corner, Corner.R | Dark | 4 | 2⅞'' x 3¼'' | 3⅜'' x 4¼'' | 3⅞'' x 5¼'' | 4⅞'' x 7¼'' | yes |
| Unfinished Block Size | 7½'' | 11'' | 14½'' | 21½'' | na | ||
| Grid Size | 1'' | 1½'' | 2'' | 3'' | na | ||
Subcutting the patches for the Corner Beam units
Stack your Corner rectangles together in pairs with RST.
The height of the rectangles should be along the sides, and the width should go across the top and bottom.
This orientation is important! When the rectangles are arranged this way, the angle we cut will be correct.

Line up all the edges, so it's a neat stack and, with a pencil, make a mark 5/8" in from the top left edge and 5/8" in from the bottom right edge.

You've now got four pairs of mirror-image Corner/Corner.R patches.
For the Beams, use the template that matches your chosen CB size. Cut right along the lines next to the corner angles. You don't need to cut as precisely along the diagonal side lines.
Stack the Beam squares with their edges lined up. Place the template on top, matching up the corners. Trim away any fabric that extends beyond the template.
 It doesn't matter if THESE squares are right side up or down.
Create the units for your Bouquet quilt block
We need to make a few adjustments to our sewing machine settings to paper piece.
- Reduce your stitch length to 16–20 stitches per inch (1.3-1.6 mm). This perforates the paper and stabilizes the seam when you remove the pattern. [Learn more about stitch length here.]
- Reduce your machine's speed or just plain slow down. Sew only as fast as you can AND stay on the solid stitching line.
- Install an open toe appliqué foot (sometimes called an 'embroidery' or 'satin stitch' foot) if you have one (it makes it easier to see where you're stitching).
- Use a larger needle (90/14) IF you have problems removing the pattern. Personally, I use an 80/12 Microtex Sharp for paper piecing without any issues.
Corner Beam Units (CB)
Make 4

Use a tiny dab of Elmer's Washable Glue Stick to hold the Beam patch, wrong side to the unprinted side of the paper pattern between the dashed placement lines.
 You can make out the shadow of the patch positioned correctly on the unprinted side of the pattern
With RST, line up the long, angled edge of either the Corner or Corner.R (it doesn't matter which one you stitch first) with the Beam. This triangle is oversized and extends well past the Beam patch.
 See how I wasn't terribly concerned about cutting on the line when I cut out the pattern. There's no points for perfection for that job!
Stitch on the solid line between the two patches, starting and ending past the outside dashed lines surrounding the block. (red arrows)

Press.
Position and stitch the remaining Corner or Corner.R in the same manner as the first.

Repeat for all four units.
Give them a good pressing.
At the cutting mat, align the 1/4" mark on your ruler with the solid line, and trim away the excess fabric. (It's easier to match the 1/4" on your ruler with the line than the edge of your ruler with the outside dashed line.)
Repeat for each side of all four CBs.
 The final side on this CB unit is trimmed
This trimming takes our CBs from 'hot mess' to perfection.
Every time!
 Hot mess (left) vs perfection (right)
All the outside edges are on straight of grain, just like any block you pieced with traditional methods.
The paper has served its purpose and can be removed now.

The paper piecing is complete. From this point forward, return your stitch length to the one you regularly use for piecing and install your favorite 1/4" presser foot.
HST
Make 8

We're using the 8-at-a-time method for making our HSTs.
With a pencil, mark a diagonal line from each pair of diagonal corners.
Install your favorite 1/4" presser foot and stitch 1/4" away from both sides of both lines.
Give the sewn squares a good press.
Next, we cut these stitched patches into 4 equal-size squares.
Find the Finished Block Size for your block in the chart below and its corresponding Center Measurement.
HST Dimensions | ||
|---|---|---|
| Finished Block Size | Center Measurement | Trim HST to… |
| 7" | 2⅛" | 1½" x 1½" |
| 10½" | 2⅝" | 2" x 2" |
| 14" | 3⅛" | 2½" x 2½" |
| 21" | 4⅛" | 3½" x 3½" |
For our 10½" finished Bouquet quilt block, the Center Measurement is 2-5/8". Line up that mark on your ruler with the edge of the #1/#2 (red arrow) and cut in half through the center.
 Here you can see the drawn diagonal lines and the stitching 1/4" from both sides of each.
Line up this same mark on your ruler with the bottom edge (red arrow) and cut in half through the center once more.

Finally, cut each square in half on the diagonal marked lines.
Voila! You've got 8 HST!

Press each with the SA toward the darker fabric.
Referring to the chart again, find the 'Trim HST to...' column that corresponds to your Finished Block Size and trim to perfection.
For our 10½" sample, that measurement is 2"x2".
Position the 45° line of your ruler on the seam, and trim away the first two sides not covered by the ruler.

Flip the HST 180°, align the cut edges with the 'Trim HST to...' size (remember that's 2"x2" for our sample block) and finish the trimming.

Repeat for all eight of your HSTS. The diagonal seams should cut the corners in half.

Your HSTs are ready for the next step.
Corners
Make 4

Before we complete the four corners for our Bouquet quilt block, we'll need to piece a couple of subunits together.
With RST, sew a #3 to a #4.
Press the SA towards #4.

Repeat for a total of four. (You'll have one extra #4 at this point. We'll use it when we assemble the block.)
With RST, add the light #1 side of an HST to the #3 side of #3/#4 for a total of four.
Press the SA toward #3 to reduce bulk.

Stitch a #1/#2 HST to a #3.
Press the SA toward the #3.
Repeat for a total of 4

Add these subunits to the CB as shown below.
 This looked a lot more difficult at the beginning, didn't it!
Press the SA toward the CB.
Add a #1/#2/#3/#4 to the adjacent side. Pay attention that the medium patches in the CB and the HSTs are in the correct position.

Press the SA again toward the CB.
Repeat for a total of four.
Putting our Bouquet quilt block together
All that's left is the easy stuff—as easy as making a simple nine-patch!
Arrange the pieced Corners and cut #5s and the remaining #4 into the Bouquet design. The #4 squares are toward the center.

With RST, and using pins as needed, stitch the units into rows.
The SA are pressed toward the #5s in all rows to minimize bulk.

Finally, stitch the rows together.
Give your creation a final press with these last SAs pressed to the center.
Consider using my favorite pressing technique for the flattest block you'll ever see—nothing special required!
Here is our finished Bouquet quilt block...

...and now from the backside to see how the SAs lay.

With the step-by-step instructions and free downloadable patterns, you can achieve stunning results with the Bouquet quilt block. Paper piecing helps ensure perfect points and precise piecing every time.
If you enjoyed making this floral quilt block, be sure to browse our library of free quilt block patterns to find your next endeavor.
With traditional piecing and paper piecing options, you're sure to discover a new favorite block to stitch up.
Happy quilting!
📌Seed now, bloom later!
Pin this Bouquet quilt block tutorial for a rainy day quilting project. Your fabric stash is waiting! 🌷

What about a different quilt block?
For a list of all the 260+ quilt block patterns on this site, start here.
If you know the name of the block, shorten your search by using these links:
Click here if you're looking for blocks with at least some paper piecing.
Click here if you're looking for the basic building blocks of quilting, i.e., Flying Geese, half square triangles, quarter square triangles, etc., along with several techniques to make each.
And finally, use these links to find blocks in these finished sizes:
- Home
- Free Quilt Block Patterns
- Bouquet Quilt Block


Yummy fabrics
to drool over
Click any image below to see the full collection and find pricing and ordering information.


By Julie Baird
Copyright © 2008-2026 Generation Quilt Patterns, LLC
All Rights Reserved
Generations-quilt-patterns.com does not sell any personal information. (See Privacy Policy)