- Home
- Free Quilt Block Patterns
- Art Square Quilt Block
Make an Art Square Quilt Block
From our Free Quilt Block Patterns Library
This post contains affiliate links for which I receive compensation
Skill Level: Confident Beginner
The Art Square quilt block looks incredibly simple to make. Just 3 shapes to cut.
You'll learn two different methods (one no-cost, one some-cost) to cut the center, on-point square perfectly.
You'll also see a neat way to use this block to showcase a collection of existing blocks. Looks complicated, but isn't—one of my favorite things.
Let's get started!
 Pin it for later!
📋 General Instructions

All seam allowances (SA) are 1/4". It helps to take this simple Sewing Test to make sure your's are perfect.
Starching your quilt fabric ahead of time will help tame the bias edges on the corner units. I like to use a 50/50 mix of Sta Flo Liquid Starch Concentrate and water.
Other quilters like the convenience of Best Press.
Either way I find that fabric that is starched before cutting is easier to cut and more accurate to sew on because it has less give in it.
New quilt fabrics to tickle your fancy...
Click the images below to see the full collection. We share any commercial and/or free patterns that showcase them, too. (For inspiration, of course!)


Step 1: Cutting an Art Square quilt block

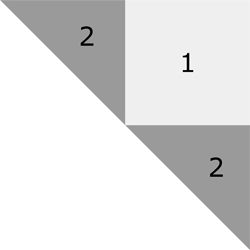
Sample Size: 6" finished / 6½" unfinished
Grid: 4x4
Design Type: 4-Patch
Attributed to: Ladies Art Company
AKA: Dottie's Choice (Farm Journal), or Village Square (Nancy Cabot)
Be sure that there is enough contrast between your fabrics.
While I'm happy with the sample block in person, the photos of it don't have enough contrast between my two fabric choices. (Another good reason to make a sample block before diving head first into a new quilt!)
The math for squares set on-point in blocks (like the #3 patch) can get a little wonky.
Many designers will have you cut the them 'just a bit bigger than' a standard rotary cut size or cut it '6-3/16 inch square'. I don't know about you, but my ruler is marked in 1/8" increments...not a 16th in sight.
Since we go to the trouble of fine-tuning our quarter inch seam, it seems kind of silly to me to then have you 'guesstimate' the size to cut the patch.
Therefore, I offer two alternative ways to accurately cut #3. The first is with the On-Point Ruler by Donna Lynn Thomas. The second is using a template which you can download below under the chart.
All the measurements in the chart below are for squares, i.e. 1-7/8" means cut a patch 1-7/8" x 1-7/8".
 | Cutting Chart for an~Traditional Piecing ~ | ||||||
|---|---|---|---|---|---|---|---|
| Patch | Fabric | Qty | Finished Block Size | ||||
| 4" | 5" | 6" | 8" | ||||
| 1 | L | 4 | 1-1/2” | 1-3/4” | 2” | 2-1/2” | na |
| 2 | D | 4 | 1-7/8” | 2-1/8” | 2-3/8” | 2-7/8” | |
| 3** | L | 1 | 4”** | 5”** | 6”** | 8”** | na |
| Unfinished Block Size | 4 1/2" | 5 1/2" | 6 1/2" | 8 1/2" | -- | ||
| Grid Size | 1" | 1 1/4" | 1 1/2" | 2" | -- | ||
**Cut this patch with the On-Point Ruler. If you don't have this ruler, click here to print templates. Use Adobe to print the templates, making sure to set 'Custom Scaling' to 100%. Use the 1" square graphic on the page to confirm the templates printed correctly. Click here for more help with printing and working with templates. | |||||||

To use the On-Point ruler, line up the measurement with the cut edge of the fabric as shown below.
 Using the On-Point Ruler to cut #3. For our 6" sample block, the center square is cut 6" with this specially created ruler.
Step 2: Assemble the corner units
Make 4
With right sides together (RST) align the edges of a #2 triangle to the #1 patch.
Stitch starting from the even side of the pair of patches—that way your machine won't 'eat' the points.
 Press SA in the direction of the arrows.
For accurate seams, use a stiletto (or in my case my handy seam ripper) to guide the points of the triangle straight through the machine.
If left unguided, they tend to pull to one side or the other.
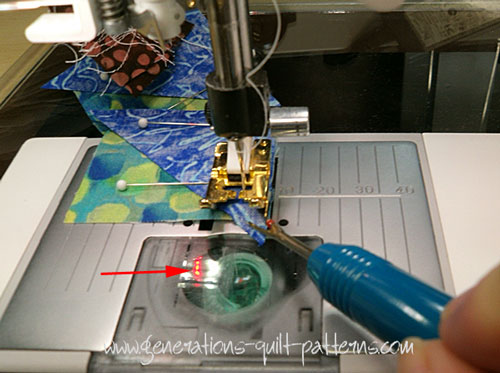 You can see the reflection of my fancy-dancy machine lights at the arrow. (Just thought you'd like to know you weren't seeing things!)
This first #2 is just a smidge longer than the side of the #1. Don't worry—that's how it's supposed to be.
Add the second #2 to the adjacent side.
 Press in the direction of the arrows.
Again, start your stitching from the even side of the group of patches. Your stitching line should fall exactly in the valley of where the patches meet as shown below.
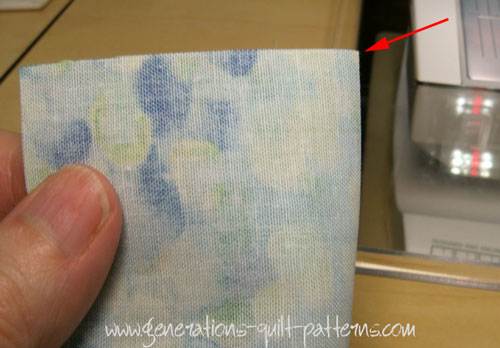
 The arrow points to the valley between the patches.
In this closeup of the backside of this corner unit, you can see how the first #2 extends a bit past the edge of #1 (lower right side of the light square) and how the second line of stitching bisects the valley between the patches (red arrow).

After pressing, the diagonal edge of this unit should be straight.
Repeat for the three remaining #1 squares.
Step 3: Assemble your Art Square quilt block
Arrange the patches as shown below.

To find the center of each side of the #3 square, fold the square in half and fingerpress a crease (red arrow).
With RST match this crease to the point of the #1 square (arrows). The points of the #2s are longer than #3. I prefer to pin them to help keep everything lined up.

Use your stiletto (or seam ripper) to help guide those triangle points through your machine.
Stitch. Press SA toward #3.
Add the two remaining corner units in the same manner.
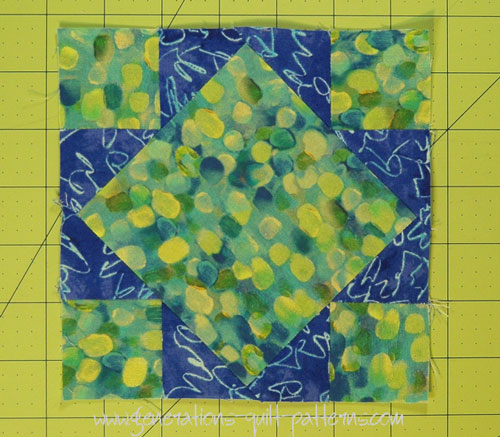
This is your finished Art Square Quilt Block!
 Art Square quilt block ready for a quilt!
Using the Art Square quilt block in a quilt
 Swap the lights and darks and add a fabric
Part of my system as I write these tutorials is to plop the blocks into several standard settings to see if it doesn't get the old creative juices flowing.
One of my 'go-to' placements is to use the block as a cornerstone with sashing.
This one, I think, is a winner!
The lights and darks of the original Art Square are switched. The #1 and #3 patches are now two different fabrics/colors.
Now plop the block into a cornerstone and this is the result.
 Perfect for showing off a collection of blocks or applique!
To complete the design, you'll need sashing like this where the blue strips are 1 grid unit wide plus 1/2" and the cream strip is 2 grid units wide plus 1/2".
 Sasing for our Art Square cornerstones
How will you use YOUR Art Square quilt blocks?
What about a different quilt block?
For a list of all the 260+ quilt block patterns on this site, start here.
If you know the name of the block, shorten your search by using these links:
Click here if you're looking for blocks with at least some paper piecing.
Click here if you're looking for the basic building blocks of quilting, i.e., Flying Geese, half square triangles, quarter square triangles, etc., along with several techniques to make each.
And finally, use these links to find blocks in these finished sizes:


Yummy fabrics
to drool over
Click any image below to see the full collection and find pricing and ordering information.


By Julie Baird
Copyright © 2008-2026 Generation Quilt Patterns, LLC
All Rights Reserved
Generations-quilt-patterns.com does not sell any personal information. (See Privacy Policy)