- Home
- Free Quilt Block Patterns
- Virginia Reel Quilt Block
Virginia Reel Quilt Block Instructions
From our Free Quilt Block Patterns Library
This post contains affiliate links, for which I receive compensation.
Skill Level: Confident Beginner
The Virginia Reel quilt block is a dynamic, whirling block made from just two fabrics.
It's made entirely of Arrowhead quilt blocks (aka pairs of Flying Geese). However, to simplify the sewing and save step or two, we will stitch it on the same foundation patterns as the Dutchman's Puzzle block, but use difference color placement to create the patchwork design.
Paperpiecing not only ensures perfect points, but also controls the directions of the seam allowances. In the center your seams will automatically nest which makes matching points a breeze.

This block is known by a slew of other names that include:
- Zig Zag
- Winding Blades
- Indian Emblem
- Battle Ax of Thor
- Chinese 10,000 Perfections
- Devil's Dark Horse
- Devil's Puzzle
- Winding Blades
- Whirligig
- Favorite of the Peruvians
- Flyfoot
- Heart's Seal
- Indian Emblem
- Mound Builders
- Pure Symbol of Right Doctrine
- Spider
- Wind Power of the Osages
It's time to do-si-do and start piecing!
For another Virginia-themed quilt block design...

May I suggest the Virginia quilt block?
Instructions for this 'stubby' Sawtooth star variation are found here, and include free (of course) downloads of the
- Paper piecing patterns,
- Cutting chart and
- A coloring or fabric planning page.
Virginia isn't just for lovers, it's for quilters, too!
When you are instructed to press, first press the pieced unit flat to set the seam. Then open the patch, pressing from the front. You may want to reduce or eliminate the use of steam for pressing these paper pieced blocks. Steam tends to curl the paper. If you don't mind a little curl and like steam, then by all means, use it!
Click here for a quick review of our favorite technique to getting the flattest quilt blocks you'll ever see. Yes-siree! It's works just as well for paper pieced blocks.
I am an advocate of using starch during the piecing process. You can make your own or purchase pre-mixed.
New quilt fabrics to tickle your fancy...
Click the images below to see the full collection. We share any commercial and/or free patterns that showcase them, too. (For inspiration, of course!)


Step 1: Choose the size, cut the patches, print the pattern
 Virginia Reel
Sample Size: 5" finished / 5½" unfinished
Grid: 4x4
Attribution: Workbasket
AKA: Zig Zag (Comfort)
Design Type: Pinwheel, 4-patch
I like to precut for paper piecing, especially if I'm making multiples of a block. This is to make sure that there is straight of grain around the outside edge for stability.
These patches are over-sized to make it easy to position them and minimize ripping.
Print the foundation pattern
Our Virginia Reel quilt block uses the Dutchman's Puzzle foundation pattern.
Choose the size you want from the chart below (see row highlighted in yellow).
To open and print it you need the Adobe Reader installed on your computer. Click here if you need it (a new window will open, so you can download it without leaving this page).
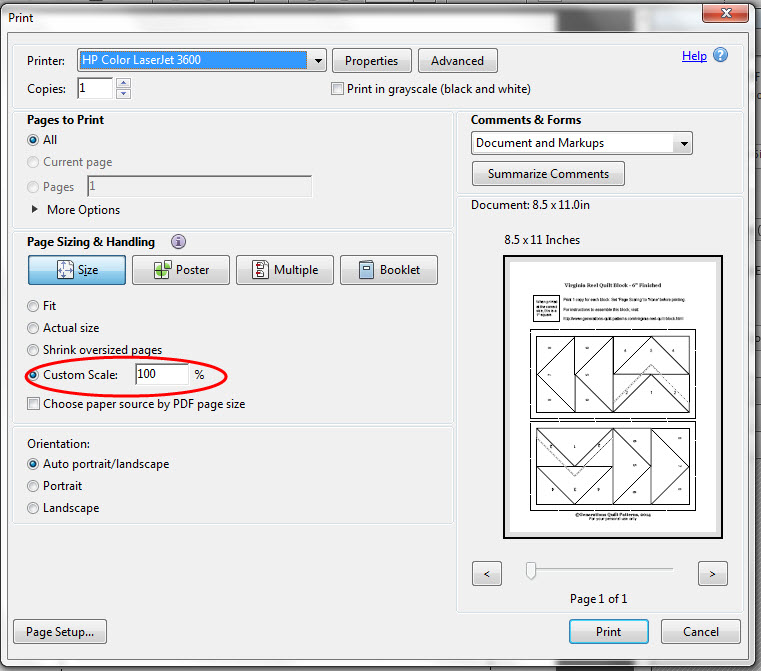
To print, open the downloaded file, and select the "Print" option.
In order to print blocks at the correct size, under 'Page Sizing and Handling'in the Adobe print menu, set 'Custom Scale' to 100%.
Click here to see what it looks like on the Print Menu page.
After printing, measure the 1" square to confirm the page is printed at the correct size.
All the dimensions in the chart below are for squares, i.e. for a 6"
finished block, for Patches #1 and #5 you'll need one 4-5/8" x 4-5/8"
square cut twice diagonally.
 |
Cutting Chart for a~ Paper Piecing ~ | |||||
|---|---|---|---|---|---|---|
| Patch | Fabric | Qty | Finished Block Size | Sub Cut | ||
| 4” | 5” | 6” | ||||
| 1, 5 | Background | 1 | 3-5/8” | 4-1/8” | 4-5/8” | |
| 3, 7 | A | 1 | 3-5/8” | 4-1/8” | 4-5/8” | |
| 2, 6 | A | 4 | 2-3/8” | 2-5/8” | 2-7/8” | |
| 4, 8 | Background | 4 | 2-3/8” | 2-5/8” | 2-7/8” | |
| Print Dutchman's Puzzle units | 4" | 5" | 6" | -- | ||
| Trim unit after stitching to... | 2-1/2” x 4-1/2” | 3” x 5-1/2” | 3-1/2” x 6-1/2” | -- | ||
| Unfinished Virginia Reel quilt block dimensions | 4-1/2” x 4-1/2” | 5-1/2” x 5-1/2” | 6-1/2” x 6-1/2” | -- | ||

Step 2: Assemble the Virginia Reel quilt block units
Cut the two units from the page you downloaded in Step 1.
Trim just outside the dashed lines—there's no need to make the effort to cut exactly on them as the last trimming makes everything nice and neat and trims off most of the thread tails, too.
As a simple reminder, I've put a red mark on all #2, #3, #6 and #7 patches to indicate which ones use Fabric A.
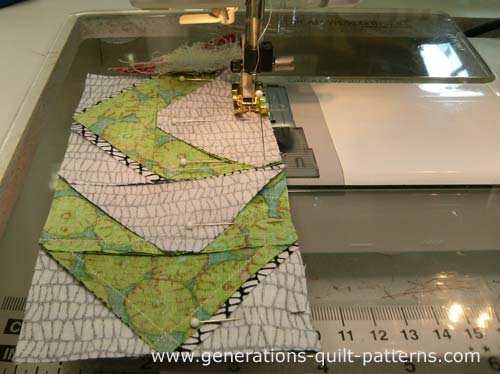
I use a dab of Elmer's Glue Stick—the one that goes on purple and dries clear—to position #1 (background) on the unprinted side of unit as shown below. Use the dashed lines for easy placement.

With right sides together, align the long bias edge of a #2 (Fabric A) triangle with either the left or right side of #1.

Helpful Hint
It doesn't matter which side you sew first, so both are labeled #2.
If you are making a bunch of these blocks, try to be consistent with which side you add to first...it just makes stitching them more efficient.
From the printed side, stitch on the line starting and ending about a quarter inch before and after it. There is no need to backstitch. Future lines of stitching will secure these stitches.
Press.
Repeat for the second #2 triangle (Fabric A).
Press. Your unit looks like this.

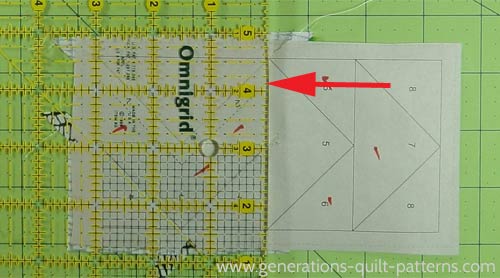
With RST, align #3 (Fabric A) so that it extends approximately 1/4" past the stitching line. In the photo below you can just make out its shadow.(red arrows)
Note, too, that its points are visible past the edges of the pattern. Use those points to eyeball placement.
Stitch from the printed side, starting and stopping past the outside dashed lines.

Use a scissor to trim this SA to approximately a 1/4".

Press.
Continue in the same manner, adding the #4 (Background) triangles to each side of #3.
At this point you may need to grade the seam allowances so that Fabric A doesn't shadow through to the top of the block. I have used scissors to trim the seam allowance back.
When we added Patch #3, we eyeballed its placement. The other alternative is to trim the SA first and then position the patch. This is how it's done.
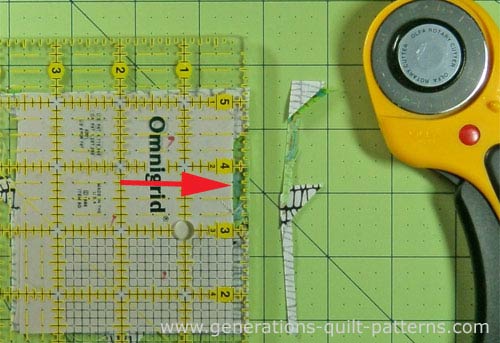
Align the edge of the ruler with the solid line.
Use your fingernail to crease the paper along the ruler.
You will have to pull some of the stitches away from the foundation...that's normal. If you rip the paper too much just use a bit of Scotch Brand Magic Tape to mend it.
Then fold the paper back on itself along the crease and re-align the 1/4" mark with this fold line. Cut the excess with your rotary cutter. This is now the placement line for #5.
I find that if I'm making just a block or two, I'll use this technique to establish the seam allowances. If I'm making oodles of the same block, I'll just eyeball the placement and trim with my scissors (as we did with Patch #3 above).
The choice is YOURS!
What you are after is a technique that gives you a good result without a lot of extra work. For me that 'extra work' is ripping out patches that don't quite cover the intended space. For others the 'extra work' is pulling out the ruler and cutter everytime there's a new SA. Again, you get to choose what is best for YOU!
Now match the long cut edge of #5 with this cut edge.
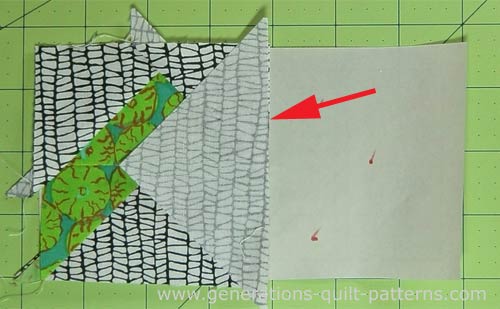
Stitch and press.
Add #6 (Fabric A) triangles.
Press.
Add #7 (Fabric A), again using its points to position it.
Press.
And finally, add the final #8 patches. Again, grade the seam allowance of the darker fabric if it might shadow through to the top of your block.
Press.
Repeat the process for the second unit.
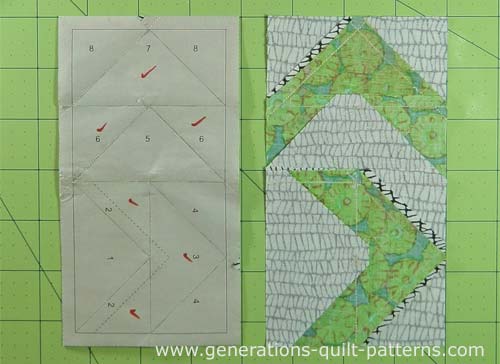
Trim the units to size by placing the 1/4" mark of the ruler on the solid outside line of the block and trim. Repeat for all the sides of each unit.
Clip any thread tails that remain.
The trimmed units look like this.
Remove the paper pattern and press.
Step 3: Assemble the Virginia Reel quilt block
Lay out the two pieced units to insure they are oriented correctly—it's easy to mistakenly swap them around. The 'arrows' point their way around the block in a clockwise circle.
Match the centers. I like to use pins to hold everything
in place.
Stitch with a quarter inch seam allowance.
With one final pressing, this is your finished Virginia Reel quilt block from the front...

...and from the back. You can see where the seam allowances were graded to reduce the chance of the darker material showing through.

Same name, different block...
Utterly different blocks can carry the same name, and the Virginia Reel quilt block is no different. Each of the ones below is also known as the Virginia Reel quilt block. Its other names are listed, too.

AKA: Pig's Tail

AKA: Rolling Star, Brunswick Star, Chained Star, Cross and Crown, Rolling Stone, Morning Star and Mother's Favorite Star

AKA: Tangled Lines
What about a different quilt block?
For a list of all the 260+ quilt block patterns on this site, start here.
If you know the name of the block, shorten your search by using these links:
Click here if you're looking for blocks with at least some paper piecing.
Click here if you're looking for the basic building blocks of quilting, i.e., Flying Geese, half square triangles, quarter square triangles, etc., along with several techniques to make each.
And finally, use these links to find blocks in these finished sizes:
- Home
- Free Quilt Block Patterns
- Virginia Reel Quilt Block


Yummy fabrics
to drool over
Click any image below to see the full collection and find pricing and ordering information.


By Julie Baird
Copyright © 2008-2026 Generation Quilt Patterns, LLC
All Rights Reserved
Generations-quilt-patterns.com does not sell any personal information. (See Privacy Policy)