- Home
- Free Quilt Block Patterns
- Virginia Quilt Block
Uncover the Beauty of the Virginia Quilt Block: A Step-by-Step Guide
Virginia is for (Quilt) Lovers: Stitch Your Heart Out! 💖🧵
This post contains affiliate links, for which I receive compensation.
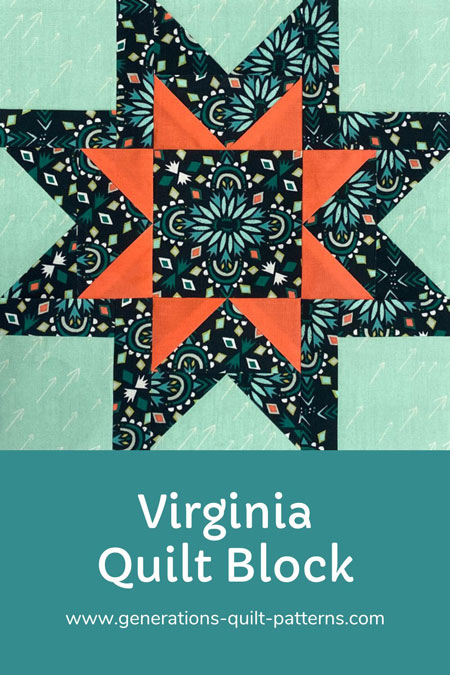
Instead of calling it the Virginia quilt block, perhaps it should be called the 'stubby star' quilt block. <cracks myself up!> You've got all the pointy goodness of a Sawtooth Star in the center, but none of the points to match at the edges.
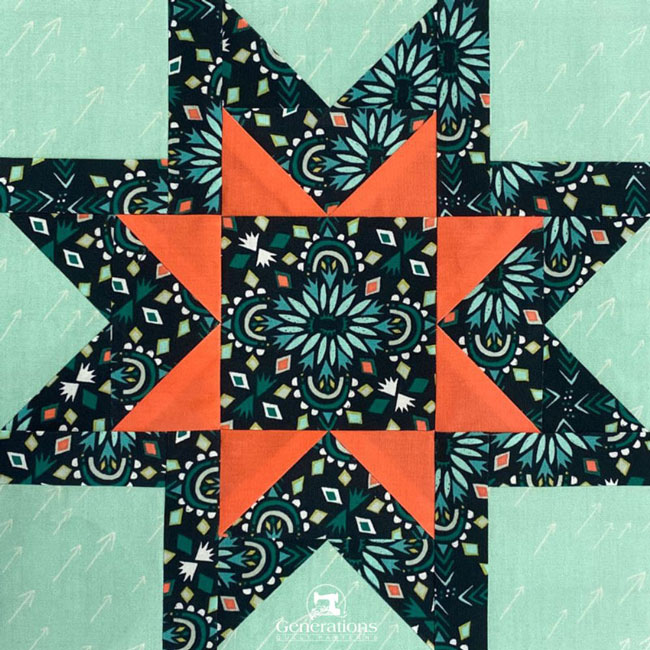 The Virginia quilt block stitched up in
Art Gallery Fabrics' Onwards and Upwards by Jessica Swift
If you've no time to quilt now, save this for later!
Stacked pairs of Flying Geese are quick and easy to stitch with paper piecing,
But if the idea of paper piecing makes you vomit in your mouth a bit—don't worry, I've got you covered.
Directions for making the Flying Geese 4-at-a-time are also included if you'd rather stick pins in your eyes than paper piece.
🧭 Ready to navigate this tutorial like Lewis and Clark explored the Louisiana Purchase?
Use these handy anchor links to chart your course through our Virginia quilt block adventure. No compass required!
- Too busy for quilting today? Pin or bookmark this for later.
The tools may be simple, but the results are sublime—follow along in this Virginia quilt block tutorial and see how!
📋General Instructions
This tutorial contains several common abbreviations. They are:
- SA—seam allowance
- RST—right sides together
- FG—Flying Geese
1/4" SA are used through this tutorial.
Highlighted in yellow, pressing instructions are easy to spot.
To press, first press the patches in the closed position as they came off your sewing machine. This sets the seam, melding the fibers of the threads into the fibers of the fabric.
Then press the SA to the dark unless otherwise noted.
Download and print the paper piecing pattern for the Flying Geese
NOTE: If you want to use traditional piecing techniques only, then SKIP this step.
You'll need the most current version of Adobe installed on your computer to download the pattern.
On the Adobe Print Menu page, under 'Page Size and Handling' set 'Custom Scale' to 100% before printing for accurate results. Click here to see what it looks like on the Print Menu page.
Choose your finished block size from the chart below and print the corresponding number of pages for a total of 4 FG Pairs.
Print the Paper Piecing Patterns | ||
|---|---|---|
| Finished Block Size | # of copies to print | Finished Unit Size |
| 9" | 1 | 3" |
| 12" | 2 | 4" |
| 15" | 4 | 5" |
After printing, use the 1" square graphic on the printed page(s) to double check that your patterns printed at the correct size.

Not sure which paper to use?
Take a look at my review of several of the most popular brands available to us quilters on the market.
You want a super-easy paper to tear away—less stress on the stitches.
New quilt fabrics to tickle your fancy...
Click the images below to see the full collection. We share any commercial and/or free patterns that showcase them, too. (For inspiration, of course!)
✂️Cutting patches for a Virginia quilt block
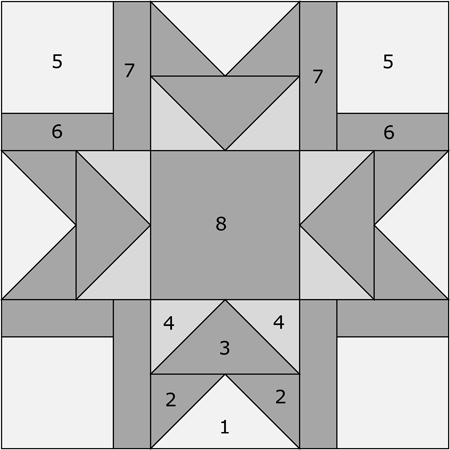 Virginia patchwork design
Sample Block Size: 9" finished / 9½" unfinished
Grid: 12x12
Attribution: Hearth & Home
AKA: Morning Star (Ladies Art Company) or Rosebud (Nancy Cabot) - click either name for another block tutorial that goes by that name
Design Type: Even 9-patch | Star
Please label all your patches. We refer to their numbers throughout this tutorial.
I used Art Gallery Fabrics for this sample. The pale green background and the dark print are from their Onwards and Upwards collection. The solid orange for the star points is one of their solids.
These fabrics have a higher thread count than your regular quilting cotton...a much finer fabric...closer to a batik. I LOVE working with Art Gallery Fabrics!
And, if you wondered...
Yes. I fussy cut the center patch...on purpose. :)
Paper piecing technique
To print a copy of the block design and blue cutting chart to use at your cutting table, click here.
 | Cutting Chart for a~ Paper PLUS Traditional Piecing ~ | |||||
|---|---|---|---|---|---|---|
| Patch | Fabric | Qty | Finished Block Size | Sub Cut | ||
| 9'' | 12'' | 15'' | ||||
| 1 | Bac | 1 | 4⅝'' x 4⅝'' | 5⅝'' x 5⅝'' | 6⅝'' x 6⅝'' | |
| 2 | Dark | 4 | 2⅞'' x 2⅞'' | 3⅜'' x 3⅜'' | 3⅞'' x 3⅞'' | |
| 3 | Dark | 1 | 4⅝'' x 4⅝'' | 5⅝'' x 5⅝'' | 6⅝'' x 6⅝'' | |
| 4 | Medium | 4 | 2⅞'' x 2⅞'' | 3⅜'' x 3⅜'' | 3⅞'' x 3⅞'' | |
| 5 | Bac | 4 | 2¾'' x 2¾'' | 3½'' x 3½'' | 4¼'' x 4¼'' | --- |
| 6 | Dark | 4 | 1¼'' x 2¾'' | 1½'' x 3½'' | 1¾'' x 4¼'' | --- |
| 7 | Dark | 4 | 1¼'' x 3½'' | 1½'' x 4½'' | 1¾'' x 5½'' | --- |
| 8 | Dark | 1 | 3½'' x 3½'' | 4½'' x 4½'' | 5½'' x 5½'' | --- |
| Unfinished Block Size | 9½'' | 12½'' | 15½'' | na | ||
| Grid Size | ¾" | 1'' | 1¼'' | na | ||
Traditional piecing techniques
There's no subcutting for any of these patches.
 | Cutting Chart for a~ Traditional Piecing ~ | ||||
|---|---|---|---|---|---|
| Patch | Fabric | Qty | Finished Block Size | ||
| 9'' | 12'' | 15'' | |||
| 1 | Bac | 1 | 4½'' x 4½'' | 5½'' x 5½'' | 6½'' x 6½'' |
| 2 | Dark | 4 | 2¾'' x 2¾'' | 3¼'' x 3¼'' | 3¾'' x 3¾'' |
| 3 | Dark | 1 | 4½'' x 4½'' | 5½'' x 5½'' | 6½'' x 6½'' |
| 4 | Medium | 4 | 2¾'' x 2¾'' | 3¼'' x 3¼'' | 3¾'' x 3¾'' |
| 5 | Bac | 4 | 2¾'' x 2¾'' | 3½'' x 3½'' | 4¼'' x 4¼'' |
| 6 | Dark | 4 | 1¼'' x 2¾'' | 1½'' x 3½'' | 1¾'' x 4¼'' |
| 7 | Dark | 4 | 1¼'' x 3½'' | 1½'' x 4½'' | 1¾'' x 5½'' |
| 8 | Dark | 1 | 3½'' x 3½'' | 4½'' x 4½'' | 5½'' x 5½'' |
| Unfinished Block Size | 9½'' | 12½'' | 15½'' | ||
| Grid Size | ¾" | 1'' | 1¼'' | ||
🪡Stitch the units for our Virginia quilt block
Corner Units
Make 2 of each unit OR 4 of only one unit below
Since I was using a directional print (the green background has arrows pointing to the upper right) and wanted to keep the print moving in the same direction, I chose this construction layout.
YOU may decide to piece four units all the same way, and then simply rotate the corners so that the dark #6 and #7 patches are toward the center.
Either method works! Do what works best for YOU with the fabrics in YOUR block.
Patch layout for directional fabrics
The direction of the print is the same in all patches.
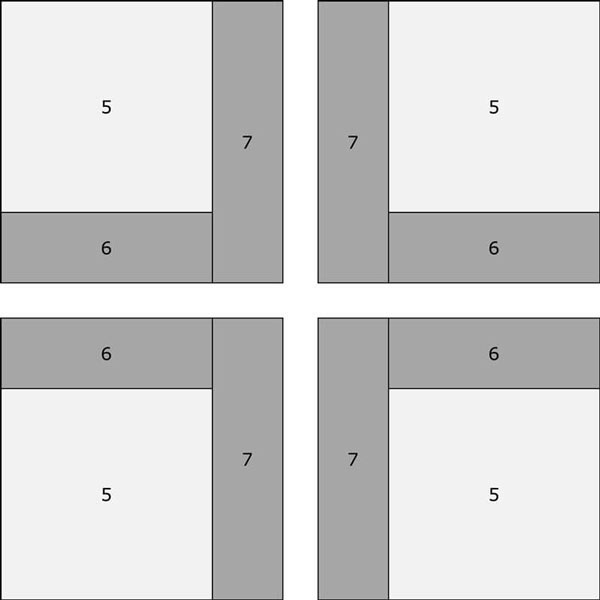 Layout of patches for Corner units using #5, #6, and #7 for directional fabrics
Patch layout for non-directional fabrics
The print has no identifiable direction so all the units can be pieced the same way.
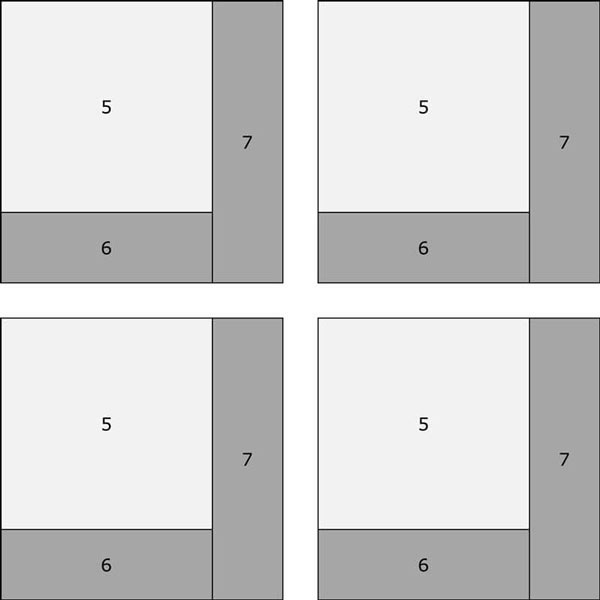 Layout of patches for Corner units using #5, #6, and #7 for non-directional fabrics
With RST, sew a #6 to #5.
Press away from #5.
With RST, sew a #7 to #5/#6, pressing away from #5 again.
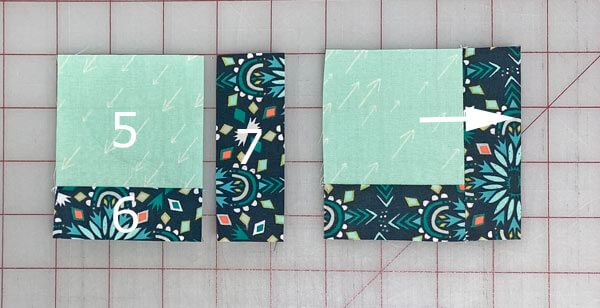
Check your accuracy before moving on to the following units. These are the edge-to-edge measurements for each of the finished block sizes:
- 9" - 3½" x 3½"
- 12" - 4½" x 4½"
- 15" - 5½" x 5½"
Flying Geese Pairs
Make 4
Anytime a pattern calls for pairs of Flying Geese, my go-to method is paper piecing. No specialty rulers required. It's easier to create perfect points, and there's less trimming.
These first instructions are for paper piecing these units.
If you prefer to use a traditional piecing technique AND you cut your patches from the green cutting chart above, CLICK HERE, The link takes you further down in the instructions for that traditional piecing information using the 4-at-a-time FG technique.
Paper Piecing Pairs of FG
Make 4
Use a small dot of Elmer's Washable Glue Stick to glue the #1 to the unprinted side of the pattern. The dashed guidelines make accurate positioning a cinch.
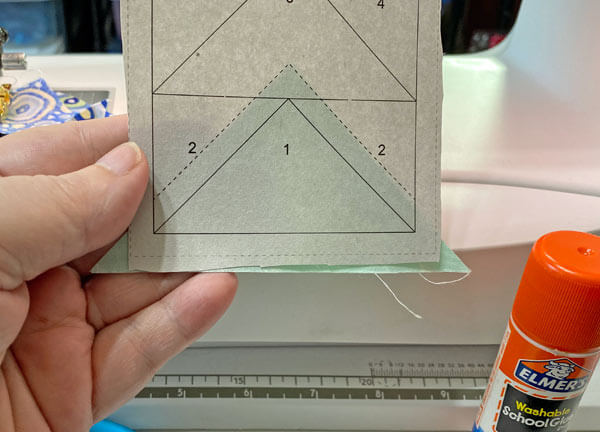
Repeat this gluing for all four units, so you can put the glue stick away.
We need to make a few adjustments to our sewing machine settings to paper piece.
- Reduce your stitch length to 16–20 stitches per inch (1.3-1.6 mm). This perforates the paper and stabilizes the seam when you remove the pattern. [Learn more about stitch length here.]
- Reduce your machine's speed or just plain slow down. Sew only as fast as you can AND stay on the solid stitching line.
- Install an open toe appliqué foot (sometimes called an 'embroidery' or 'satin stitch' foot) if you have one (it makes it easier to see where you're stitching).
- Use a larger needle (90/14) IF you have problems removing the pattern. Personally, I use an 80/12 Microtex Sharp for paper piecing without any issues.
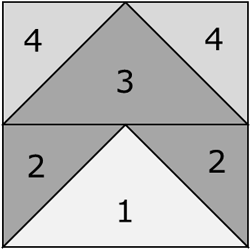
With RST, layer the long edge of a #2 with one short edge of #1.
While it doesn't matter which side you sew first, it does help to be consistent, i.e., always start on the left side, OR always start on the right.
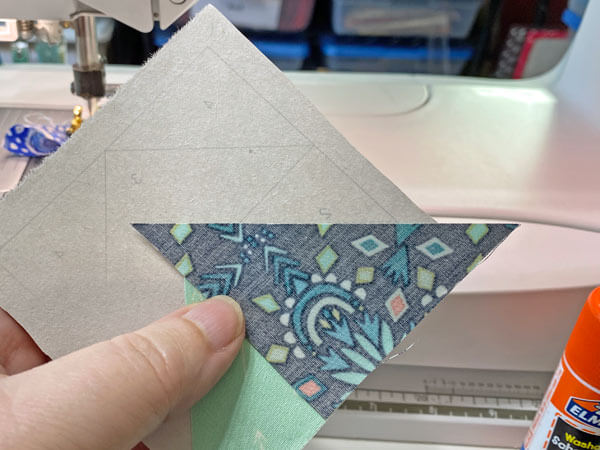 The bottom point of the #2 patch (darker fabric) is opposite the corner on the paper pattern
Sew on the solid line between #1 and #2, starting and ending your stitches a good 1/4" before and after the line.
After adding the first #2, press.
Repeat for the second #2 as shown below. Press.
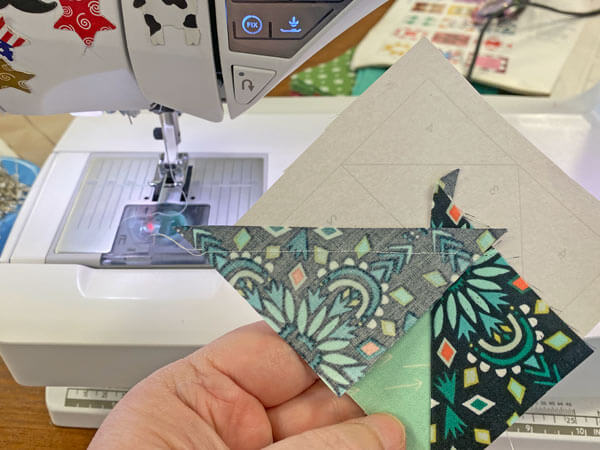
Here you can see how I've stitched a generous 1/4" past both ends of the two solid stitching lines.
Sometimes a stitch or two will pull out before the block is assembled. Those extra stitches keep your seams secure.
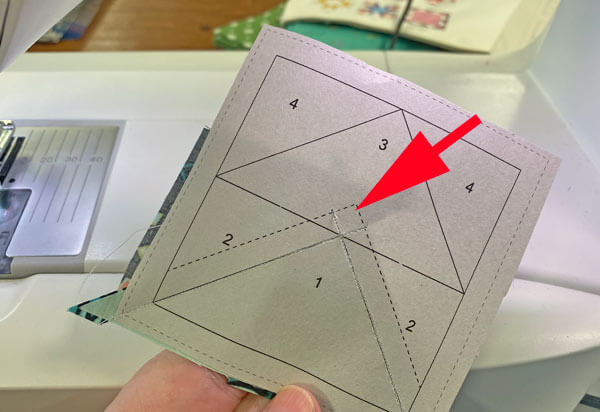
Position the edge of your ruler with the solid line between the #2s and #3. Fold the pattern back on itself on this line.
You'll have to pull the paper away from the stitches a bit—the paper may rip. This is completely normal.
If it rips too much and distorts the pattern, use a bit of Scotch Brand® Magic Tape to repair it from the printed side. (Don't iron on the tape, it'll crud up your iron.)
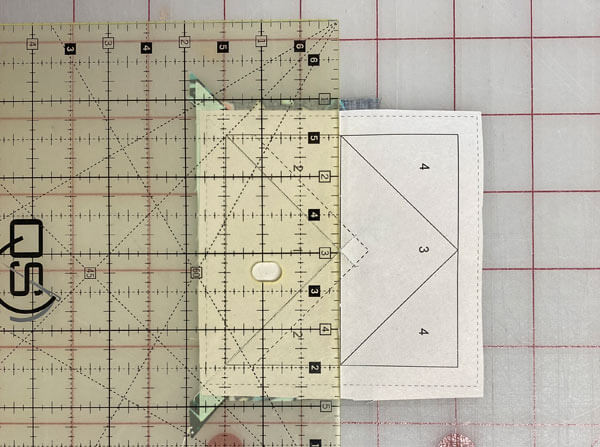
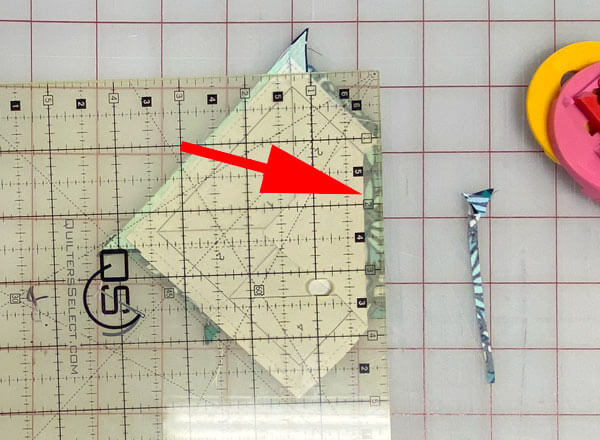
Align the 1/4" line of the ruler (red arrow) with the folded edge of the pattern, and trim, leaving behind a perfect 1/4" SA.
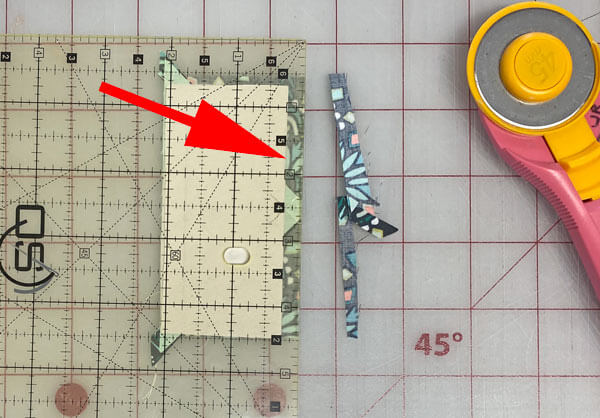
After the trimming is complete, you have the perfect placement line for #3.
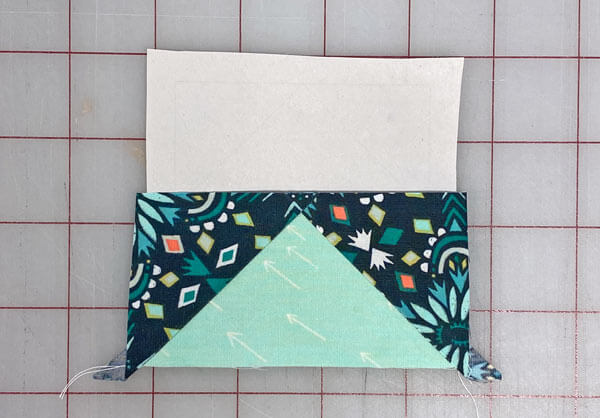 A nice straight edge to line up with for the bottom of the second Goose patch
Align the long edge of a #3 (it's the same fabric as the #2s) with the cut edge.
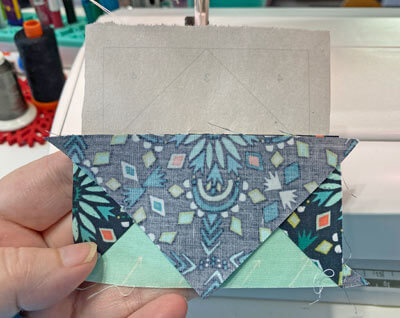
Stitch on the line, starting and stopping beyond the outside dashed lines on the pattern.
Helpful Tip:
Since this seam runs from one side of the unit to the other, you can chain piece this step in these units. Yes, there are efficiencies to be had in paper piecing! Who knew!
Press.
To trim the SAs to create the perfect placement, fold back the pattern on the line between #3 and a #4 like we did before, aligning the 1/4" marking with the fold, and trimming away the excess fabric.
Repeat for the other side.
With RST, add a #4 to each side of #3, pressing between each addition.
Notice how I've scooched the edge of the orange patch a bit past the edge of the darker #3? I don't want that darker #3 print to show through the top of my quilt (to shadow through).
By positioning #4 this way, the darker #3 won't stick out further than the SA when the patches are pressed.
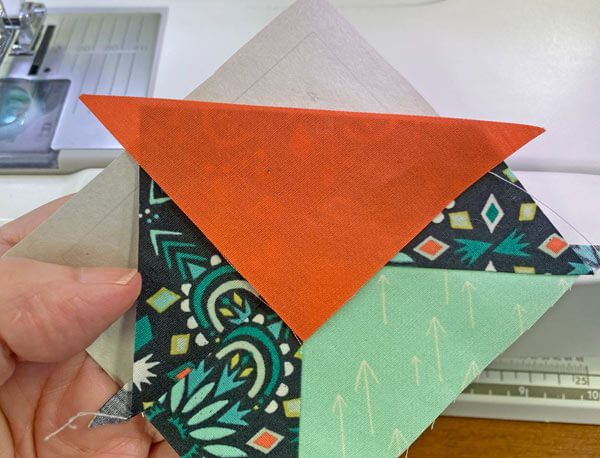 Trimming the exposed sides of the #3 gives us the perfect placement lines for the final 2 Sky patches
Remember to stitch, starting and stopping past the outside dashed lines of the unit.
Just like the last seam, you can chain piece the seams of these patches BECAUSE the seam lines extend from one edge to the other.
Chain piecing in paper piecing?
Who'd a-thunk it!
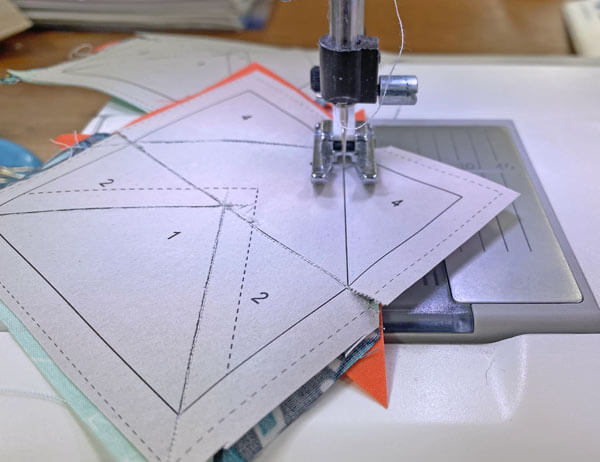
Once all 4 FGs are stitched and pressed, use your rotary cutter and ruler to trim the FG to perfection.
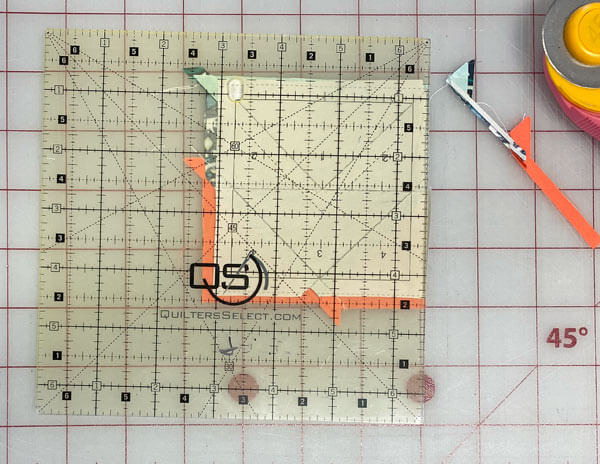 I find it most accurate to align the 1/4" mark on my ruler with one side of the solid square outline of the unit. This gives us the perfect quarter inch SA. Trim away the excess.
Beautiful, aren't they. Smooth edges all around, perfect pointy-points ending exactly where they should.
Paper piecing is a terrific tool to have in your quilting repertoire. I hope this technique becomes a favorite of yours, too!
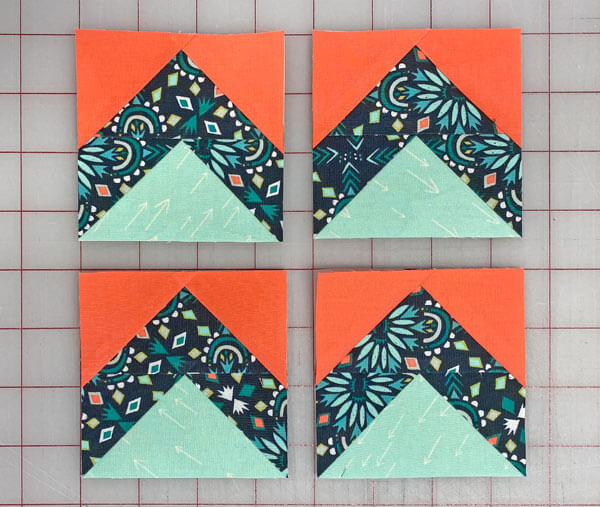 This is such a slick technique for sewing pairs of Flying Geese!
NOTE: Since the patches to make this unit were precut, all the outside edges are on the straight of grain. After the final pressing of these units, I remove the paper.

The paper piecing is complete. From this point forward, return your stitch length to the one you regularly use for piecing and install your favorite 1/4" presser foot.
Traditionally Piecing Pairs of FG 4-at-a-time
Make 4

In the Beginner and Basic quilt blocks section on this site is a tutorial for piecing FG 4-at-a-time.
Just like the patches for paper piecing, these squares are also cut oversized so after stitching, you'll be trimming them to perfection and then stitching the FG together to form the pair.
Click here to go to the 4-at-a-time tutorial now, it will open in a new window. When you're finished with the technique, simply close that window and return here.
In that tutorial, #1 and #3 are now 'Goose'. #2 and #4 are now Sky.
A quick review in pictures is below.
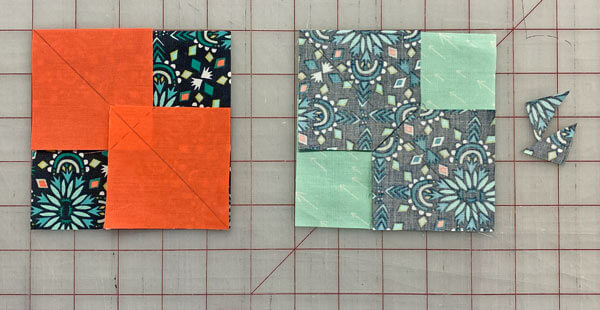 Position the #2 small squares in oppose corners, edges even with the larger square.
Draw a diagonal line from corner to corner through the patches.
Draw a short diagonal line in the opposite direction only across the #2s.
Cut through the two #2's only on that short diagonal line to remove the excess fabric.
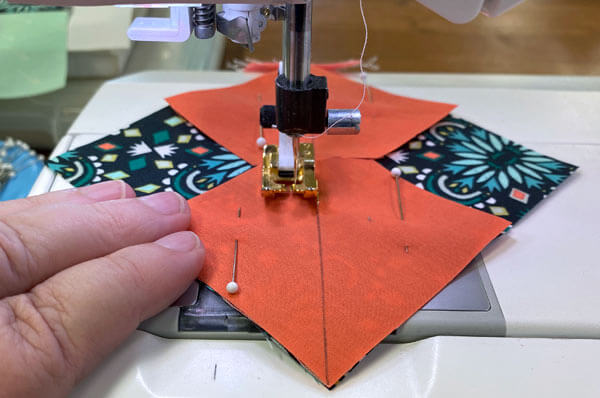 Stitch 1/4" away from both sides of the diagonal line. Pin if it helps you keep the edges even.
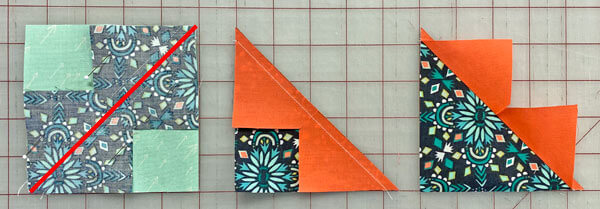 Press flat to set the seams. Cut the FG units in half between the stitching (red line, far left).
Press the units flat to set the seams.(middle)
Press the small #2s away from the #1 (right).
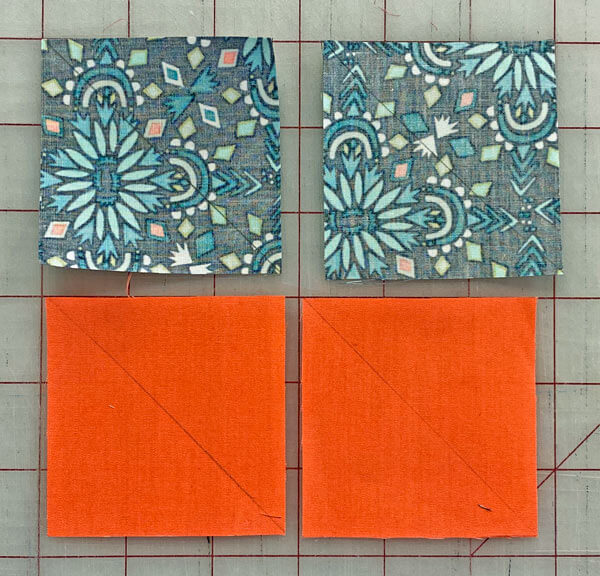 Draw a diagonal line on the backs of the remaining Sky squares
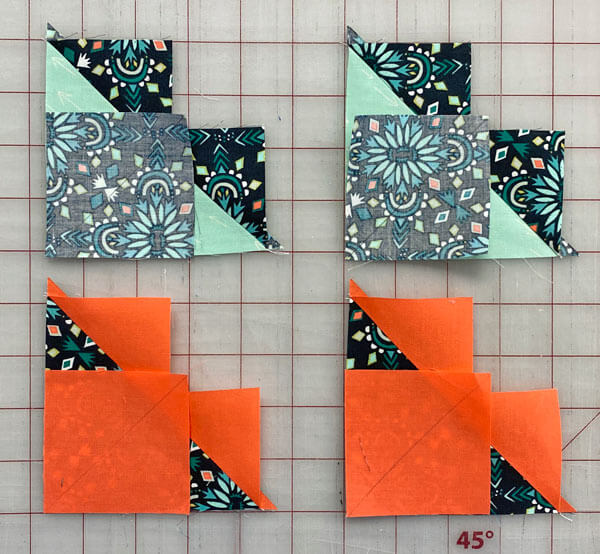 Align the marked Sky with the open corner of the corresponding stitched unit
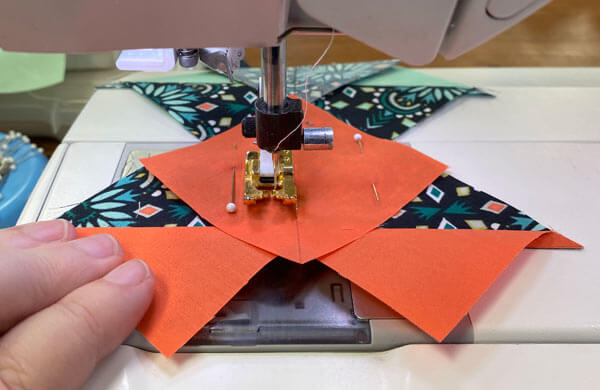 Stitch again on both sides of the drawn lines for each unit. Pin if it helps you hold everything in place.
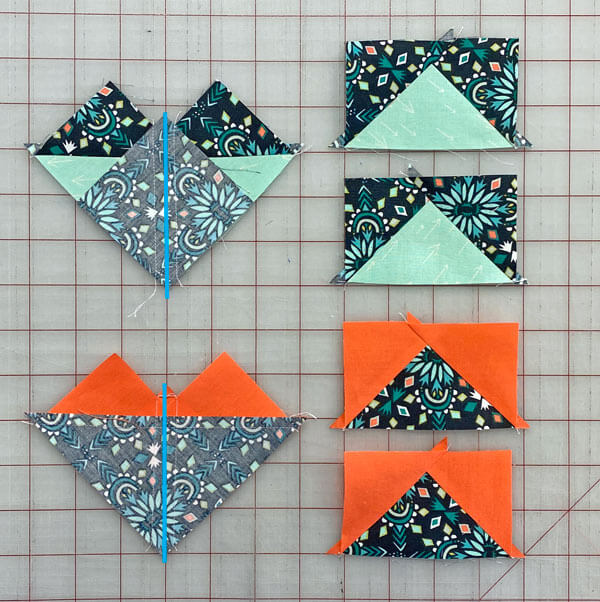 Press flat, then cut in half between the stitching lines (blue lines). Press again, SAs towards the outside corners. You now have four rough FG in need of a trim job.
Use this chart for the Center measurement and the 'Trim to' size.
FG Dimensions | |||
|---|---|---|---|
| Finished Block Size | Center Measurement | Trim individual FG to | After sewing, FG pairs measure |
| 9" | 1¾" | 2" x 3½" | 3½" x 3½" |
| 12" | 2¼" | 2½" x 4½" | 4½" x 4½" |
| 15" | 2¾" | 3" x 5½" | 5½" x 5½" |
Find the Center measurement for the block size you're working on. It's 1-3/4" for our 9" finished sample.
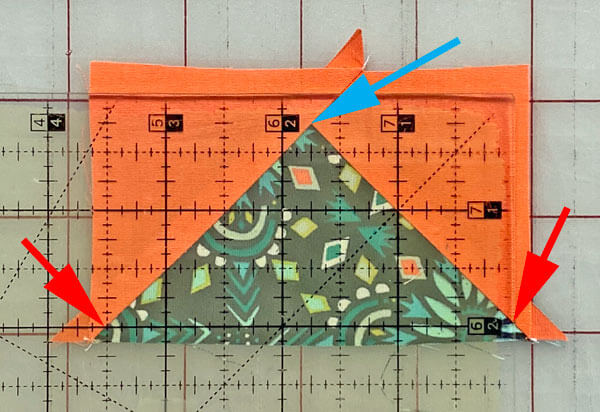
Position the point of the Goose with the Center measurement, 1/4" in from the edge. This is your 1/4" seam allowance. (blue arrow)
The Trim To measurements are used to position the bottom edge of the ruler. The height of the Goose (the lower number) is directly over the diagonal seam on one side. The width measurement is over the seam on the other side. (red arrows)
Once these three points are correctly positioned, trim away the excess fabric on the top and right sides (if you're right-handed).
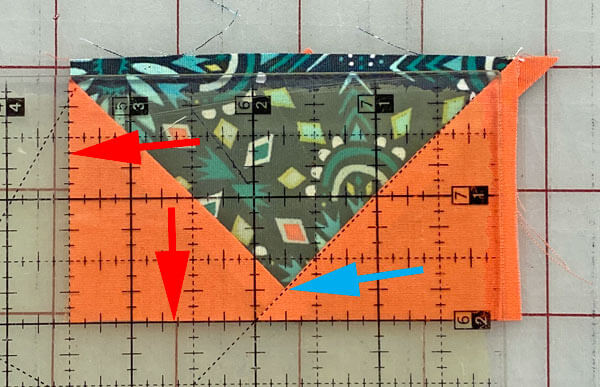
Flip your FG with the point at the bottom. Line up the freshly cut edges with the Trim To measurements—2" and 3-1/2" for our 9" sample. (red arrows)
If you're using a square ruler for trimming, the 45° diagonal marking on it should line up with the seam allowance.
The point at the bottom (blue arrow) is 1/4" in from the bottom at a distance equal to the Center measurement—1-3/4" for our sample.
Once all the points are in place, trim away the excess.
At this point, you have four each of the #1/#2 and the #3/#4 Flying Geese units. All exactly the size you need.
With RST, stitch one of each together, matching the top edge of #1/#2 to the bottom edge of #3/#4.
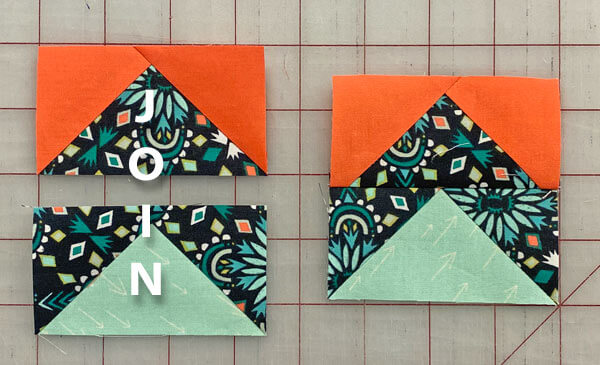
Press with the SAs toward the #3/#4 or top Goose.
Repeat for the remaining 3 pairs of FG.
🧩Assembling our Virginia quilt block
Since there are no seams to match between the units, and you checked that your stitching is accurate, this block practically sews itself together.
Arrange the units in our Virginia quilt block as shown below with the background fabric on all the outside edges.
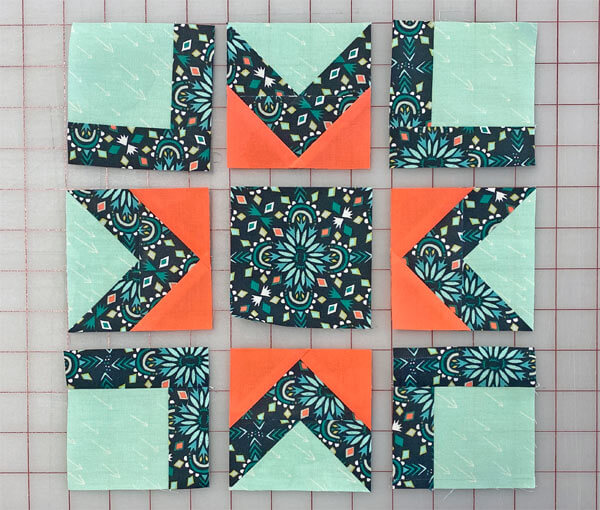
With RST, stitch them into rows.
Press.
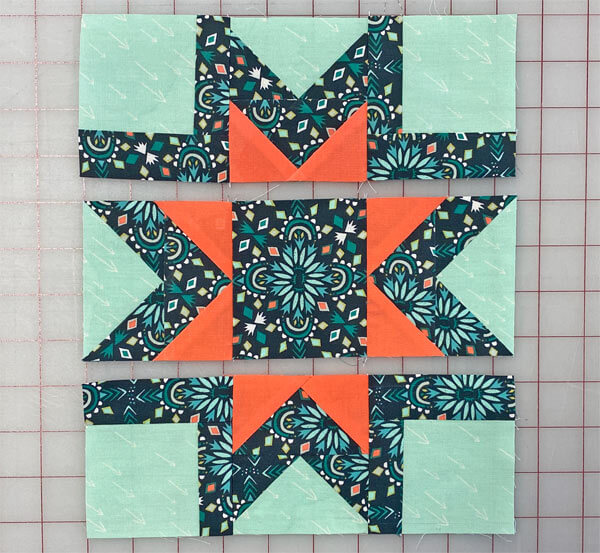
And finally, sew the rows together.
With a good final press, your Virginia quilt block looks like this.
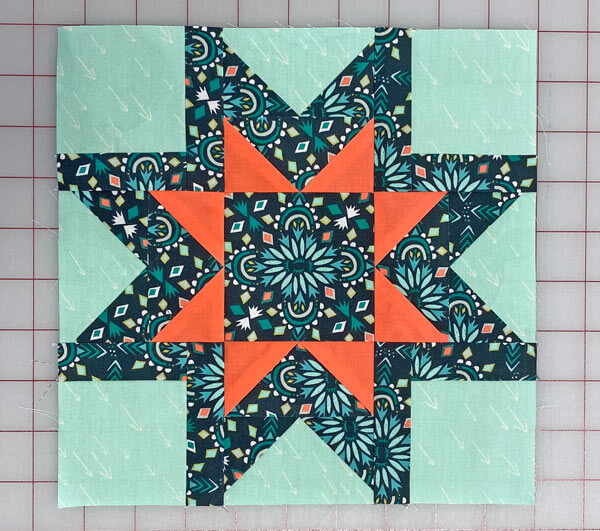
A sparkling success!
Now for a quick look at the backside to see how all those SAs work together.
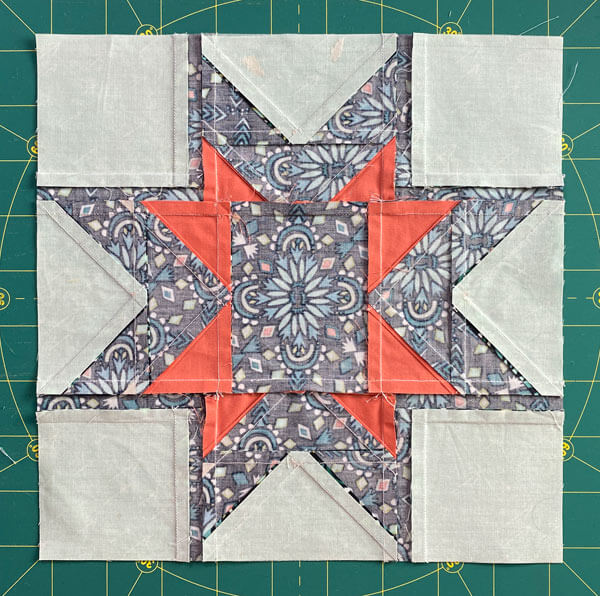
We were able to press all the SAs with background fabric underneath the star. This will help our Virginia stars to stand out a bit against the background—exactly what we like our piecing to do.
📌Not ready to cross the Delaware (or your cutting table) just yet?
Pin this Virginia quilt block tutorial for later – it'll be waiting for you like a well-preserved time capsule! 📌🏛️
🔭 Looking for something truly stellar?
You've finished your star quilt block, and you're ready for more!
Browse our collection of 70 stellar star quilt block patterns. All have instructions and cutting charts in multiple sizes. If templates or paper piecing is used in the tutorial, there's a free download for you of those materials.

Eeny. Meenie. Miney. Moe.
Which star quilt block will you sew?
For a star-studded quilting experience, choose from 100+ bedazzling star quilt patterns—for beginners and beyond—click here.
For even MORE blocks to make… 🧩🎨

...visit our Free Quilt Block Pattern Library, with over 260+ blocks to choose from in multiple sizes.
Free downloads are included in all sizes for any blocks require paper piecing patterns or templates.
- Home
- Free Quilt Block Patterns
- Virginia Quilt Block
