- Home
- Free Quilt Block Patterns
- Susannah Quilt Block
Susannah Quilt Block
From our Free Quilt Block Patterns Library
This post contains affiliate links, for which I receive compensation.
A Susannah quilt block is quick to piece when you use Connector Corners.
After that it's all simple squares.
Fully-illustrated instructions follow a cutting chart for 4 different sized blocks.
'Susannah' seems to be a popular block name. I share four variations: three different colorations and one with trickier piecing.
Eight different quilt layout ideas complete this tutorial.
It's time to get busy. Let's cut up and quilt!

📋 General Instructions

This tutorial uses these abbreviations:
- SA - seam allowance
- RST - right sides together
- BAC - background fabric
- CC - connector corners
SA are 1/4" and pressed towards the darker fabric unless noted otherwise.
Using starched quilt fabric makes it easier to press back the connector corners. Learn about starching here.
New quilt fabrics to tickle your fancy...
Click the images below to see the full collection. We share any commercial and/or free patterns that showcase them, too. (For inspiration, of course!)


Step 1: Cut patches for a Susannah quilt block
 Susannah design
Sample Size: 6" finished / 6½" unfinished
Grid: 4x4
Attributed to: Beth Gutcheon
Design Type: Uneven 9-patch, large center
Our sample Susannah block uses three fabrics.
Choose a medium and dark with contrast so it's easy to see the piecing—why do the work if no one notices?
Connector corners will take a wee bit more fabric than traditional piecing techniques.
Why use them?
The math is more accurate. Who wants to have to fudge a bit while sewing?
 | Cutting Chart for a~Traditional Piecing w/Connector Corners ~ | |||||
|---|---|---|---|---|---|---|
| Patch | Fabric | Qty | Finished Block Size | |||
| 4" | 6" | 8" | 12" | |||
| 1 | BAC | 1 | 2½" x 2½" | 3½" x 3½" | 4½" x 4½" | 6½" x 6½" |
| 2 | Med | 8 | 1½" x 1½" | 2" x 2" | 2½" x 2½" | 3½" x 3½" |
| 3 | Dark | 4 | 1½" x 1½" | 2" x 2" | 2½" x 2½" | 3½" x 3½" |
| 4 | BAC | 4 | 1½" x 1½" | 2" x 2" | 2½" x 2½" | 3½" x 3½" |
| Unfinished Block Size | 4½" | 6½" | 8½" | 12½" | ||
| Grid Size | 1" | 1½" | 2" | 3" | ||

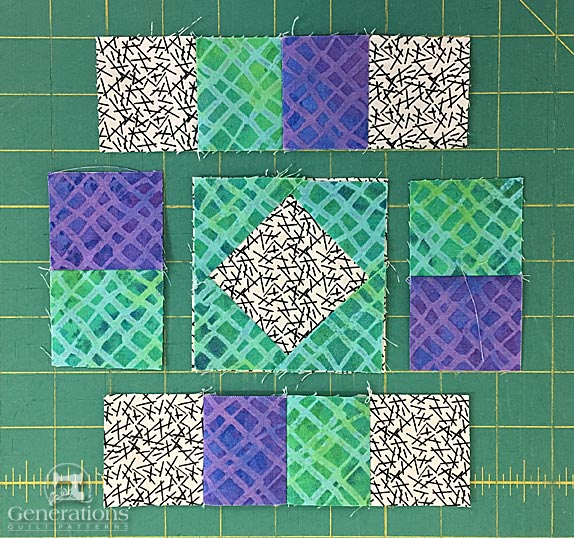
Step 2: Assemble the units for your Susannah
Center

Make 1
On the backside of four #2s draw a diagonal line from corner to corner. The line in the photo below is just dark enough to see during stitching.

With RST, add one #2 to two opposite corners of a #1. This is so you can stitch two before getting up to press.
 Use an open toe applique foot to make it easy to see the drawn line.
Press the patches flat, as sewn, to set the seam. Next, trim away the excess between the seam line and the outside corner. Leave a 1/4" SA (white arrow.)

Complete this step by pressing the patches toward the corners.

Add the two remaining #2s to the remaining pair of opposite sides in the same manner.
Trimming and pressing as before.
The finished center looks like this.

Sides
Make 4
With RST, stitch a #2 to a #3. SAs are pressed toward #3.
Repeat for the three remaining pairs.
 Press SA toward #3 - Make 4 - Set 2 aside
Set two pairs aside for the left and right sides.
Add a #4 to each side of the remaining pairs. SA are pressed toward the #2 or #3 patch. These units are for the top and bottom sides.
 Make 2
Step 3: Assemble your Susannah block
Arrange the units into the Susannah design.
With RST, stitch the left and right sides to the center. Use the arrows below for pressing directions.
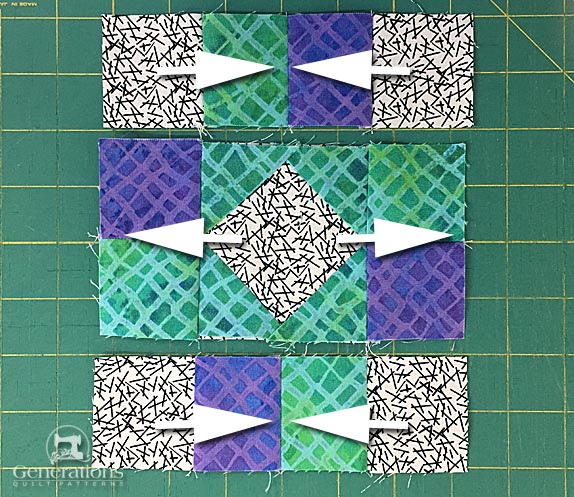
Stitch the rows together. Pin as needed. I find pins especially helpful in matching the point of the square in a square center unit with the seam between #2 and #3.
One final press and your Susannah is complete!
Same name, different block
The following blocks are all known as 'Susannah', most are simply different colorings of the the design.

Three fabrics, a bit less piecing...

...different fabric positions...

...with four fabrics...

...and finally a bit different approach to the piecing.
In this Susannah variation, the center Square in a Square is replaced with template piecing and partial seams—personally I prefer connector corners or paper piecing...more efficient!
Intrigued by 'Susannah'?
Click here for inspiration to lay out your blocks.
What about a different quilt block?
For a list of all the 260+ quilt block patterns on this site, start here.
If you know the name of the block, shorten your search by using these links:
Click here if you're looking for blocks with at least some paper piecing.
Click here if you're looking for the basic building blocks of quilting, i.e., Flying Geese, half square triangles, quarter square triangles, etc., along with several techniques to make each.
And finally, use these links to find blocks in these finished sizes:


Yummy fabrics
to drool over
Click any image below to see the full collection and find pricing and ordering information.


By Julie Baird
Copyright © 2008-2026 Generation Quilt Patterns, LLC
All Rights Reserved
Generations-quilt-patterns.com does not sell any personal information. (See Privacy Policy)