- Home
- Free Quilt Block Patterns
- Sugar Bowl Quilt Block
Sugar Bowl Quilt Block
From our Free Quilt Block Patterns Library
This post contains affiliate links, for which I receive compensation.
The Sugar Bowl quilt block is really a basket design made with half square triangles and cut squares.
A terrific block for a beginning quilter to practice their HST technique.
In this tutorial you'll find:
- A Sugar Bowl quilt block coloring page to download and print
It's time to cut up and sew!

📋 General Instructions

Several abbreviations are used on this page. They are:
- SA - seam allowance
- RST - right sides together
- HST - half square triangles
1/4" SA are used through this tutorial.
Pressing instructions are highlighted in yellow throughout this tutorial.
When pressing, first press the patches in the closed position just as they came off your sewing machine. This sets the seam, melding the fibers of the threads into the fibers of the fabric.
Then press the SA to the dark unless otherwise noted.
New quilt fabrics to tickle your fancy...
Click the images below to see the full collection. We share any commercial and/or free patterns that showcase them, too. (For inspiration, of course!)


Step 1: Cutting patches for your Sugar Bowl block
 Sugar Bowl design
Sample Block Size: 8" finished / 8½" unfinished
Grid: 4x4
Attribution: Nancy Cabot
Design Type: Basket
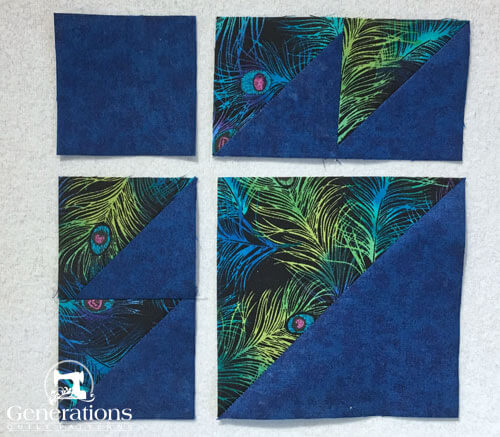
This sample block is a fabulous example of why it's important to make a test block before committing to the fabric choices in your own quilt.
When laid next to each other, it looked like enough contrast between the two fabrics would be perfect for our Sugar Bowl sample block.
Once the block was finished though, I personally found there really wasn't enough contrast for my liking.
The variegated peacock fabric was simply too dark to contrast with the darker, tone-on-tone blue.
Beautiful fabric—just too dark for this combinaton.
Label your patches. We refer to their numbers throughout this Sugar Bowl block tutorial.
 | Cutting Chart for a~Traditional Piecing ~ | ||||||
|---|---|---|---|---|---|---|---|
| Patch | Fabric | Qty | Finished Block Size | Sub Cut | |||
| 4'' | 6 '' | 8'' | 12'' | ||||
| 1** | Bac | 2 | 1⅞'' x 1⅞'' | 2⅜'' x 2⅜'' | 2⅞'' x 2⅞'' | 3⅞'' x 3⅞'' | na |
| 2** | Dark | 2 | 1⅞'' x 1⅞'' | 2⅜'' x 2⅜'' | 2⅞'' x 2⅞'' | 3⅞'' x 3⅞'' | na |
| 3** | Bac | 1 | 2⅞'' x 2⅞'' | 3⅞'' x 3⅞'' | 4⅞'' x 4⅞'' | 6⅞'' x 6⅞'' | na |
| 4** | Dark | 1 | 2⅞'' x 2⅞'' | 3⅞'' x 3⅞'' | 4⅞'' x 4⅞'' | 6⅞'' x 6⅞'' | na |
| 5 | Bac | 2 | 1½'' x 2½'' | 2'' x 3½'' | 2½'' x 4½'' | 3½'' x 6½'' | na |
| 6 | Dark | 1 | 1½'' x 1½'' | 2'' x 2'' | 2½'' x 2½'' | 3½'' x 3½'' | na |
| 7 | Dark | 1 | 1⅞'' x 1⅞'' | 2⅜'' x 2⅜'' | 2⅞'' x 2⅞'' | 3⅞'' x 3⅞'' | |
| 8 | Bac | 1 | 2⅞'' x 2⅞'' | 3⅞'' x 3⅞'' | 4⅞'' x 4⅞'' | 6⅞'' x 6⅞'' | |
| Unfinished Block Size | 4 1/2'' | 6 1/2'' | 8 1/2'' | 12 1/2'' | na | ||
| Grid Size | 1'' | 1 1/2'' | 2'' | 3'' | na | ||
| **I prefer to cut my patches extra large for HST, stitch, and then trim them to size. If you prefer to do the same, add a bit extra to the measurements for Patches #1-#4 above (I added 3/8" to each dimension for the sample block). DO NOT add anything to #7 and #8 before subcutting. There is a chart further down in these instructions where you need it for trimming them to size. If you have a perfectly reliable 1/4" seam allowance use the dimensions in the cutting charts for these patches. | |||||||
Step 2: Assemble the units for your Sugar Bowl
Small Half Square Triangles
Make 4

On the backside of #1 (the lighter or the easier to see of #1 and #2) draw a diagonal line from corner to corner).
Install your favorite quarter inch presser foot.
Or, use a Quick Quarter ruler to mark the sewing lines that are 1/4" away from the center diagonal. (When using this method, I use my open toe applique foot for sewing the marked lines. It's easier to see them.)
Click here to compare the two marking methods.
With RST stitch 1/4" away from both sides of the center diagonal. Repeat for the second pair of #1/#2.
 After marking with the Quick Quarter ruler, time to sew on the lines.
Cut each #1/#2 in half on the marked line to create a total of four HSTs.
 Sewn HST, cut in half, pressed to the dark side
Press with the SAs toward the darker #2.
Using the chart below, find the 'Trim HST to...' measurement that corresponds to your chosen finished block size.
HST Dimensions | ||
|---|---|---|
| Finished Block Size | Trim HST to… | |
| #1/#2 | #3/#4 | |
| 4" | 1½" | 2½" |
| 6" | 2" | 3½" |
| 8" | 2½" | 4½" |
| 12" | 3" | 6½" |
If you added extra to the patches #1-#4 in the cutting chart, there'll be more to trim. If you cut those patches the exact size, it should be only a minor hair cut.
For our sample, we trimmed to 2½"x2½".
HSTs trimmed? Check!!!

Using the photo as a guide, with RST stitch two pairs of HST together. They must be mirror-images of each other.
 These pairs need to be the mirror-image of each other.
SAs are pressed to the dark.
Set these aside until Step 3.
Large Half Square Triangle
Make 1

Prepare this pairing just as you did #1/#2.
On the backside of #3 draw a diagonal line from corner to corner.
With RST with #4, sew 1/4" away from both sides of the line.
Cut the unit apart on the diagonal marking. Put one HST aside. It's excess for a single block.
Press to the dark.
Again, refer to the chart (above) to trim this HST to exact size.
For our sample Sugar Bowl block the measurement is 4½"x4½".
#5/#7 Units

Make 1 each, mirror image
With RST, pin a short edge of #5 to #7. Repeat for the second pairing, but positioning them as a mirror-image of the first set.
To avoid chewing up the point as you stitch, start your seam from the straight edge.
That's why I've pinned from the #5 side on one and the #7 side on the other.

Press the SA toward the dark #7.
All our patches are stitched. Let's create our Sugar Bowl block.
Step 3: Assemble your Sugar Bowl quilt block
Arrange your patches to form basket design. Pay special attention to how your pairs of HST are arranged.

First we'll join the main part of the basket.
With RST, sew the small #6 square to the Bac fabric of the #1/#2 pair in the top row.
With RST, sew the second #1/#2 pair the the Bac fabric of the large HST.

The SA in the top row is pressed toward the small #3 square.
The remaining SA is pressed toward the Bac in the large HST.
With RST join the two sections, the seams nest. When matching the points on HSTs I rely on pinning for accuracy.
To learn more about pinning for perfect points, click here.

Press toward the center or large HST.
Again, arrange your patches to make sure you've got the #5s and #7s in the correct position to form the legs of our Sugar Bowl.
Click here if you need a refresher.
With RST sew a#5/#7 to the main basket.
Press towards #5 to avoid bulk.

Add the second #5/#7 in the same manner.
Find the center of the long bias edge of your subcut #8 by folding it in half and giving it a light crease with your finger.
 The crease is in the upper left corner of this photo.
Match that crease with the 'X' formed by your stitches on the dark corner of the large HST.
Pin to hold things accurately with the basket on top; #8 on bottom. That way you can see your seams and avoid flipping them as you sew.
Your quarter inch SA begins and ends in the 'V' shape (blue arrows) formed by matching the edges of the patches.
Stitch the seam.

The last SA is pressed out from the center toward #8.
Clip any stray thread tails and you're done!
 Our Sugar Bowl quilt block is complete!
This is our Sugar Bowl quilt block from the backside so you can see how all the SAs are pressed and fit together.
 Hmmmm...someone should have probably flipped the cutting mat for a better picture, eh? ;)
What about a different quilt block?
For a list of all the 260+ quilt block patterns on this site, start here.
If you know the name of the block, shorten your search by using these links:
Click here if you're looking for blocks with at least some paper piecing.
Click here if you're looking for the basic building blocks of quilting, i.e., Flying Geese, half square triangles, quarter square triangles, etc., along with several techniques to make each.
And finally, use these links to find blocks in these finished sizes:


Yummy fabrics
to drool over
Click any image below to see the full collection and find pricing and ordering information.


By Julie Baird
Copyright © 2008-2026 Generation Quilt Patterns, LLC
All Rights Reserved
Generations-quilt-patterns.com does not sell any personal information. (See Privacy Policy)