- Home
- Free Quilt Block Patterns
- Hovering Hawks Quilt Block
Spread Your Quilting Wings: Hovering Hawks Block Tutorial
No fowl play here, just piecing perfection! 🐓✨
This post contains affiliate links, for which I receive compensation.
Skill Level: Beginner
The Hovering Hawks quilt block is a variation on a 9-patch block.
This design substitutes a Birds in the Air unit for the standard four light patches in that block.
To make the triangles and all those bias edges as painless a possible, these units are paper pieced. You'll find free downloads for the paper piecing patterns a bit further down on this page.
Let's spread our wings and get started on our Hovering Hawks!
Hate paper piecing?
I've got you covered. Click here to go to the cutting chart and instructions for traditional piecing techniques to make this block.
🧭Ready to embark on your Hovering Hawks adventure?
Use these links to swoop 🦅 directly to the section you need. Whether you're a fledgling quilter or a seasoned pro, we've got your flight path covered!
- A cutting chart in 4 sizes with a download of the chart and block design
- A download for the paper piecing patterns and templates for each size
- A coloring/fabric planning page to download and print
📋 General Instructions
I use an open toe applique foot for all my paper piecing. There's nothing between my eyes and the stitching lines.
I prewash all my fabrics and then starch them.
That means I can frequently fingerpress my seams instead of hopping up, back and forth, to the iron.
📥Download and print the patterns
Skip this step if you intend to use traditional piecing methods to make your Hovering Hawks.
To download the free patterns you need ADOBE READER installed on your computer. You can get it here if you don't already have it.
WHY ADOBE?
It's
simple. My patterns have dashed placement guides to make the
positioning of the first patch virtually foolproof. With Adobe, they
show exactly as intended—a dashed guideline. In other programs it renders as a
solid line which can make the pattern confusing for the beginning
quilter.
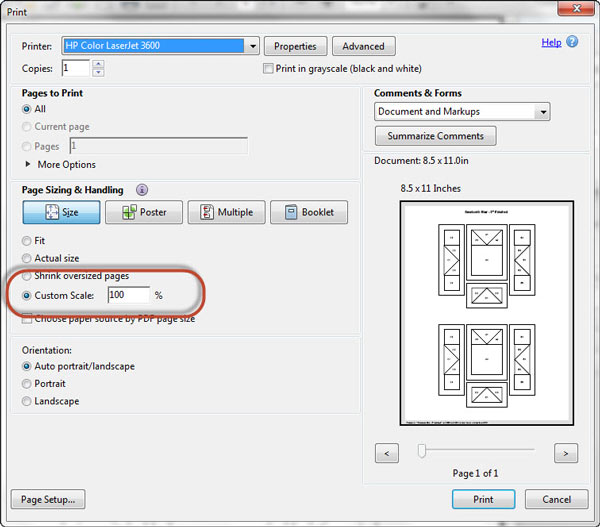
To print, open the downloaded file, and select the "Print" option.
To print blocks at the correct size, under 'Page Sizing and
Handling' in the Adobe print menu, set 'Custom Scale' to 100%.Click here to see what it looks like on the Print Menu page.
If you use something other than Adobe, you'll need to set 'Page Scaling' to 'None' to print at '100%'. Printing at 'Actual Size' tends to print blocks at weird sizes.
Download and Print the Paper Piecing Pattern | ||
|---|---|---|
| Finished Block Size | # of pages to print for 1 block | Birds in the Air Unit Size |
| 6” | 1 | 2" |
| 9” | 1 | 3" |
| 12” | 2 | 4" |
| 18” | 4 | 6" |
Use the chart (left) to find the units to print that correspond to the finished block size you need.
Once you've printed your pattern, use the information on the printed page to measure your block to confirm that it printed at the correct size.
After printing, cut out the four Birds in the Air units just past the outside dashed line of each.
New quilt fabrics to tickle your fancy...
Click the images below to see the full collection. We share any commercial and/or free patterns that showcase them, too. (For inspiration, of course!)


✂️Cutting for a Hovering Hawks block
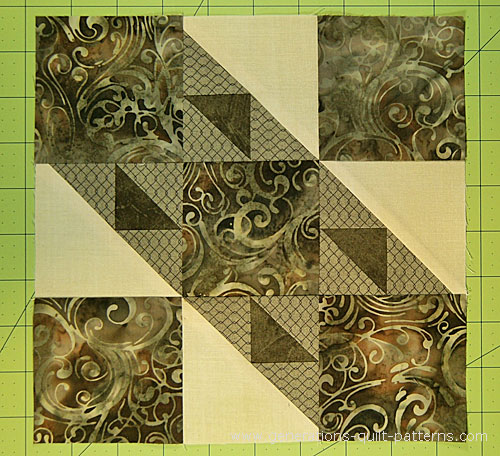
 Hovering Hawks design
Sample Size: 9" finished / 9½" unfinished
Grid: 6x6
Design Type: Jacob's Ladder, even 9-patch
Click here if you'd prefer to skip the paper piecing.
To make your Hovering Hawks quilt block really sing, make sure there is good contrast between each of the three values and background fabric choices.
Trust your instincts!
If you have to 'think about' whether a fabric is a lighter or darker than the one you're comparing it to, it's not. When it's noticeably different, you'll know it instantly.
Don't forget to subcut #BitA1-#BitA5 as instructed.
 | Cutting Chart for a~ Includes Paper Piecing ~ | ||||||
|---|---|---|---|---|---|---|---|
| Patch | Fabric | Qty | Finished Block Size | Sub Cut | |||
| 6'' | 9'' | 12'' | 18'' | ||||
| BitA-1 | Dark | 2 | 1⅞'' x 1⅞'' | 2⅜'' x 2⅜'' | 2⅞'' x 2⅞'' | 3⅞'' x 3⅞'' | |
| BitaA-2 BitA-3 BitA-4 | Light | 6 | 2⅜'' x 2⅜'' | 2⅞'' x 2⅞'' | 3⅜'' x 3⅜'' | 4⅜'' x 4⅜'' | |
| BitA-5 | Bac | 2 | 3⅜'' x 3⅜'' | 4⅜'' x 4⅜'' | 5⅜'' x 5⅜'' | 7⅜'' x 7⅜'' | |
| 6 | Med | 5 | 2½'' x 2½'' | 3½'' x 3½'' | 4½'' x 4½'' | 6½'' x 6½'' | --- |
| Unfinished Block Size | 6½'' | 9½'' | 12½'' | 18½'' | na | ||
| Grid Size | 1" | 1½" | 2" | 3" | na | ||
🪡Assemble the units for Hovering Hawks
Birds in the Air units (BitA)
Make 4
 This is form the fabric side
📢Updated Tutorial Note:
Since first writing this tutorial, I've updated the Birds in the Air paper piecing patterns to include the Finished/Unfinished size in the seam allowance and to add 'BitA' to the numbering.
You'll see the old numbering in this tutorial (#1-#5). The only difference is the addition of 'BitA'. None of the patch positions changed.
Install an open toe appliqué foot if you have one. Reduce your stitch length to 15–18 stitches per inch. This makes more perforations in the paper (making it easier to remove) and reduces the amount of stress on each individual stitch (because there's more of them).
The paper pattern below is the reverse of the design because we are stitching from the back side of the block.
Position the wrong side of #1 (BitA-1) on the unprinted side of the pattern with a bit of Elmer's Washable Glue Stick.
 Use the dashed guidelines for quick placement. (arrows)
With right sides together (RST) center #2 (BitA-2) over #1 (BitA-1).
 The point on #2 lines up with the corner of #2 on the paper pattern.
Stitch the seam between #1(BitA-1) and #2(BitA-2). Start and end a quarter inch off the drawn stitching line. Press.
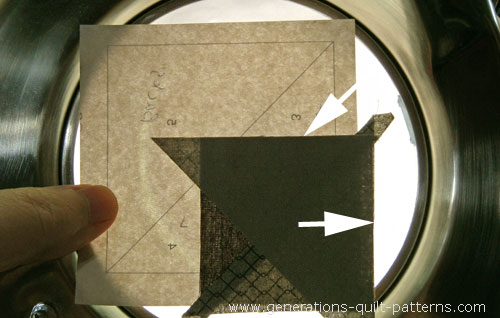
Now position #3(BitA-3), RST, aligning its edges with those of #1(BitA-1) and #2(BitA-2). (arrows)
This ensures that there's plenty of fabric around the outside edge for a good trim job at the end of this patch.
Stitch the seam as before. Press.
Add #4(BitA-4) in the same manner, matching the edges and pressing after it's added.
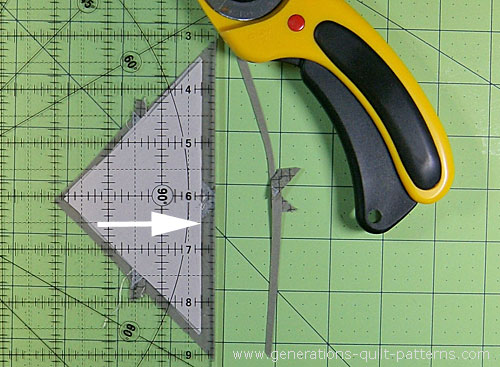
For perfect placement of #5(BitA-5), trim the SAs of #3(BitA-3) and #4(BitA-4) with one cut.
At your cutting mat, lay your ruler on the stitching line between #3/#4 and #5(BitA-5).
With your thumbnail, crease the paper along this edge. Fold back the paper and lay your ruler's 1/4" mark on the folded edge. Trim away the excess with your rotary cutter.
Now, with RST, position #5's(BitA-5) long edge with the freshly trimmed SA.
 Just like Patch #2, the point of #5 lines up with the point of #5 on the pattern.
Stitch starting and ending past the outside dashed lines that surround the unit.
To trim the unit to size, on your cutting mat lay the quarter inch mark on your ruler along the solid outline on the right side (left if you're left handed) and trim. Repeat for all the sides of all the units.
If you want more detailed instructions to make this unit, click here to go to Birds in the Air quilt block.

The paper piecing is complete. From this point forward, return your stitch length to the one you regularly use for piecing and install your favorite 1/4" presser foot.
🧩Putting it all together
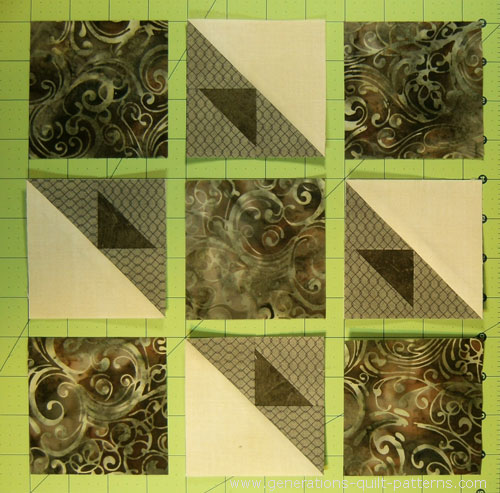
Arrange the Birds in the Air units and cut squares into the rows of your Hovering Hawks quilt block. Pay particular attention to the direction of the pieced patches—they're much too easy to get turned around at your sewing machine.
Stitch the units into rows. The HUGE benefit to paper piecing is that if you've been diligent about stitching directly on the line, all you need do is match the edges. Add a couple of pins.
You'll have perfectly sewn points every time.
 SA are pressed toward the solid cut squares to reduce bulk.
If you suspect any shadowing—that's when a darker fabric shows through to the top, trim the SA on the #6 squares down to a scant quarter inch. That way, they won't show past the lighter #5(BitA-5) patches.
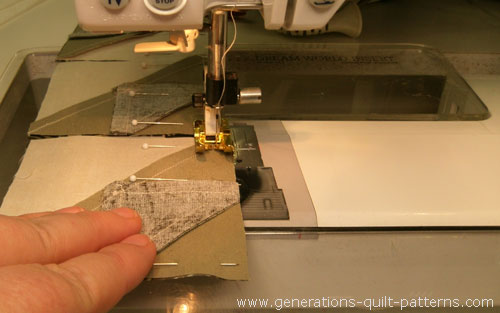
Stitch the rows together. I do use pins for this.
After the rows are stitched together, give your patchwork on final press. If yours seems a bit lumpy, try our best pressing technique. You'll be amazed at the results you get with this simple trick.
And this is your finished Hovering Hawks quilt block, all ready for your quilt.
 Our Hovering Hawks are ready to take flight
If you prefer traditional piecing...
Hovering Hawks design...don't worry. Use the cutting chart below.
It includes ALL the pieces in the Hovering Hawks block.
Don't forget to subcut #BitA1-#BitA5 as instructed.
 | Cutting Chart for a~ Traditional Piecing ~ | ||||||
|---|---|---|---|---|---|---|---|
| Patch | Fabric | Qty | Finished Block Size | Sub Cut | |||
| 6'' | 9'' | 12'' | 18'' | ||||
| BitA-1 | Dark | 2 | 1⅞'' x 1⅞'' | 2⅜'' x 2⅜'' | 2⅞'' x 2⅞'' | 3⅞'' x 3⅞'' | |
| BitaA-2 BitA-3 BitA-4 | Light | 6 | 1⅞'' x 1⅞'' | 2⅜'' x 2⅜'' | 2⅞'' x 2⅞'' | 3⅞'' x 3⅞'' | |
| BitA-5 | Bac | 2 | 2⅞'' x 2⅞'' | 3⅞'' x 3⅞'' | 4⅞'' x 4⅞'' | 6⅞'' x 6⅞'' | |
| 6 | Med | 5 | 2½'' x 2½'' | 3½'' x 3½'' | 4½'' x 4½'' | 6½'' x 6½'' | --- |
| Unfinished Block Size | 6½'' | 9½'' | 12½'' | 18½'' | na | ||
| Grid Size | 1'' | 1½'' | 2'' | 3'' | na | ||
Once your patches are cut, click here to go to instructions for piecing the Birds in the Air quilt block. (This link opens in a new window to make it easier for you to get back to this point in the tutorial.)
Follow the instructions. The only difference is that your #1 and #5 are cut from two different fabrics.
Make four units.
To complete your block, follow the instructions in Putting it all together on this page.
Nesting Success: You've Mastered Hovering Hawks! 🏆🪶
Remember, practice makes progress, so keep spreading those creative wings! Why not share your hawk-eye precision with our quilting flock? 📸🤝
Whatever block you swoop into next, the sky's the limit! Keep calm and quilt on, you talon-ted creator! 🧵✂️
Until we meet again at the quilting bee, may your points be perfect, your blocks square, and your creativity as boundless as a bolt of batik! 🔷🎨
📌Spread your quilting wings later
Pin now, soar through the tutorial when you're ready! 🧵 🦅

Other Jacob's Ladder quilt blocks... 🪜🧵
...are shown below. This design family is generally characterized by a combination of four patch units and HSTs. The designs are either 4- or 9-patch based.
Click on the image to go to that tutorial.


For design inspiration, click here to check out the Jacob's Ladder quilt pattern page.
For even MORE blocks to make… 🧩🎨
...visit our Free Quilt Block Pattern Library, with over 260+ blocks to choose from in multiple sizes.
Free downloads are included in all sizes for any blocks require paper piecing patterns or templates.


Yummy fabrics
to drool over
Click any image below to see the full collection and find pricing and ordering information.


By Julie Baird
Copyright © 2008-2026 Generation Quilt Patterns, LLC
All Rights Reserved
Generations-quilt-patterns.com does not sell any personal information. (See Privacy Policy)