- Home
- Quilt Design Inspiration
- Jacob's Ladder Quilt Block
Timeless Jacob's Ladder Quilt Block Pattern in 5 sizes
From our Free Quilt Block Patterns Library
This post contains affiliate links, for which I receive compensation.
Skill Level: Beginner
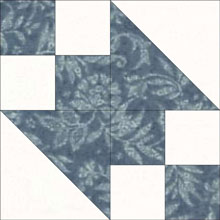
The Jacob's Ladder quilt block is characterized by strong diagonal lines running in both directions through the block.
Four patches fill the corners and center of this variation on a nine-patch pattern, with half square triangles completing the design.
This block goes by a number of other names including:
- Going to Chicago, Nancy Page
- Golden Stairs, Nancy Cabot
- Off to San Francisco
- Railroad
- Road to California
- Susie's Fancy
Further below you'll find cutting instructions for 5 block sizes, 8 variations based on this patchwork design, and finally a look at a few other blocks that carry the 'Jacob's Ladder' moniker.
Visit our page Jacob's Ladder Quilt Design and scroll down to the 3x3 Grid section to jump start your idea factory on what to do with all the blocks you'll make.
Let's get to our Jacob's Ladder!
📋 General Instructions
Several abbreviations are used in this tutorial:
- SA - seam allowance
- RST - right sides together
- HST - half square triangle
All seam allowances (SA) are 1/4".
When you are instructed to press, first press the pieced unit flat to set the seam. Then open the patch, pressing from the front. Seam allowances are pressed to the dark fabric unless otherwise noted.
To make them easy to find, pressing instructions are highlighted in yellow.
New quilt fabrics to tickle your fancy...
Click the images below to see the full collection. We share any commercial and/or free patterns that showcase them, too. (For inspiration, of course!)


Step 1: Cutting patches for a Jacob's Ladder block
 Jacob's Ladder design
Sample Block Size: 6" finished / 6½" unfinished
Grid: 6x6
Design Type: Even 9-patch |. Jacob's Ladder
Watch for the half square triangles are marked with '**'.
I prefer to make my HSTs larger and trim them down to the actual size after stitching.
The Quick Piecing method is used to make them.
There is a chart further down in these instructions where you need it for trimming them to size.
Click here to download the cutting chart and block design to use while constructing this block.
Click here to download the coloring/fabric planning page.
 | Cutting Chart for a~ Traditional Piecing ~ | ||||||
|---|---|---|---|---|---|---|---|
| Patch | Fabric | Qty | Finished Block Size | ||||
| 4½'' | 6'' | 9'' | 12'' | 18'' | |||
| 1** | Bac | 2 | 2⅜'' x 2⅜'' | 2⅞'' x 2⅞'' | 3⅞'' x 3⅞'' | 4⅞'' x 4⅞'' | 6⅞'' x 6⅞'' |
| 2** | A | 2 | 2⅜'' x 2⅜'' | 2⅞'' x 2⅞'' | 3⅞'' x 3⅞'' | 4⅞'' x 4⅞'' | 6⅞'' x 6⅞'' |
| 3 | Bac | 1 | 1¼'' x 13½'' | 1½'' x 16'' | 2'' x 21'' | 2½'' x 26'' | 3½'' x 36'' |
| 4 | A | 1 | 1¼'' x 13½'' | 1½'' x 16'' | 2'' x 21'' | 2½'' x 26'' | 3½'' x 36'' |
| Unfinished Block Size | 5'' | 6½'' | 9½'' | 12½'' | 18½'' | ||
| Grid Size | ¾" | 1" | 1½'' | 2'' | 3'' | ||

And these are the cut patches. Pretty simple, eh?!

Step 2: Piecing the Jacob's Ladder units
Half Square Triangles
Make 4
 Make 4
With a pencil, draw a diagonal line on the back side of each of the lighter #1 squares.
With RST, layer one marked light square with one dark #2 square. Stitch a quarter inch away from the drawn line on both sides. Repeat for the second pair of squares.
 Arrow points to anchor cloth.
Cut on the drawn line to create two units from each pair of squares.
Press.
Find your finished block size in the chart below. Check your accuracy. Trim if needed—if you cut oversized patches, you WILL need to trim.
HST Dimensions | |
|---|---|
| Finished Block Size | Trim HST to… |
| 4½" | 2" |
| 6" | 2½" |
| 9" | 3½" |
| 12" | 4½" |
| 18" | 6½" |
These are your trimmed HSTs.
 For the 6" finished sample block, the HSTs are trimmed to 2½" x 2½"
For more detailed information on this HST-technique, click here.
Four Patches
Make 5
 Make 5
With RST, align the edges of the light and dark strips. Stitch the long edge with a quarter inch seam.
This seam is pressed to the dark.
Use the chart below to check the accuracy of your stitching. Your strip set width should match the measurement that corresponds to your finished block size.
StripSet Widths | |||
|---|---|---|---|
| Finished Block Size | After Stitching | SubCut Width | 4-Patch Dimensions |
| 4½'' | 2" | 1¼" | 2" x 2" |
| 6" | 2½" | 1½" | 2½" x 2½" |
| 9" | 3½" | 2" | 3½" x 3½" |
| 12" | 4½ | 2½" | 4½ x 4½ |
| 18" | 6½" | 3½" | 6½" x 6½" |
With your rotary cutter, straighten one short edge of this strip set.
Referring to the chart above, cut your strip set into 10 patches equal to the SubCut width.
For the sample 6" block, I've cut ten 1-1/2" segments that look like this.
 For this 6" finished sample each segment measures 1-1/2" x 2-1/2"
Alternating light and dark fabrics, stitch pairs of these segments together to create five 4-patches with an edge-to-edge measurement equal to 4-Patch Dimensions in the chart above.
Press flat to set the seam and meld the fibers of the thread into the fibers of your fabric.
To reduce bulk at the center of a four patch, I like to twirl or fan or pinwheel the seam allowance. To do so, loosen the stitches in the center seam allowances—DO NOT TRIM THESE THREAD TAILS—and gently urge the SAs to more clockwise around the center as you look at your 4-patch from the backside.
It looks like this (below, right).
 Twirl or fan the seam allowances to reduce bulk in the center of the block
Press the seams in this direction.
Step 3: Assemble the Jacob's Ladder block
Lay out your sewn units in rows.
It's REALLY easy to get the patches discombobulated. (Ask me how I know!)
Just remember that the dark sides of your HSTs border the light diagonal chain of squares that runs through the center from upper left to lower right.

Stitch the patches into rows.

You can press in either direction—towards the 4-patches or towards the HSTs—just be consistent. That way your seams will nest which makes matching them so much easier.

Stitch the rows together. After a final press your Jacob's Ladder quilt block looks like this.

Other Jacob's Ladder quilt blocks... 🪜🧵
...are shown below. This design family is generally characterized by a combination of four patch units and HSTs. The designs are either 4- or 9-patch based.
Click on the image to go to that tutorial.


For design inspiration, click here to check out the Jacob's Ladder quilt pattern page.
Now what?

You've learned just how simple this design is to make.
Your blocks are finished.
What to do?
How to arrange them?
Click here to find layout ideas for the Jacob's Ladder block to spur your creativity!
8 Variations on the Jacob's Ladder design
Play with the number of fabrics and the units and you've got a multitude of Jacob's Ladder quilt block based patterns at your fingertips.

Blue Chains
A third fabric is added that changes the color placement.

Road to the White House
Two of the corner 4-patches are replaced with squares.
The second diagonal disappears when the block is set edge to edge.

Tail of Benjamin's Kite
The center four patch is replaced with a solid square.

Rocky Road to California
Back to the two fabric block, four patches are changed or removed.
Click here for instructions to make this variation.

Wagon Tracks
The second diagonal is completely gone.
Also known as Pacific Rail Road or Road to Arkansas.
In these next variations, the half square triangles are inline with the dark diagonal chain and form, well, 'bats' for lack of a better word.
Road to Arkansas
Still the exact same units as the original Jacob's Ladder, just rotated for a totally different looking block.
Broken Sugar Bowl
Corner 4-patches are gone. Three fabrics.
This block is also called Road to the White House.
And last, but not least...
Buckeye Beauty
The block drawn on a 2x2 grid instead of our 3x3. Great for scrap quilts!
Also know as: Double Four Patch, Gay Scrap Quilt, Going to Chicago, New Four Patch, Railroad, Railroad Crossing and World's Fair.
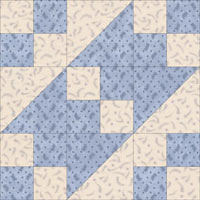
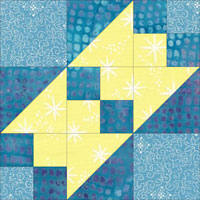
Same name, different block...
I've found three 3x3 grid blocks that are also named 'Jacob's Ladder quilt block'. The first two look like variations of the same idea--more like a 'Wild Goose Chase' in my humble opinion.


This third one mimics the feel of the original Jacob's Ladder with the same strong diagonal line, but it is accomplished with smaller triangle squares.
A wee bit more scrap friendly because the patches are smaller.
For even MORE blocks to make… 🧩🎨

...visit our Free Quilt Block Pattern Library, with over 260+ blocks to choose from in multiple sizes.
Free downloads are included in all sizes for any blocks require paper piecing patterns or templates.
- Home
- Quilt Design Inspiration
- Jacob's Ladder Quilt Block


Yummy fabrics
to drool over
Click any image below to see the full collection and find pricing and ordering information.


By Julie Baird
Copyright © 2008-2026 Generation Quilt Patterns, LLC
All Rights Reserved
Generations-quilt-patterns.com does not sell any personal information. (See Privacy Policy)