- Home
- Free Quilt Block Patterns
- Broken Sugar Bowl Quilt Block
Broken Sugar Bowl Quilt Block: Piecing Together Sweetness in 5 Sizes! 🍯🧵🍬
Sew sweet, you can almost taste it! 🍯🧵
This post contains affiliate links, for which I receive compensation.
Skill Level: Beginner
Our Broken Sugar Bowl quilt block tutorial is here to guide you every step of the way. This beginner-friendly pattern from the Jacob's Ladder family will have you stitching with confidence.
Not quite the block you were looking for?
Click here to go to the other Jacob's Ladder variations and links to those patterns.
Gather your materials and join us in making this timeless quilt block.
🧭 Navigate through this sugar-coated tutorial faster than a kid in a candy store! 🍭
Use these links to zip straight to the sweetest parts:
- A cutting chart in 5 sizes with a download of the chart and block design
- More Jacob's Ladder quilt blocks to make
Cut. Sew. Press. Whip up a quilt block so sweet, you'll need a dentist appointment!
📋 General Instructions
Several abbreviations are used on this page:
- SA - seam allowance
- HST - half square triangle
- RST - right sides together
- Bac - background fabric
All SA are 1/4" unless otherwise noted.
Pressing instructions are highlighted to make them easy to find.
New quilt fabrics to tickle your fancy...
Click the images below to see the full collection. We share any commercial and/or free patterns that showcase them, too. (For inspiration, of course!)


✂️ Cutting patches for a Broken Sugar Bowl

Sample Size: 6" finished / 6½" unfinished
Grid: 6x6
Design Type: Jacob's Ladder | Even 9-patch
Choose a medium and dark fabric with enough contrast so that the individual pieces are clearly differentiated.
I prefer to cut over-sized patches for my half square triangles, then sew the unit and trim to the correct dimensions.
In this tutorial for the 6" finished sample block, I cut my #2 and #3 patches 3-1/8" x 3-1/8" instead of the 2-7/8" x 2-7/8" listed in the chart below—adding 1/4" to each dimension—for specifically that reason.
If you'd like to cut your HST patches oversized, they are marked with ** below.
Label those patches like you're organizing your fabric stash#8212;it'll save you time and prevent a scrappy identity crisis later!
Download these items to help you while you make this block:
 | Cutting Chart for a~ Traditional Piecing ~ | ||||||
|---|---|---|---|---|---|---|---|
| Patch | Fabric | Qty | Finished Block Size | ||||
| 6'' | 9'' | 12'' | 15'' | 18'' | |||
| 1 | Dark | 2 | 2½'' x 2½'' | 3½'' x 3½'' | 4½'' x 4½'' | 5½'' x 5½'' | 6½'' x 6½'' |
| 2 | Med | 2 | 2⅞'' x 2⅞'' | 3⅞'' x 3⅞'' | 4⅞'' x 4⅞'' | 5⅞'' x 5⅞'' | 6⅞'' x 6⅞'' |
| 3 | Bac | 2 | 2⅞'' x 2⅞'' | 3⅞'' x 3⅞'' | 4⅞'' x 4⅞'' | 5⅞'' x 5⅞'' | 6⅞'' x 6⅞'' |
| 4 | Dark | 1 | 1½'' x 7'' | 2'' x 9'' | 2½'' x 11'' | 3'' x 13'' | 3½'' x 15'' |
| 5 | Bac | 1 | 1½'' x 7'' | 2'' x 9'' | 2½'' x 11'' | 3'' x 13'' | 3½'' x 15'' |
| 6 | Bac | 2 | 1½'' x 1½'' | 2'' x 2'' | 2½'' x 2½'' | 3'' x 3'' | 3½'' x 3½'' |
| 7 | Med | 2 | 1½'' x 1½'' | 2'' x 2'' | 2½'' x 2½'' | 3'' x 3'' | 3½'' x 3½'' |
| Unfinished Block Size | 6½'' | 9½'' | 12½'' | 15½'' | 18½'' | ||
| Grid Size | 1'' | 1½'' | 2'' | 2½'' | 3'' | ||

🪡 Create the Broken Sugar Bowl units
Half Square Triangles (HST)
Make 4

We'll use the Quick Pieced Method for making these HSTs.
Draw a diagonal line on the back of both #3 background squares.
With your favorite 1/4" presser foot installed, stitch a 1/4" from both sides of this drawn line.

After stitching, give the pairs a quick press as they were sewn and then cut them in half on the drawn line.

Press the four HST open with the SA to the dark.

Find your Finished Block Size in the chart below and trim your HST as directed.
If you cut generously you'll be trimming more than if you cut the patches the exactly as listed in the Cutting Chart.
| Finished Block Size | Trim HST to... |
|---|---|
| 6” | 2½" |
| 9” | 3½" |
| 12” | 4½" |
| 15" | 5½" |
| 18" | 6½" |
Four Patches
 Make 1
 Make 2
With RST, sew the #4 and #5 strips together along the long edge.
The SA is pressed to the dark #4.
Find your Finished Block Size in the chart below.
Verify that your strip set measures true to the corresponding width. Subcut the stripset into four equal units using the 'Subcut Width'.
| Finished Block Size | Stripset Width after Stitching | Subcut Width |
|---|---|---|
| 6” | 2½” | 1½” |
| 9” | 3½” | 2” |
| 12” | 4½” | 2½” |
| 15” | 5½” | 3” |
| 18” | 6½” | 3½” |
With RST stitch a #6 to a #7 square. Repeat for a total of two.
Press the SA toward the darker fabric.
Arrange the pairs as shown below.
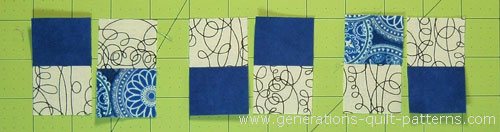
With RST, sew each pair together. The SA can be pressed to one side or 'twirled'.
These are our finished four patches.

🧩Assemble the Broken Sugar Bowl quilt block
Arrange all the units into rows as shown below. The dark #1(large) and #4(small) squares are in the outside corners.

With RST, stitch the units in each row together.
Take a quick peek and flip open the patches right before sewing them to make sure everything's in the right position. It's really easy to mix them up at the sewing machine.
When you're sure they're in the proper position, stitch.
 Press the SA away from the HST.
Press the SA away from the HST.
With RST, stitch the rows together. I pin to keep the points of the HST matching up where they should be.
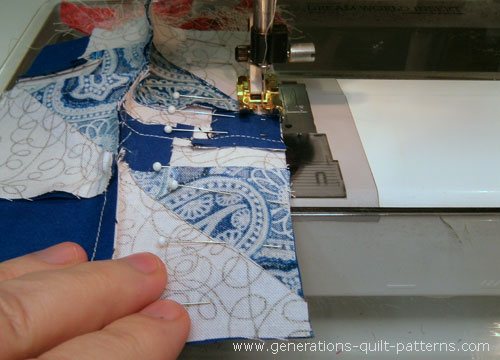
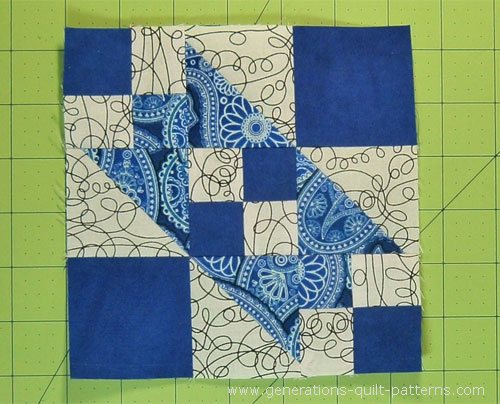
One final visit to the ironing board and this is the finished Broken Sugar Bowl quilt block!
Sweet Dreams Are Made of Quilts: Your Broken Sugar Bowl Finale! 💤🍬
🎉You've pieced together a Broken Sugar Bowl quilt block sweeter than any dessert. 🍨 This block isn't just pretty. It's your superpower to turn scraps into stories. 🦸♀️✨
Showcase it proudly and watch everyone ask for seconds! 🍰 Now, go sprinkle some sugar bowl magic on your quilting world. 🧵🍭 Remember, your fabric stash is the ultimate calorie-free treat! 😉🧵
Until your next stitch, may your rotary cutter glide true, your quilt sandwich layer smooth, and your quilting journey be as cozy as a favorite quilt on a chilly night! 🌙🛏️
📌 Pin this post quicker than you can say "Pass the sugar!"
Your future quilting self will thank you! 📍🍬

More Jacob's Ladder variations...
The Broken Sugar Bowl quilt block is one of a number of Jacob's Ladder block variations. There are instructions on this site for many more—both 9-patch and four-patch variations—in several sizes.
Simply click any of the images below to go directly to those block instructions.


For design inspiration, click here to go to our Jacob's Ladder quilt pattern ideas page.
For even MORE blocks to make… 🧩🎨

...visit our Free Quilt Block Pattern Library, with over 260+ blocks to choose from in multiple sizes.
Free downloads are included in all sizes for any blocks require paper piecing patterns or templates.
- Home
- Free Quilt Block Patterns
- Broken Sugar Bowl Quilt Block


Yummy fabrics
to drool over
Click any image below to see the full collection and find pricing and ordering information.


By Julie Baird
Copyright © 2008-2026 Generation Quilt Patterns, LLC
All Rights Reserved
Generations-quilt-patterns.com does not sell any personal information. (See Privacy Policy)