- Home
- Free Quilt Block Patterns
- Double Quartet Quilt Block
Double Quartet Quilt Block
From our Free Quilt Block Patterns Library
This post contains affiliate links, for which I receive compensation.
The Double Quartet is the perfect place to use our 8-at-a-time half square triangle technique!
It saves a couple of steps from the traditional method. They come out perfect every time.
And when your HST are perfect, your block is a breeze to put together!
It's to to cut up and sew. On the double!

📋 General Instructions

Several abbreviations are used on this page. They are:
- SA - seam allowance
- RST - right sides together
- HST - half square triangles
1/4" SAs are used through this tutorial.
When instructed to press, first press the patches in the closed position just as they came off your sewing machine.
This sets the seam, melding the fibers of the threads into the fibers of the fabric.
Then press the SAs as instructed.
I prefer to use starched quilt fabric for cutting and sewing accuracy—mixing StaFlo Liquid Starch concentrate with water in a 50/50 mixture.
New quilt fabrics to tickle your fancy...
Click the images below to see the full collection. We share any commercial and/or free patterns that showcase them, too. (For inspiration, of course!)


Step 1: Cut patches for a Double Quartet
 Double Quartet design
Sample Size: 8" finished / 8½" unfinished
Grid: 4x4
Attribution: Capper's Weekly
AKA: Flying X Quilt (KC Star), X Quarte (Woman's World)
Design Type: 4-patch, 16 squares
You'll need two fabrics with good contrast.
If you're using a print, be sure that the scale fits the block size you've chosen.
To avoid the look of 'missing points' it helps to use a contrasting fabric in a color that isn't in the print.
 | Cutting Chart for a~Traditional Piecing ~ | ||||||
|---|---|---|---|---|---|---|---|
| Patch | Fabric | Qty | Finished Block Size | ||||
| 4" | 6" | 8 " | 10 " | 12 " | |||
| 1 | L | 1 | 4¼" x 4¼" | 5¼" x 5¼" | 6¼" x 6¼" | 7¼" x 7¼" | 8¼" x 8¼" |
| 2 | D | 1 | 4¼" x 4¼" | 5¼" x 5¼" | 6¼" x 6¼" | 7¼" x 7¼" | 8¼" x 8¼" |
| 3 | L | 4 | 1½" x 1½" | 2" x 2" | 2½" x 2½" | 3" x 3" | 3½" x 3½" |
| 4 | D | 4 | 1½" x 1½" | 2" x 2" | 2½" x 2½" | 3" x 3" | 3½" x 3½" |
| Unfinished Block Size | 4½" | 6½" | 8" | 10½" | 12" | ||
| Grid Size | 1" | 1½" | 2" | 2½" | 3" | ||
Step 2: Assemble the units for a Double Quartet
HST
Make 8

We use the 8-at-a-time method for making our HSTs.
If you plan to make many blocks, you may want to use another HST method like triangle paper for even more efficient piecing.
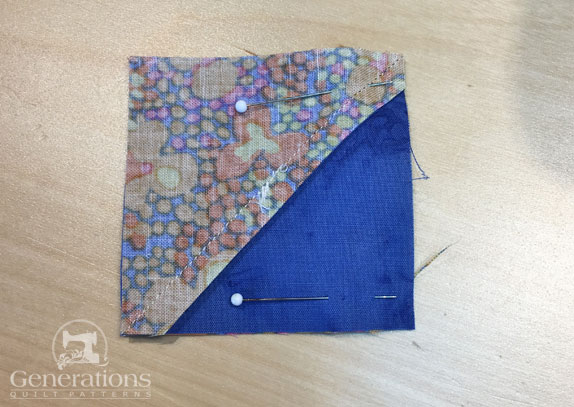
On the backside of either the #1 or #2 square (whichever one is easier to see the marking on) mark a diagonal line from each pair of corners.
On the sample I've marked the darker #2 with my favorite marking tool—the Bohin Mechanical Chalk pencil (with white chalk 'lead').
Sew a quarter inch away from both sides of the each of the lines for a total of four lines of stitching.
 I like this version of a quarter inch foot —the one with all the markings on it—for this part.
Give the sewn #1/#2 a press.

Now we need to cut this square into 8 HSTs.
Use the chart below to find the Center Measurement that corresponds to the Finished Size you choose.
HST Dimensions | ||
|---|---|---|
| Finished Block Size | Center or Midpoint Measurement | Trim HST to… |
| 4" | 2⅛" | 1½" |
| 6" | 2⅝" | 2" |
| 8" | 3⅛" | 2½" |
| 10 " | 3⅝" | 3" |
| 12 " | 4⅛" | 3½" |

For our 8" sample the Center Measurement is 3-1/8".
I like to use a rotating rotary mat for this next bit of cutting. There's less chance of disturbing the patches for the second cut.
Align that center Measurement mark on your ruler with the edge of your #1/#2.
The edge of the ruler should go right through the center of your patches.
Cut them in half.

Rotate your mat a quarter turn, align the center measurement with the edge of your block, cut through the center again.
At this point you have four equal squares.

To finish the job, cut each in half along the chalk line.
Voila!

Press each with the SA toward the darker #4 patch.
Referring back to the chart above, find the 'Trim HST to...' measurement. For the 8" sample, they are trimmed to 2-1/2".
 Untrimmed (left) and after trimming (right)
After all 8 are trimmed, sew them into pairs as shown below.
The SAs nest. That makes getting a good match at the points much easier.
If you've tried any of the other quilt block tutorials on this site, you may be wondering if I've pinned here. (Click here to see if you were right!)
 Press the SA in the direction of the white arrow.
Repeat three more times.
Pairs
Make 4
With RST, sew a #3 to a #4 patch.
 Press the SA to the light #3 (white arrow)
Repeat three more times.
Quarters
Make 4
With RST, stitch a pair of HST to a pair of squares.
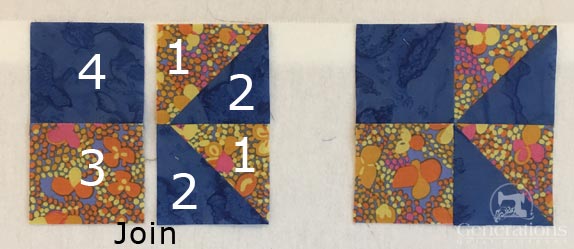
As usual, I like to pin to ensure pointy points where they matter.

Repeat four times total.
To complete the units we'll twirl the seams.
Undo the stitches at the center of the block—don't trim them. Then press the seams in a clockwise manner around the center.
 The twirled seams create a reverse image of the unit on the backside.
Twirling these seams means that all the SA will nest together.
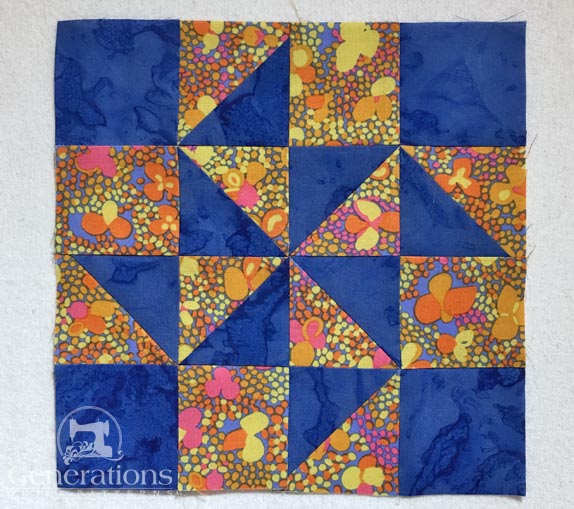
Step 3: Assemble the Double Quartet quilt block
Arrange the four quarters into the Double Quartet design. A solid, dark #4 square is in each corner. A pinwheel forms in the center.
 Because we took the time to twirl our SA, no matter how the units are arranged, all the SA will nest.
Stitch the two units in each row together, pinning as needed.
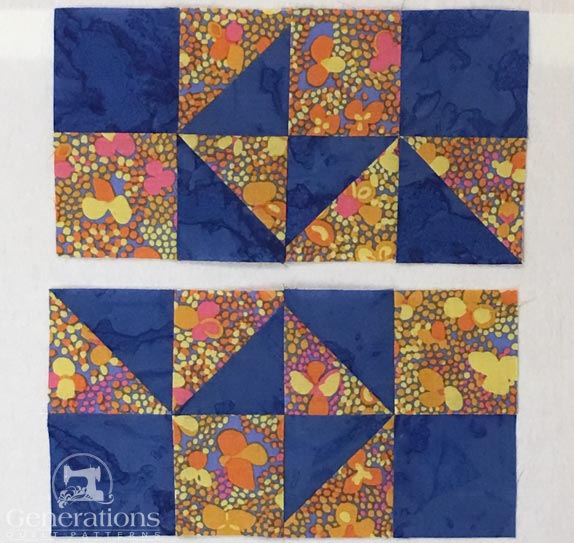
SA are pressed in opposite directions so they will nest for the final seam.
Finally, join the two halves RST.
Pin to get a good match in the center of the pinwheel. If you need a quick refresher on getting perfect points, click here.
After stitching, give your block on final press (try my favorite pressing technique for a really flat block) and it's ready for a quilt!
What about a different quilt block?
For a list of all the 260+ quilt block patterns on this site, start here.
If you know the name of the block, shorten your search by using these links:
Click here if you're looking for blocks with at least some paper piecing.
Click here if you're looking for the basic building blocks of quilting, i.e., Flying Geese, half square triangles, quarter square triangles, etc., along with several techniques to make each.
And finally, use these links to find blocks in these finished sizes:
For even more blocks to make...

For you, are quilt block designs like potato chips...
...you can't have just one?!!
Check the amazing resources I rely on for all the quilt block designs you see on this website.
To see if they're worthy of a spot in YOUR quilting library, CLICK HERE.


Yummy fabrics
to drool over
Click any image below to see the full collection and find pricing and ordering information.


By Julie Baird
Copyright © 2008-2026 Generation Quilt Patterns, LLC
All Rights Reserved
Generations-quilt-patterns.com does not sell any personal information. (See Privacy Policy)