- Home
- Beginner Quilt Blocks
- Half Square Triangle Paper
Half Square Triangle Paper
Make oodles of half square triangles without ANY marking!
This post contains affiliate links, for which I receive compensation.
Do you have a lot of identical half square triangles to make?
Dreading it?
Half Square Triangle Paper to the Rescue!
With free downloads for you to try, too.
Pros:
- Makes loads of identical half square triangles quickly
- Eliminates marking
- There are several products available on the market for this technique, as well as, the free downloads you'll find on this page

Cons:
- You must sew accurately on the line - no wiggle room
- Not a good choice for scrap quilts - all the HST are identical
- You must clip off all the dog ears
- There's paper to remove at the end
On this page you'll learn step-by-step how to make half square triangles (HST) using triangle paper that you can download directly from this site.
Let's get started!
Print your own Half Square Triangle Paper
To follow along with this tutorial I've provided downloads of half square triangle paper that you can print from your home computer. That way you can try the technique before spending any money.
You may print as many as you like. In fact, I suggest you either bookmark this page or add the image at the top to your Pinterest boards to make it easy to come back.
You'll need the most recent version of Adobe loaded on your computer to read and print the PDF file. Click here to get the no-cost Adobe download if you need it.
Why Adobe?
Because all the dashed lines reliably print out with this program. And I want you to have the pattern exactly as it is drawn!
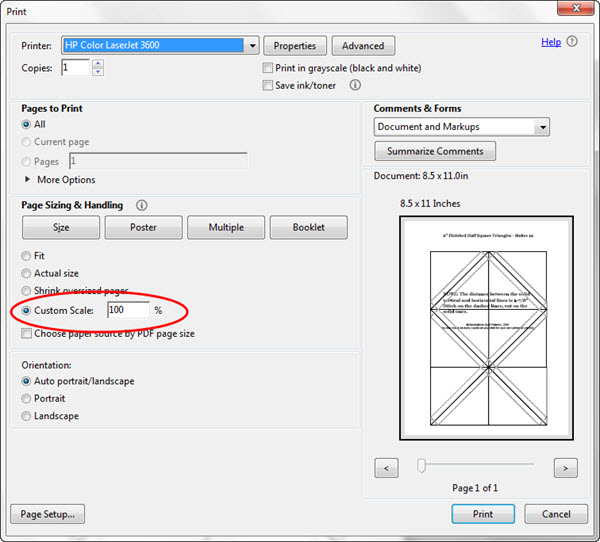
On the Adobe Print Menu page, under the Page Size and Handling heading, set 'Custom Scale ' to 100% so that your patterns print at the correct size. Print one copy and then measure a single square to confirm it's correct. It's measurement is on each pattern page.
Did it print correctly?
It's easy to check.
On each pattern page, you'll find the exact distance between the solid vertical and horizontal lines (red circle below) printed on the pattern.
The size of each square is as follows:
- 1" pattern - 1-7/8" x 1-7/8"
- 1-1/2" pattern - 2-3/8" x 2-3/8"
- 2" pattern - 2-7/8" x 2-7/8"
In the photo below, one square measures exactly 2-7/8" for a 2" finished HST. Perfect!
 It never fails. I always seem to get my ruler upside down in these shots!
If it's not the correct size, go back to the Adobe print menu and make sure you've set Custom Scale to 100%. Reprint.

Not sure which paper to use?
Take a look at my review of several of the most popular brands available to us quilters on the market.
You want a super-easy paper to tear away—less stress on the stitches.
The Technique
Step 1:
Trim away the excess from your printed triangle paper pattern. No need to be neat. Just cut a bit away from the outside solid black rectangle. This way you'll be able to see the edges of your fabric so that you know the triangle paper is properly placed.
If there's a bunch of pages to trim, I'll use my rotary cutter and mat to make quick work of the job.
Step 2:
I like to starch my fabric before cutting. This helps to control the bias edges. [Click here to learn how...]
Cut one rectangle from each of your two fabrics. I like to leave a minimum of a 1/4" extra on all four sides. That results in rectangles that are at least:
- 8" x 9-7/8" for the 1"finished
- 7-5/8" x 10" for the 1-1/2"finished
- 6-1/4" x 9-1/4" for the 2"finished
Layer the two rectangles right sides together (RST).
Helpful Hint
Giving your layered rectangles a quick press together helps their cotton fibers 'stick' to each other better.
Step 3:
Next lay the roughly trimmed triangle paper on top of the two rectangles.
- For seams pressed to the dark side, the paper is on top of the light fabric.
- For seams pressed to the light, place it on top of the dark fabric.
Pin the paper to the fabric to hold it in place and prevent all the layers from shifting.
Avoid pinning either on or too close to the dashed sewing line to save time. You won't need to remove the pins as you sew except for the smallest HST sizes.
 This is the perfect job for Flower Head Pins. Everything lays nice and flat.
Step 4:
Set stitch length to 15-18 stitches/inch or 1.5mm. This short length perforates the paper more than your regular piecing length and makes removing it so much easier.
I prefer to use an open toe applique foot for paper piecing because there's nothing between your eyes and the dashed stitching line.
Finally, if your machine has a speed control, set it for a slower stitching speed. For perfect HSTs, it's a MUST that you stitch accurately. You have more control sewing at a slower speed.
To create your scant 1/4" seam allowance, stitch on the side of the dashed line closest to the solid diagonal line.

Why?
These patterns are drawn precisely using the standard formula for rotary cutting HST—Finished Size + 7/8"—there is no accommodation for a scant 1/4" unless you stitch on the side of the line.
If you stitch exactly in the center of the line, your HST will be eversoslightly smaller than needed.
Step 5:
Stitch all the dashed lines. If you start in a corner, you are usually able to stitch in one continuous pass.
Just pivot at the corners.
 Start at either red arrow
Step 6:
After the stitching is complete I like to give the sewn unit a quick press from the fabric side to make things neat for cutting.
Personally I find it so much easier to align my ruler with a line within the pattern and cut. Each triangle paper pattern size is marked with the distance between the horizontal and vertical lines so you don't have to remember the distance.
 Here the 2⅞" line on the ruler is placed on the first vertical solid line in from the right.
Cut the HSTs apart on the solid lines. Straight lines (up and down and side to side) first. Diagonal lines after cutting all the squares.
 A pile of half square triangles ready for pressing
Step 7:
After cutting them apart on all the solid lines you need to decide if you'll
- Remove the paper now, or
- Remove just the larger triangle, then press the seam allowance and then remove the last remaining bit of paper
Because I starch my fabric before cutting, I prefer to remove all the paper and then press the units.
Some quilters like to leave the little bit of paper in to stabilize the seamline during pressing...removing it after the HST has cooled.
To remove the paper it helps to hold the seamline with your thumb and forefinger and then tear away the paper.
Trim away the dog ears with a scissor to reduce bulk.

Now a quick measure to make sure the half square triangles are just right...
 The 2" finished HST measure 2-1/2" unfinished. Perfect!
SUCCESS!
Now to make oodles more!


By Julie Baird
Copyright © 2008-2026 Generation Quilt Patterns, LLC
All Rights Reserved
Generations-quilt-patterns.com does not sell any personal information. (See Privacy Policy)