- Home
- Free Quilt Block Patterns
- Ribbon Quilt Block
Ribbon Quilt Block Instructions
From our Free Quilt Block Patterns Library
This post contains affiliate links, for which I receive compensation.
The Ribbon Quilt block is a quickie to put together when you use our 8-at-a-time method for making half square triangles.
Just add a center square and you're done!
To save this tutorial for another time, just share it to your Pinterest boards with the pinnable image below.

📋 General Instructions

These abbreviations are used in this lesson:
- SA - seam allowance
- RST - right sides together
- HST - half square triangle
SA are 1/4" and pressed toward the darker fabric unless otherwise noted.
New quilt fabrics to tickle your fancy...
Click the images below to see the full collection. We share any commercial and/or free patterns that showcase them, too. (For inspiration, of course!)


Step 1: Cutting patches for a Ribbon block
 Ribbon design
Sample Size: 6" finished / 6½" unfinished
Grid: 3x3
Attribution: Nancy Page
Design Type: Even 9-patch
To ensure that the points of your star are easy to see, choose fabrics with a high contrast.
In the sample block, I've used a cream for my Light fabric and an orange print (with no cream in it) for my Dark.
This block could easily be pieced using a variety of scrappy dark fabrics, too.
 |
Cutting Chart for a~ Traditional Piecing ~ | |||||
|---|---|---|---|---|---|---|
| Patch | Fabric | Qty | Finished Block Size | |||
| 4 1/2" | 6 " | 9 " | 12” | |||
| 1 | L | 1 | 5 1/4” | 6 1/4” | 8 1/4” | 10 1/4” |
| 2 | D | 1 | 5 1/4” | 6 1/4” | 8 1/4” | 10 1/4” |
| 3 | L | 1 | 2” | 2 1/2” | 3 1/2” | 4 1/2” |
| Unfinished Block Size | 5 " | 6 1/2" | 9 1/2" | 12 1/2” | ||
| Grid Size | 1 1/2" | 2 " | 3 " | 4” | ||

Step 2: Create the half square triangles (HST)

The Ribbon Quilt block is the perfect opportunity to use the 8-at-a-time method for making HST. We'll start with patches that are slightly over-sized and then trim to perfection once the stitching is complete.
To begin, on the backside of the #1 square draw a light diagonal line between each pair of corners. I prefer a mechanical pencil for this marking because the line stays nice and fine.
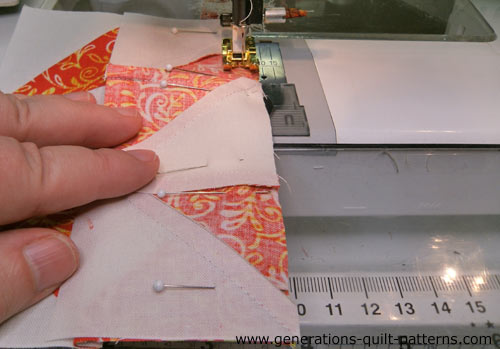
Layer the #1 and #2 squares with right sides together (RST) and stitch a 1/4" from both sides of each diagonal line. Pin if it helps you keep the layers together. (The red arrow below points to my 'spider'—a scrap piece of fabric that I begin my stitching on to prevent my machine from chewing up the point of the two squares.)
 A standard quarter inch foot works well for this stitching.
Give the squares a quick press so that they lay flat for the next step. (It's helpful if you have a rotating or small cutting mat for this next step so that you turn the mat instead of moving the fabric patches.)
From the chart below, find your finished block's size and it's corresponding Center/Midpoint measurement. For our 6" finished sample block that measurement is 3-1/8"
| Finished Block Size | Center/Midpoint | Trim HST to... |
|---|---|---|
| 4 1/2" | 2 5/8” | 2” |
| 6" | 3 1/8” | 2 1/2” |
| 9" | 4 1/8” | 3 1/2” |
| 12" | 4 5/8” | 4 1/2” |
Line up this center/midpoint measurement (red arrow) on your ruler with the edge of your quilt block.
Cut along the opposite side of your ruler. Ideally that opposite side lines up right with the middle of the drawn 'X'. If it's off a wee bit, don't worry, the original squares are generously sized.
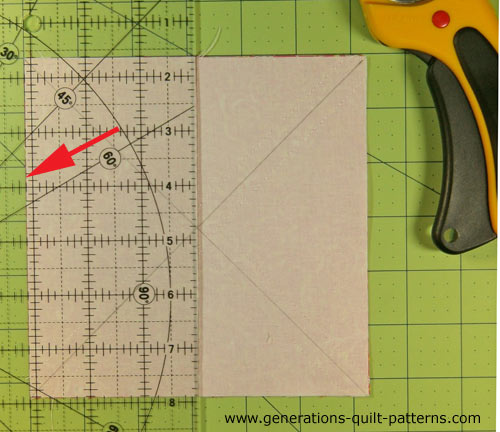
Repeat for the other side of the patches so that you end up with four squares equal to the center/midpoint number. For our example, we have four 3-1/8" squares.
Then cut each in half along the drawn pencil line as shown below—scissors or rotary cutter, either is just fine.
 8 HST from just 2 squares of fabric...not too shabby!
Press each of the HST units with the SA toward the dark fabric and trim to size as noted in the chart above.
Click here if you need more detailed instructions for this method of making HST.
Step 3: Assemble the Ribbon Quilt block
Arrange the HST and center square as shown below. The corners all have the lighter #1 pointing out.

Stitch the units in each row together.
Honestly, this is the hardest part because it's so easy to get units switched around. If we organize the rows a bit differently, you can see that the top and bottom rows are actually pieced exactly the same.
 It's much easier to see what's going on when the rows are laid out like this isn't it?
Now lay the rows out again like they are in the finished block.
 Press the SA in the direction of the arrows
I used pins to help keep the points exactly lined up with the seam lines.
After joining the rows, this is the finished Ribbon Quilt block, all ready for a quilt!
 Full of pointy-perfection!
Closely Related Blocks
There are instructions on this site for two other blocks that closely resemble the Ribbon Quilt block.
On the left is the Friendship Star made with quick pieced half square triangles. On the right is the Mississippi—made completely with the Connector Corners technique. No triangles. None at all!


What about a different quilt block?
For a list of all the 260+ quilt block patterns on this site, start here.
If you know the name of the block, shorten your search by using these links:
Click here if you're looking for blocks with at least some paper piecing.
Click here if you're looking for the basic building blocks of quilting, i.e., Flying Geese, half square triangles, quarter square triangles, etc., along with several techniques to make each.
And finally, use these links to find blocks in these finished sizes:


Yummy fabrics
to drool over
Click any image below to see the full collection and find pricing and ordering information.


By Julie Baird
Copyright © 2008-2026 Generation Quilt Patterns, LLC
All Rights Reserved
Generations-quilt-patterns.com does not sell any personal information. (See Privacy Policy)