- Home
- Free Quilt Block Patterns
- Dewey Quilt Block
Stitch up a Dewey Quilt Block
Showcase your large scale prints or machine embroidery collections...
This post contains affiliate links, for which I receive compensation.
Skill Level: Beginner
The Dewey quilt block came to my attention as the result of a reader asking for ideas for a block exchange where the finished blocks would read 'red'. (Thanks for asking, Thomasean! This was fun!)
Though a simple block to piece—it's all squares and rectangles—The Dewey block offers several design possibilities depending on the placement of your fabrics.
 Pin It for later!
The three sizes supplied in this tutorial are sized to either showcase 4" machine embroidery designs (the 8" blocks) or large scale prints (the 12" and 16" versions).
The 16" is also 'pre-cut' (Jelly Rolls, Charm Squares and Layer Cakes) friendly.
Let's get started!
📋 General Instructions

All seam allowances (SA) are 1/4".
When pressing, first press the pieced unit flat to set the seam. Then open the patch, pressing from the front. All seam allowances are pressed toward the 'frame' fabric.
Take a minute to review our favorite 'secret' technique to getting the flattest quilt blocks you'll ever see.
Now THAT'S sweet!
New quilt fabrics to tickle your fancy...
Click the images below to see the full collection. We share any commercial and/or free patterns that showcase them, too. (For inspiration, of course!)


Step 1: Cut the patches for the Dewey block
 Dewey design
Sample Size: 12" finished / 12½" unfinished
Grid: 16x16
Attributed to: Clara Stone
You may find it helpful to starch your quilt fabric before cutting, especially for the 8" block.
The darker frame patches for that size finish at 1/2" wide. The starch just makes it easier to keep a good 1/4" seam as you sew.
In the chart below, Fabric A is the large floral; B is the brown 'frame' fabric.
The 16" version is pre-cut friendly. One 40" Jelly Roll Strip or one Layer Cake square will yield 16 Patch #3s. A single 5" Charm Square will yield 4 of the patches.
 | Cutting Chart for a~Traditional Piecing ~ | ||||
|---|---|---|---|---|---|
| Patch | Fabric | Qty | Finished Block Size | ||
| 8" | 12" | 16" | |||
| 1 | A | 1 | 4½" x 4½" | 6½" x 6½" | 8½" x 8½" |
| 2 | B | 2 | 1" x 4½" | 1¼" x 6½" | 1½" x 8½" |
| 3 | A | 16 | 1½" x 1½" | 2" x 2" | 2½" x 2½" |
| 4 | B | 12 | 1" x 1½" | 1¼" x 2" | 1½" x 2½" |
| 5 | B | 2 | 1" x 7½" | 1¼" x 11" | 1½" x 14½" |
| 6 | B | 2 | 1" x 7½" | 1¼" x 11" | 1½" x 14½" |
| 7 | B | 2 | 1" x 8½" | 1¼" 12½" | 1½" x 16½" |
| Unfinished Block Size | 8½" | 12½" | 16½" | ||
| Grid Size | 1" | 1½" | 2" | ||
Step 2: Assemble your Dewey quilt block
Install a quarter inch foot on your sewing machine. (I like the one with the flange or guide on the right side.)
With right sides together (RST), align the edge of a #2 frame patch with the center square. Stitch. Repeat for the opposite side.
Press toward the #2 frame patches (brown).

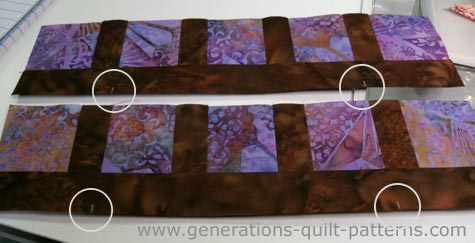
With RST, stitch a #4 (frame) patch to a #3 square. Make 12 of these. (Photo below, top)
Press.
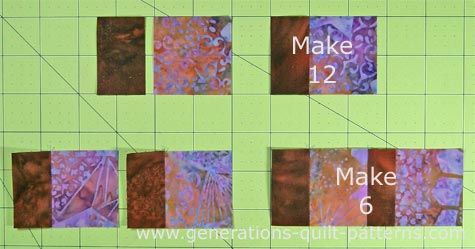
With RST, stitch a pair of these units together. Make 6. (Photo above, bottom)
With RST, stitch a #3 square to two of these pairs. Make 2 (see below). Press. Set aside.

With RST, sew a #3 to a pair. Make 2 (see below). Press.
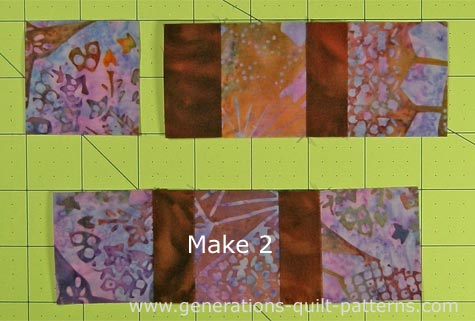
At this point, you've used up all the #3 and #4 patches.
Layout the center, top and side sewn units and #5 frame patches.
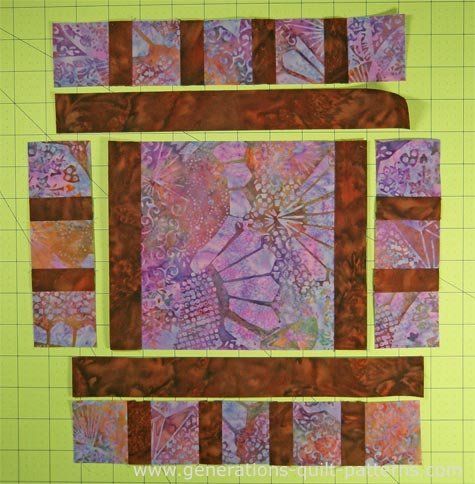
With RST sew the #5 to the strip made from five #3s. Make 2. Press.
In the photo below, I've pinned to keep the edges together evenly. I also like to sew from the side with all the seam allowances to ensure none are flipped and sewn down during stitching.
Press.

With RST, stitch a strip made of three #3s to the left and right sides of the center unit.
Press.
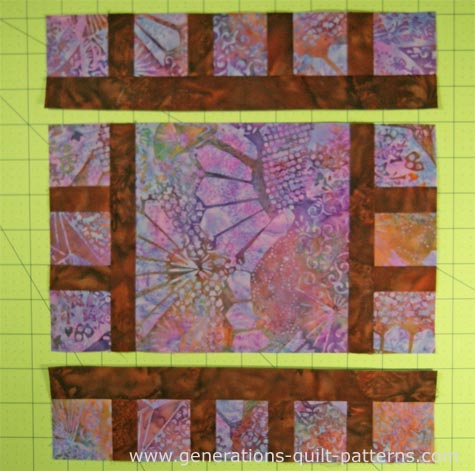
With RST, stitch the top and bottom pieced units to the center. If you have trouble with the frame patches (brown) lining up nicely, go ahead and mark the match point with chalk as shown below.
All that's left is to add the outside framing strips (Patches #6 and #7). First, the side patches (#6) are added. Press.
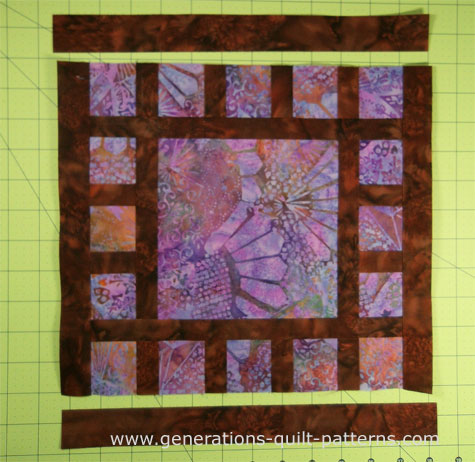
Stitch a #7 to the top and bottom with RST.
One final pressing, the Dewey quilt block is finished!

From the back you can see that all the seam allowances have been pressed towards the frame (brown) fabrics.

Design Options for the Dewey Quilt Block
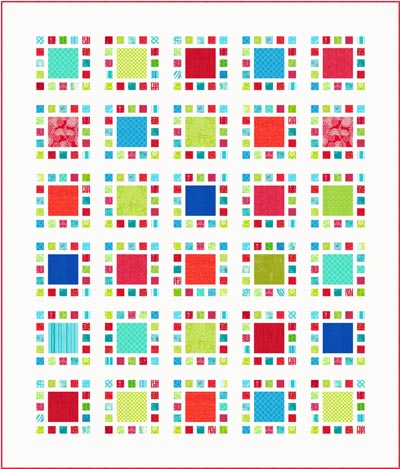
In the tutorial we used just two fabrics for our Dewey block. A quilt made from these blocks with a simple sashing looks like this.

Sashing and borders are cut from the same scrumptious large floral. The cornerstones and binding are cut from the frame fabric.
The two thin borders between the center field and large border help to contain the blocks.
For a more modern looking Dewey quilt block, choose a red and white fabric. Now the frames are the focal point.
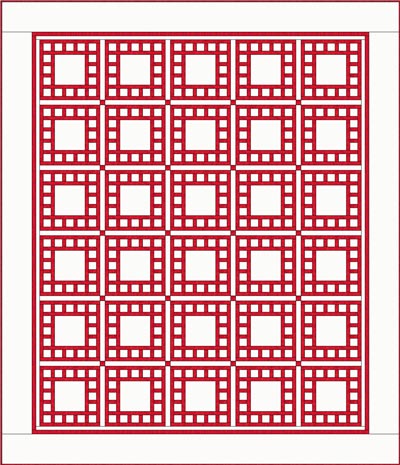
Use the Open spaces in the blocks for a machine quilting samplers.
And finally, this Piet Mondrian-inspired take on the design substitutes the white fabric into the frames. Use a white sash and the squares appear to float on the quilt top.
Did you notice?
The white sashing is cut a bit wider to provide some breathing room for this colorful quilt. (I also removed the piecing lines from the blocks so they don't distract from the overall design.)
How will you set your Dewey quilt blocks?
Ready for more?
There's plenty more to keep you busy!
Just check out our Free Quilt Block Pattern Library to find blocks for your next quilting creation!
What about a different quilt block?
For a list of all the 260+ quilt block patterns on this site, start here.
If you know the name of the block, shorten your search by using these links:
Click here if you're looking for blocks with at least some paper piecing.
Click here if you're looking for the basic building blocks of quilting, i.e., Flying Geese, half square triangles, quarter square triangles, etc., along with several techniques to make each.
And finally, use these links to find blocks in these finished sizes:


Yummy fabrics
to drool over
Click any image below to see the full collection and find pricing and ordering information.


By Julie Baird
Copyright © 2008-2026 Generation Quilt Patterns, LLC
All Rights Reserved
Generations-quilt-patterns.com does not sell any personal information. (See Privacy Policy)