- Home
- Free Quilt Block Patterns
- Continental Quilt Block
Do the Continental...Quilt Block, that is!
From our Free Quilt Block Patterns Library
This post contains affiliate links, for which I receive compensation.
The Continental quilt block is made lickety-split from quick-pieced half square triangles with a bit of strip piecing throw in for good measure.
In this tutorial you'll find:
- A cutting chart in three sizes
- A coloring page for you to download and use
It's time to cut up and sew!

📋 General Instructions

Several abbreviations are used on this page. They are:
- SA - seam allowance
- RST - right sides together
- HST - half square triangles
1/4" SA are used through this tutorial.
When instructed to press, first press the patches in the closed position just as they came off your sewing machine.
This sets the seam, melding the fibers of the threads into the fibers of the fabrics.
Then press the SA to the dark unless otherwise noted.
Pressing instructions are highlighted in yellow.
I starch all my quilt fabrics before cutting into it. In my humble opinion, the cutting and stitching is more accurate because the fabric doesn't shift. I prefer a 50/50 mix of StaFlo concentrated starch and water.
Learn more about starching your fabrics here.
And finally, label your patches. We'll refer to their numbers through the tutorial.
Optional: Download and print the coloring page

Remember that even though the sample block is made with just two fabrics, that doesn't mean you can't add more.
Use this coloring page to help you plan out YOUR color placement.
Click here to get yours. Print as many as you want for your own personal use.
New quilt fabrics to tickle your fancy...
Click the images below to see the full collection. We share any commercial and/or free patterns that showcase them, too. (For inspiration, of course!)


Step 1: Cutting for a Continental quilt block
 Continental block design
Sample Block: 9" finished / 9½" unfinished
Grid: 9x9
Attribution: Quilter's Newsletter Magazine
Design Type: Uneven 9-patch, small center
As with all 'pointy' designs, choose fabrics with good contrast between them.
For points that don't disappear into the background, choose two fabrics that don't have the same exact colors in each.
If you'd like to print the block design and cutting chart, click here.
 | Cutting Chart for a~Traditional Piecing ~ | |||||
|---|---|---|---|---|---|---|
| Patch | Fabric | Qty | Finished Block Size | |||
| 9" | 13 1/2" | 18" | ||||
| 1** | Light | 6 | 2⅞" x 2⅞" | 3⅞" x 3⅞" | 4⅞" x 4⅞" | |
| 2** | Dark | 6 | 2⅞" x 2⅞" | 3⅞" x 3⅞" | 4⅞" x 4⅞" | |
| 3 | Light | 4 | 2½" x 2½" | 3½" x 3½" | 4½" x 4½" | |
| 4 | Dark | 1 | 1½" x 7" | 2" x 9" | 2½" x 11" | |
| 5 | Light | 1 | 1½" x 7" | 2" x 9" | 2½" x 11" | |
| 6 | Dark | 1 | 2½" x 7" | 3½" x 9" | 4½" x 11" | |
| 7 | Light | 1 | 1½" x 1½" | 2" x 2" | 2½" x 2½" | |
| Unfinished Block | 9 1/2" | 14" | 18" | |||
| Grid | 1" | 1½" | 2" | |||
| **I prefer to cut my patches extra large for HST, stitch, and then trim them to perfection. If you prefer to do the same, add a bit extra to the measurements for Patches #1 and #2 above. There is a chart further down in these instructions where you need it for trimming them to size. | ||||||
Step 2: Assemble the units for your Continental quilt block

HSTs
Make 12
We use the Quick Pieced method to make our HSTs.
If you plan to make many blocks, you may want to use another HST method like 8-at-a-time or triangle paper for more effiency.
On the back side of either the #1 or #2 patches draw a single diagonal line from corner to corner. Mark whichever is easier to see your line on.
With RST, pair a #1 and #2 and stitch 1/4" from both sides of the line.
 The diagonal line on these patches is drawn with a pencil.
Press flat to set the seam.
At your cutting mat, cut each pair in half along the marked line.
Now press each pair again. So that your seams nest for easier matching later on, press 4 HST with the SA towards the lighter fabric and 8 HSTs with the SA towards the darker one.

Double check that your darker fabric doesn't peek out past the edge of the light seam allowance. If it does, grade the darker seam allowance by trimming it back just a wee bit with your scissors.
We don't want the darker fabric shadowing through the top of our quilt later.
Before creating our quarter blocks, check to see that your HSTs are the accurate. Trim as needed to the dimensions found in the chart below.
Continental Quilt Block | |
|---|---|
| Finished Block | Trim HST to… |
| 9" | 2½" |
| 13½" | 3½" |
| 18" | 4½" |
Quarter Blocks

Make 4
Arrange two HSTs as shown below, using one with SAs pressed to the dark and one to the light.
This way your seams nest, helping you get a good match at the point.
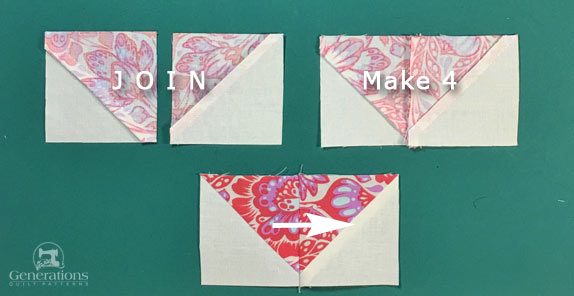
With RST, stitch the two HST together, using pins as needed to ensure a good match.
SAs are pressed in the direction of the arrow.
Repeat for a total of four.
A note from Julie...
The previous pair of HSTs could have just as easily been constructed as a single Flying Geese unit. Remember, YOU are always in charge as the maker of a pattern.
In this instance, i found that it was easier to get a good match as the points of the HSTs if they were made individually instead of substituting in a Flying Geese unit.
If you would prefer four less patches and seams per block, you can always change the block construction to your preference!
With RST, join a #3 square to the dark side of a HST as shown below, pressing the SA as indicated by the white arrow below.

Again, make four.
To join the pairs, match RSTs and stitch, pinning as needed for a good match in the center of the unit.
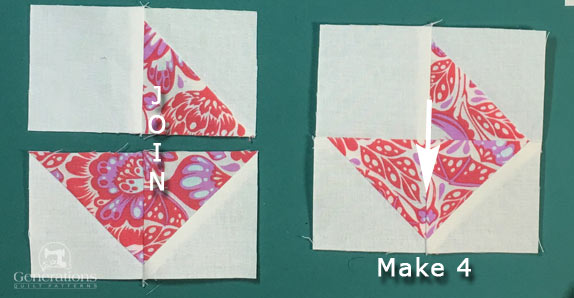
Press this seam in the direction of the arrow.
Sides
Make 4

These side units rather look like a pieced sashing between the block quarters.
We'll use strip piecing to make them quickly and accurately.
With RST, sew a #4 to one long side of your #5 strip.

It's easiest to press after each strip is added instead of after both are sewn—much less likely to accidentally press a tuck in at the seam.
Press towards #4.
With RST, add #6 to the opposite side of #5.

Use the chart below to both check the accuracy of your sewing.
Continental Quilt Block | ||
|---|---|---|
| Finished Block | Stripset Dimensions after stitching | SubCut Measurement |
| 9" | 4½" x 7" | 1½" |
| 13½" | 6½" x 9" | 2" |
| 18" | 8½" x 11" | 2½" |
At the cutting mat, straighten one short side of the strip set by aligning a straight line on your ruler (blue arrows) with a seam line.
Simply trim off a wee bit with your rotary cutter...less than a 1/4" will do the trick.

Now find your Finished Block size in the chart above and cut four units the width of the Subcut Measurement.
 The subcut on the far right shows the backside of the unit so that you can see the seams.
Step 3: Assemble your Continental quilt block
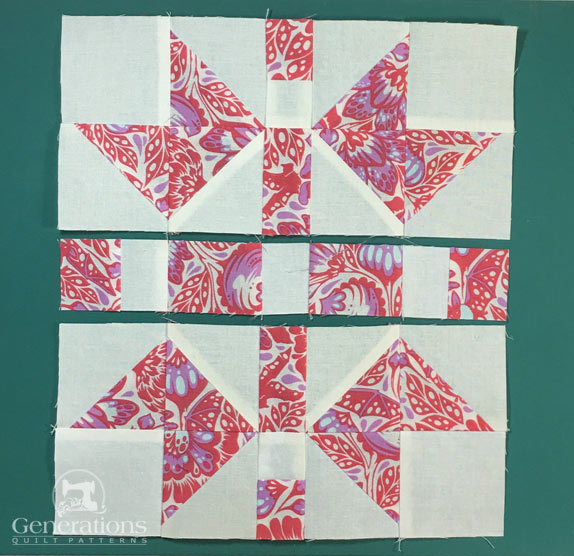
Arrange all the stitched units to create the Continental block design. The #3 square is in the outer corners. The small dark one is on the outside edge at the sides.

SAs in the top and bottom rows are pressed in toward the #4/#5/#6; the middle out is out from the center.
With RST stitch the units in each row together, pressing the SAs as shown in the photo below.
Stitch the rows together. Here you can see how I've pinned to ensure a good match at the points.
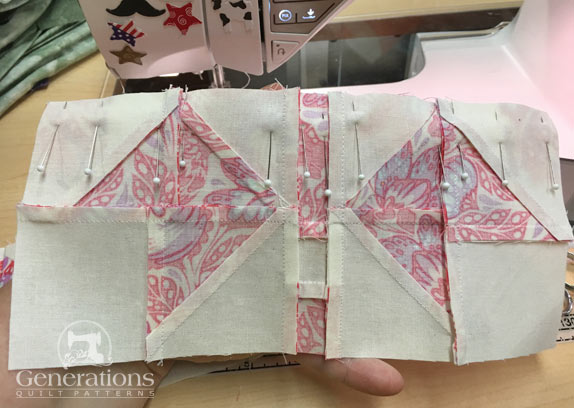
And our Continental quilt block is finished.
 Our completed Continental quilt block
Here's a look at the back to see how all the seams nested together.

What about a different quilt block?
For a list of all the 260+ quilt block patterns on this site, start here.
If you know the name of the block, shorten your search by using these links:
Click here if you're looking for blocks with at least some paper piecing.
Click here if you're looking for the basic building blocks of quilting, i.e., Flying Geese, half square triangles, quarter square triangles, etc., along with several techniques to make each.
And finally, use these links to find blocks in these finished sizes:


Yummy fabrics
to drool over
Click any image below to see the full collection and find pricing and ordering information.


By Julie Baird
Copyright © 2008-2026 Generation Quilt Patterns, LLC
All Rights Reserved
Generations-quilt-patterns.com does not sell any personal information. (See Privacy Policy)