- Home
- Free Quilt Block Patterns
- On the Square Quilt Block
On the Square Quilt Block
From our Free Quilt Block Patterns Library
This post contains affiliate links, for which I receive compensation.
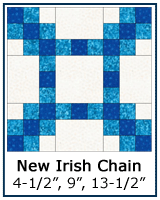
The On the Square quilt block is the same design as our New Irish Chain—though the construction method is different.
Instead of nine-patch construction, this time we're assembling the block much as we would a Courthouse Steps block—in rounds of pre-stitched 'logs'.

Two opposite sides are stitched and pressed, followed by the remaining two opposite sides. Then move to the next round of logs.
Strip piecing helps us keep all 49 patches in each block easily organized.
Let's get started.
📋 General Instructions

Several abbreviations are used in this tutorial:
- SA - seam allowance(s)
- RST - right sides together
- Bac - Background fabric
Seam allowances (SA) are all 1/4".
Pressing instructions are provided throughout the tutorial to ensure that your SA nest to make matching seams as easy as possible.
They are highlighted in yellow to make them easy to spot.
SAs that nest make matching seams so much easier.
New quilt fabrics to tickle your fancy...
Click the images below to see the full collection. We share any commercial and/or free patterns that showcase them, too. (For inspiration, of course!)


Step 1: Cutting patches for On the Square
 On the Square design
Sample Size: 9" finished / 9½" unfinished
Grid: 9x9
Design Type: Irish Chain, Log Cabin
Attributed to: Hearth & Home
AKA: New Irish Chain - American Woman
The biggest challenge to choosing quilt fabrics for this block is to have enough contrast between the medium and dark fabrics that form the chain.
You go to the trouble of cutting and piecing those squares. You certainly want to see them.
While the background is shown as a light here, there's nothing to prevent you from using a darker value.
Cutting Chart for an~ Traditional Piecing ~ | |||||||
|---|---|---|---|---|---|---|---|
| Patch | Fabric | Qty | Finished Block Size | ||||
| 9'' | 13½'' | 18'' | |||||
| 1 | Bac | 1 | 3½'' x 3½'' | 5'' x 5'' | 6½'' x 6½'' | ||
| 2 | Med | 6 | 1½'' x 7'' | 2'' x 9'' | 2½'' x 11'' | ||
| 3 | Dark | 1 | 1½'' x 7'' | 2'' x 9'' | 2½'' x 11'' | ||
| 4 | Dark | 12 | 1½'' x 1½'' | 2'' x 2'' | 2½'' x 2½'' | ||
| 5 | Bac | 1 | 3½'' x 7'' | 5'' x 9'' | 6½'' x 11'' | ||
| 6 | Bac | 1 | 5½'' x 7'' | 8'' x 9'' | 10½'' x 11'' | ||
| Unfinished Block Size | 9½'' | 14'' | 18½'' | ||||
| Grid Size | 1'' | 1½'' | 2'' | ||||

Step 2: Strip piecing the rounds for our On the Square
Start by completing all the strip piecing first. Then there's not so many pieces to keep track of.
Round 1

With RST stitch a #2 strip to each side of a #3 to form a strip set.
I love using my quarter inch foot with a guide for piecing strips together.
If my brand-spankin' new Juki machine hadn't had this foot, I wouldn't have bought it...this presser foot is that terrific!
Using it in combination with starched quilt fabric makes the process virtually foolproof.
No wonky 1/4" seams!
 Sewing the first #2 to the center #3.
Press the SAs toward the darker #3.
Set this aside.
Round 2

With RST sew a #2 to each side of the #5 patch.
SA are pressed toward #5. While this doesn't follow the usual 'press to the dark', this will help with matching seams when the rounds are added to the block.
Set aside.
Round 3

With RST sew a #2 to each long edge of the #6.
Press with SA toward #6—again this helps with matching seams later.
Set aside.
If you're having trouble getting nice flat stripsets, try this pressing technique. No special tools needed.
Just the flattest units you'll ever press!
Check the Accuracy of your On the Square Stripsets
Compare with the measurements in the chart below to make sure your strip sets are the correct width before subcutting.
If not, make any adjustments now.
| Finished Block Size | Stripset Width after stitching | SubCut Width | ||
|---|---|---|---|---|
| #2/#3/#2 | #2/#5/#2 | #2/#6/#2 | ||
| 9" | 3½" | 5½" | 7½" | 1½" |
| 13½" | 5" | 8" | 11" | 2" |
| 18" | 6½" | 10½" | 14½" | 2½" |
Straighten one short end on each of the three different strip sets.
 To straighten a short edge, align one of the ruler lines with a seam in the stripset and trim just a wee bit off the side.
All of the stripsets are subcut into four equal units. Use the chart above to find the Subcut Width.
For the pictured 9" finished sample block, all the subcuts are 1½" wide.
Here the first round patches are subcut with the waste on the right.
 The subcut #2/#3/#2 segments
Subcut the second and third rounds in the same manner.

To the ends of two of each round, add a dark #4 patch.
SA are pressed toward the #4.
 1st round
 2nd round (top) and 3rd (bottom)
One final press and all our rounds are complete. It's time to assemble the block.
Step 3: Sew the rounds to make our On the Square
As you add each group of four segments, use the chart below to check your accuracy.
| Finished Block Size | Block Size after Adding… | ||
|---|---|---|---|
| Round 1 | Round 2 | Round 3 | |
| 9" | 5½" x 5½" | 7½" x 7½" | 9½" x 9½" |
| 13½" | 8" x 8" | 11" x 11" | 14" x 14" |
| 18" | 10½" x 10½" | 14½" x 14½" | 18½" x 18½" |
Arrange the patches for the first round.

With RST, add the top and bottom units to the center #1 square.
Sew with the unit with the most seams on top to avoid flipping seam allowances as you stitch.
For the first round that means the pieced strip, #2/#3/#2 is on top (shown below).

Press SAs in toward #1.
Add the sides. While the seams of the patches nest making matching them so much easier, pins do help to hold everything in place while you sew.
Press SAs out from the center toward #2/#3/#2 top and bottom patches.
The first round is complete. Our 9" finished sample measures 5½" x 5½".
Arrange the patches for the second round.

While we're showing adding the shorter rows to the top and bottom every time, if you accidentally switch and add them to the sides...no problem.
If you follow the pressing directions everything does work out fine.
With RST, add the top and bottom patches.
Press SAs toward the center.
Repeat for the two remaining sides, pressing these SAs out.
Arrange the patches for the final round.

Stitch the short segments to the top and bottom, pressing seams in towards the center.
Add the final two segments, pressing toward the outer edge.
One final visit to the ironing board and our On the Square quilt block is finished.

On the backside it's easier to see how the seams are pressed.
 Hmmm. There's a few thread tails to be trimmed. SOMEBODY was slackin'!
There's always options in Quilting!
For an alternative way to make this block design, check out the New Irish Chain quilt block.
Will you make yours with rounds like our 'On the Square' or with 9-patches like the Irish Chain?
What about a different quilt block?
For a list of all the 260+ quilt block patterns on this site, start here.
If you know the name of the block, shorten your search by using these links:
Click here if you're looking for blocks with at least some paper piecing.
Click here if you're looking for the basic building blocks of quilting, i.e., Flying Geese, half square triangles, quarter square triangles, etc., along with several techniques to make each.
And finally, use these links to find blocks in these finished sizes:


By Julie Baird
Copyright © 2008-2026 Generation Quilt Patterns, LLC
All Rights Reserved
Generations-quilt-patterns.com does not sell any personal information. (See Privacy Policy)