- Home
- Free Quilt Block Patterns
- Morning Star, traditional piecing and assembly
Traditional Piecing Option for Your Morning Star Quilt Block 🌟
Transform simple shapes into stunning starlight ✨
This post contains affiliate links, for which I receive compensation.
Prefer traditional piecing methods?
You'll achieve the same beautiful results using familiar techniques and standard rotary cutting. Let's get started! ✨

Both paper piecing and traditional piecing techniques are provided—choose whichever suits you better.
On the page you'll find:
- Downloadable cutting charts in 5 sizes for traditional piecing methods
- More block designs that start out as 8-Pointed Stars, just like this Morning Star
It's time to cut up and sew!
📋 General Instructions
Several abbreviations are used on this page. They are:
- SA - seam allowance
- RST - right sides together
- HST - half square triangles
- QST - quarter square triangles
- Bac - Background fabric
- Med - medium value fabric
- BW - Brave World

1/4" SA are used through this tutorial.
Pressing instructions are highlighted in yellow throughout this tutorial.
When instructed to press, first press the patches in the closed position just as they came off your sewing machine.
This sets the seam, melding the fibers of the threads into the fibers of the fabric.
Cutting patches for a traditional Morning Star block

Sample Block Size: 9" finished / 9½" unfinished
Grid: 6x6
Design Type: Star, Even 9-patch | Star | Paper Pieced
You'll need a light, a medium, a dark, and a background. Our pale green dot batik is our light, with white as the background.
The green chart below is for a traditionally pieced Morning Star block.
 | Cutting Chart for a~ Traditional Piecing ~ | |||||||
|---|---|---|---|---|---|---|---|---|
| Patch | Fabric | Qty | Finished Block Size | Sub Cut | ||||
| 4½'' | 6'' | 9'' | 12'' | 15'' | ||||
| BW-1 | Light | 4 | 1¼'' x 1¼'' | 1½'' x 1½'' | 2'' x 2'' | 2½'' x 2½'' | 3'' x 3'' | --- |
| BW-2, BW-3 | Bac | 4 | 1⅝'' x 1⅝'' | 1⅞'' x 1⅞'' | 2⅜'' x 2⅜'' | 2⅞'' x 2⅞'' | 3⅜'' x 3⅜'' | |
| BW-4 | Med | 2 | 2⅜'' x 2⅜'' | 2⅞'' x 2⅞'' | 3⅞'' x 3⅞'' | 4⅞'' x 4⅞'' | 5⅞'' x 5⅞'' | |
| 5** | Dark | 2 | 2¾'' x 2¾'' | 3¼'' x 3¼'' | 4¼'' x 4¼'' | 5¼'' x 5¼'' | 6¼'' x 6¼'' | --- |
| 6** | Light | 1 | 2¾'' x 2¾'' | 3¼'' x 3¼'' | 4¼'' x 4¼'' | 5¼'' x 5¼'' | 6¼'' x 6¼'' | --- |
| 7** | Bac | 1 | 2¾'' x 2¾'' | 3¼'' x 3¼'' | 4¼'' x 4¼'' | 5¼'' x 5¼'' | 6¼'' x 6¼'' | --- |
| 8 | Light | 1 | 2'' x 2'' | 2½'' x 2½'' | 3½'' x 3½'' | 4½'' x 4½'' | 5½'' x 5½'' | --- |
| Unfinished Block Size | 5'' | 6½'' | 9½'' | 12½'' | 15½'' | na | ||
| Grid Size | 3/4'' | 1'' | 1½'' | 2'' | 2½'' | na | ||
| **I prefer to cut my patches extra large for QST, stitch, and then trim them to size. If you prefer to do the same, add a bit extra to the measurements for Patches #5, #6 and #7 above (I added 1/2" to each dimension for the sample block). There is a chart further down in these instructions where you need it for trimming them to size. If you have a perfectly reliable 1/4" seam allowance use the dimensions in the cutting charts for this patches. | ||||||||

Assembling the Brave World(BW) units continued...
Make 4

The same numbering system is used for both the paperpieced and this traditionally pieced unit.
Starching your quilt fabric before cutting, in my humble opinion, making both the cutting and piecing more accurate.
My preference is a 50/50 mix of StaFlo Liquid Starch concentrate and water.
Traditionally pieced BW units
With RST, align the short side of a BW-2 with BW-1 and stitch with a 1/4" SA.

Press with the SA toward #BW-2.
If your BW-2 triangle extends past the bottom of BW-1, you've done it right. This bit of excess disappears after adding BW-3.
Align the short side of BW-3 with the adjacent side of BW-1. You might want to flip open the patches before stitching to check that the edges of BW-2 and BW-3 form a long, straight edge.
 This seam will cut through the point on the V at the bottom of the stitching line.
After pressing the SA towards away from BW-1, you can see that we, indeed have a nice long, non-jaggedy edge. Perfect!
 The blue arrow points to the dog ears. These are clipped with scissors at some point.
With RST match all the edges of BW-4 with BW-1/BW-2/BW-3. If your cutting and SA are accurate, they should match exactly.
Here's the view from the BW-4 side.
 The dog ears need a trim. They get in the way of my favorite 1/4" foot—the one with a guide on the side.
And here's the view from the BW-1/BW-2/BW-3 perspective. A very good match!

After this last seam, it's a good idea to check that the finished BW unit is the correct size.
Use the table below to check for accuracy and find the center of the unit.
BW Dimensions for a Morning Star Block | ||
|---|---|---|
| Finished Morning Star Block Size | BW Edge-to-Edge Dimensions | Center of BW Unit |
| 4½" | 2" x 2" | 1" |
| 6" | 2½" x 2½" | 1¼" |
| 9" | 3½" x 3½" | 1¾" |
| 12" | 4½" x 4½" | 2¼" |
| 15" | 5½" x 5½" | 2¾" |
For our 9" finished sample, our BW units should measure 3-1/2" x 3-1/2". The center is at 1-3/4".
At your cutting mat, position the 1-3/4" line of your rule on the seam between BW-1 and BW-2, and then BW-1 and BW-3. The diagonal line is directly on top of the diagonal seam (blue arrow).

Trim the top and right sides and then flip the block, repeat the ruler positioning and trim the remaining two sides.
Here is our finished unit after just a wee bit of a haircut.
 Just the tiniest bit of trimming needed(blue arrow).
Repeat for a total of 4.
QSTs
Make 4

On the back of the background and medium #6 and #7 squares, draw a diagonal line from corner to corner.
With RST, layer a marked #6 with a dark #5.
With your favorite quarter inch foot installed, stitch 1/4" away from both sides of each line. Repeat for the #7 and #5 pair.

Press.
Cut the HSTs in half on the lines. Press the HSTs open with SA to the darker #5s.
 Though it's a bit hard to see the two on the left are my dark plus background fabric. The two on the right are my dark with the light fabric choice.
Position a line on your ruler (colored in red to help you see it) with the stitched seam and the top and bottom corners of one of your patches. (This ensures patches that have perfect 90° angles in the center.)
If you started with over-sized patches like I do, you'll have a bit of wiggle room so don't worry is the ruler isn't exactly in the corners.
Draw a diagonal line with your favorite marking tool.

Here you can see just a bit better that the ruler is aligned with stitching (red arrow).
 My stitches are directly under this dashed marking on the ruler.
With RST, layer a #5/#6 and a #5/#7 HST, nudging the seams together with your fingers in the center. I pin to help hold these seams together during sewing.
Here, before sewing, I've pulled back the top HST to check that the seams are matching up and that the dark fabrics alternate.

Stitch 1/4" away from both sides of each marking.

After sewing, check for a good match at the center of the QSTs.
 Yep. That's a good one.
Press the units flat to set the seam.
Cut in half along the markings.

Press the QSTs open with the SA in either direction.
 I love my Magic Pressing Mat...everything presses so nice and flat.
Refer to the table below and find the Center Measurement that corresponds to your chosen Finished Block Size.
QST Dimensions | ||
|---|---|---|
| Finished Block Size | Center Measurement | Trim QST to… |
| 4½" | 1" | 2" |
| 6" | 1¼" | 2½" |
| 9" | 1¾" | 3½" |
| 12" | 2¼" | 4½" |
| 15" | 2¾" | 5½" |
You need a square ruler with a 90° diagonal line that runs through the corners for trimming. My very favorite ruler for this job is the new one by Quilters Select.
Position the diagonal line of the ruler right on top of the diagonal seam line (red arrow) and the Center Measurement marks directly over the center of the QST where all the seams come together.
For our 9" sample Morning Star, that measurement is 1-3/4".
Trim.
 This is my new favorite ruler for trimming half and quarter square triangles—my Quilters Select in action. It just doesn't slip. Sweet!
If you cut your patches exactly as in the chart, you'll be using this measurement to check that your patches are the correct size. Make adjustments as needed.
Rotate the QST so that the two cut edges are now under your ruler.
Align the diagonal ruler line as before (red arrow). Find the Trim QSTs to... measurement in the chart above. These marks on your ruler should be directly over the two trimmed edges.
For our 9" sample, that's 3-1/2", and it's right over those cut edges.
 The seams perfectly bisect the corners of the QST
Trim away the excess.
Repeat these steps until you've completed four perfect QSTs.
Assemble your Morning Star quilt block
Lay out all your patches to create the Morning Star design. The light fabric patch in each unit is towards the center of the block. It forms a square behind the Ohio star design.
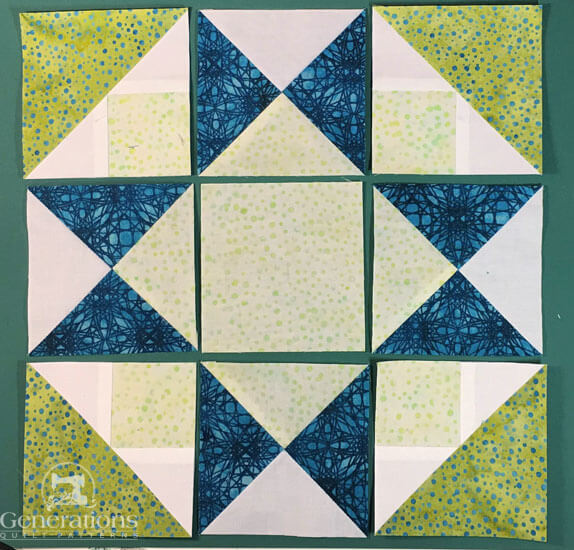
With RST, stitch the units in each row together.
The seams of the large triangles in the BWs (green dot) and QSTs (dark blue) nest to make matching the points at the outside edge virtually foolproof.
SA are pressed toward the BW units and the center square in the middle row.
Sew the rows together, pinning when needed to help keep everything lined up and points matching.
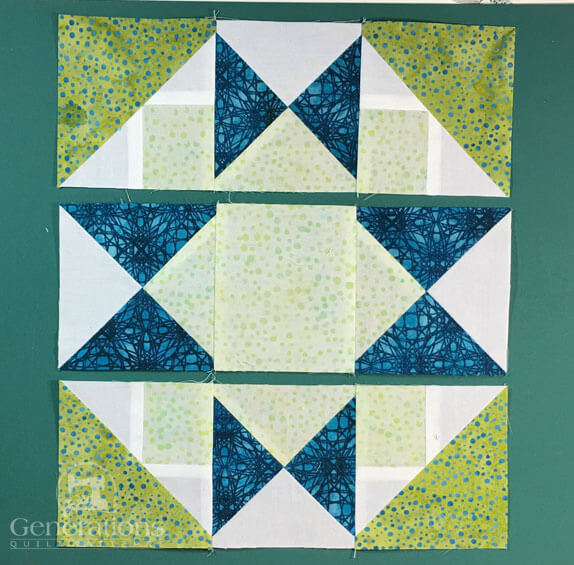
This is our finished Morning Star quilt block.

To help you understand how all the SAs fit together, here is our Morning Star block from the backside.

You Did It: Your Morning Star Is Shining! ⭐
Look at those perfect points you created! Whether you chose paper piecing for precision or traditional piecing for comfort, you've mastered new skills and created something beautiful. 🌟
Remember when those star points seemed tricky? Now you're a celestial quilting expert! Sure, you might have had a chat with your seam ripper along the way (we all do!), but every stitch brought you closer to this stunning finish. ✨
Until we meet again, may your rulers stay found and your rotary blades sharp!
📌 The Morning Star quilt block bends the Space-Time Continuum
Add some gravitational pull to your Pinterest board—this stellar block is pure astronomical magic! 🪐✨

More related 8-pointed star quilt block patterns
There are several tutorials available to you on this website that start with an Ohio star as its base. Click on any of the images below to go straight to that tutorial.
Aunt Dinah and Twin Star may seem a little suspect.
But look closely. Those are 3-patch quarter square triangles on each side.
You'll find confirmation in Barbara Brackman's BlockBase+ (love the software). These blocks are listed in the '09 Equal Nine Patch' library in '03 Like Ohio Star'.


🔭 Looking for something truly stellar?
You've finished your star quilt block, and you're ready for more!
Browse our collection of 70 stellar star quilt block patterns. All have instructions and cutting charts in multiple sizes. If templates or paper piecing is used in the tutorial, there's a free download for you of those materials.

Eeny. Meenie. Miney. Moe.
Which star quilt block will you sew?
For a star-studded quilting experience, choose from 100+ bedazzling star quilt patterns—for beginners and beyond—click here.
For even MORE blocks to make… 🧩🎨

...visit our Free Quilt Block Pattern Library, with over 260+ blocks to choose from in multiple sizes.
Free downloads are included in all sizes for any blocks require paper piecing patterns or templates.
- Home
- Free Quilt Block Patterns
- Morning Star, traditional piecing and assembly


By Julie Baird
Copyright © 2008-2026 Generation Quilt Patterns, LLC
All Rights Reserved
Generations-quilt-patterns.com does not sell any personal information. (See Privacy Policy)