- Home
- Free Quilt Block Patterns
- Maple Leaf Design Quilt Block
Maple Leaf Design Quilt Block
A Tutorial using the Connector (or Folded) Corners Technique
This post contains affiliate links, for which I receive compensation.
Skill Level: Beginner
The Maple Leaf Design quilt block (AKA: Arabic Latticework, Broad Arrows, or Fig Leaf) is deceptively simple to make.
We use the connector corner technique to eliminate the need to cut triangles. No bias edges to mess with!
And there's a secret design element. I'll show you after we make the block. (Click here if you can't wait!)

The block is pre-cut friendly, too. For the 6" block, a single leaf can be cut from a charm square, or pairs of leaves from a layer cake. (Can you say 'Stash Buster'?!!!)
Let's leave all this talk behind and start piecing our Maple Leaf Design quilt block.
📋 General Instructions

All seam allowances (SA) are 1/4".
Press units flat first to set the seam. Then open the patches and press again, being careful not to accidentally press a tuck in at the SA.
New quilt fabrics to tickle your fancy...
Click the images below to see the full collection. We share any commercial and/or free patterns that showcase them, too. (For inspiration, of course!)


Step 1: Cut patches for a Maple Leaf design

Sample Size: 9" finished / 9½" unfinished
Grid: 6x6
Attribution: Ladies Home Journal
AKA: Arabic Latticework (QNM), Broad Arrows (Nancy Cabot), Broad Arrows (Farm Journal), Fig Leaf (QNM)
Design Type: 4-patch
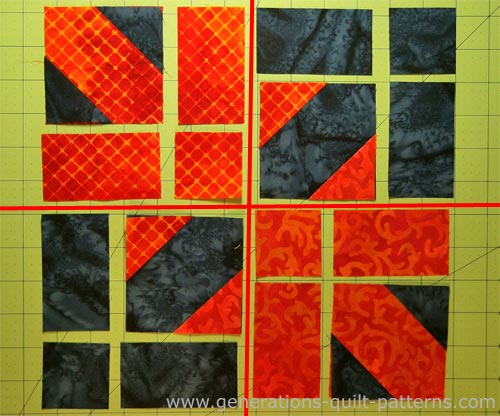
To really make this block ZING! be sure to select leaf and background fabrics with strong contrast.
If you use a light background go for medium-dark or dark leaves to ensure they all show up when the blocks are set into your quilt.
In the example block, the pretty leaves are cut from clear, bright colors. The background is a muted or shaded dark gray-blue. The leaves literally pop off the background in person.
 |
Cutting Chart for a~ Traditional Piecing w/Connector Corners ~ | |||
|---|---|---|---|---|
| Patch | Qty and Fabric | Finished Block Size | ||
| 6" | 9” | 12” | ||
| Large Square (LS) | 2 – Background 1 – A 1 – B | 2½" x 2½" | 3½" x 3½" | 4½" x 4½" |
| Small Square (SS) | 6 – Background 3 – A 3 – B | 1½" x 1½" | 2” x 2" | 2½" x 2½" |
| Rectangle (R) | 4 – Background 2 – A 2 – B | 1½" x 2½" | 2” x 3½" | 2½" x 4½" |
| Unfinished Block Size | 6½" | 9½" | 12½" | |
| Grid Size | 1” | 1½" | 2” | |
Step 2: Assemble the units for your Maple Leaf Design
Using the Connector or Folded Corner technique, start by drawing diagonal lines on the backs of 8 small squares (SS): four background, two A and two B. I've used my Bohin Mechanical chalk pencil to draw them. (It makes a perfect fine line—every time!)
 You can barely make out the chalk mark on the backs of the orange squares, but it's just dark enough to see when I'm sewing.
With right sides together (RST), align the edges of two SS-Background (SS-Bac) in the opposite corners of a LS-Fabric A (LS-A) and a LS-Fabric B (LS-B). Stitch on the lines.
With RST, align the edges of a SS-A and a SS-B in opposite corners of the two LS-Bac. Stitch on the lines.
 Sewing the connector corners to the large squares (LS).
With a scissor, trim away the excess fabric from the small squares as shown below. Leave a 1/4" SA.
 Each LS-B has a connector corner in Fabric A and Fabric B.
Press.
Your connector corners are finished.

Step 3: Assemble your Maple Leaf Design quilt block
Lay out all your patches paying particular attention to the connector corner units with the background fabric in the center.

With RST, stitch together a SS and a R from each quadrant. Both are from the same fabric.
Why is that? Wouldn't it be easier/faster to just cut a larger rectangle?
Yes, it would! But this way you can choose to piece a scrappy block and keep the values symmetrical.

Press with SA to the R.
Join the R to the Connector Corner unit in each quadrant. Press with the SA toward the R.

With RST, stitch each of the pairs of units together, pressing with the SA toward the pretty leaves.
 Ideally the corner of the Fabric A & B triangles (above) match with the seamline between the R and SS of the adjoining leaf.
And finally, stitch the rows together. Your SA nest to help get a perfect match in the center of your Maple Leaf Design quilt block.

Your Maple Leaf Design quilt block is finished!

Keeping a Promise!
In the introduction, I promised a design secret and here it is!
When these blocks are set edge to edge, adjoining ones complete a background leaf. Here they are with a light background...

...and now with a dark...

An interesting note about value.
Both the quilt diagrams above contain the same two blocks. The gray used for the leaves is exactly the same in both diagrams.
However, with the dark background and higher contrast, the lightest leaf really pops.
To cut using pre-cut squares...
The 6" Maple Leaf Design is pre-cut friendly. Cut as indicated below. The gray areas are waste.
 5" Charm Square
You can get the patches for a single leaf from a Charm Square...
 10" Layer Cake
Or four pretty leaves from a Layer Cake square...
A kissin' cousin...

...of our Maple Leaf Design quilt block is the Ozark Maple Leaf.
It is made with fewer connector corner units. Half square triangles are used for the extra points at the outside edges of the leaves.
Click here for instructions to make the Ozark Maple Leaf design.
What about a different quilt block?
For a list of all the 260+ quilt block patterns on this site, start here.
If you know the name of the block, shorten your search by using these links:
Click here if you're looking for blocks with at least some paper piecing.
Click here if you're looking for the basic building blocks of quilting, i.e., Flying Geese, half square triangles, quarter square triangles, etc., along with several techniques to make each.
And finally, use these links to find blocks in these finished sizes:


Yummy fabrics
to drool over
Click any image below to see the full collection and find pricing and ordering information.


By Julie Baird
Copyright © 2008-2026 Generation Quilt Patterns, LLC
All Rights Reserved
Generations-quilt-patterns.com does not sell any personal information. (See Privacy Policy)