- Home
- Free Quilt Block Patterns
- Joyces Mystery Quilt Block
Joyce's Mystery Quilt Block
Perfect Points can be YOURS with Paper Piecing!
This post contains affiliate links, for which I receive compensation.
Skill Level: Confident Beginner
A Joyce's Mystery quilt block looks like it might be a prickly little thing to make.
But don't let all those points fool you!
Paperpiecing is the great equalizer.
If you can sew on a line, you CAN make this block. And staying on the line is even easier once you slow your machine speed.
Let's take the mystery out of Joyce's block!

📋 General Instructions
 Open Toe
Applique Foot
For paperpiecing, reduce your stitch length to 15-18 stitches to the inch. This makes more holes in the pattern making the paper easier to remove at the end.
More stitches also reduces the amount of stress on each individual stitch as the paper is torn away.
If you have one, install an open toe applique foot. It makes it so much easier to see the line as you're stitching.
Should you have a hard time removing the paper from your finished units, try using a larger, 90/14, needle. Personally, I regularly use a 80/12 without a problem.
What's important, though, is what works BEST for YOU!
All the seams in the units run from one outside edge to the other. Start and end all your seams a 1/4" from the beginning and ending of each solid stitching line.
And finally, sew slower. If you've got a speed control dial on your machine, dial it down. Staying on the line is crucial to a block that virtually puts itself together.
New quilt fabrics to tickle your fancy...
Click the images below to see the full collection. We share any commercial and/or free patterns that showcase them, too. (For inspiration, of course!)


Step 1: Download and print the patterns
To download any of the Joyce's Mystery block patterns, you MUST HAVE ADOBE READER installed on your computer. Get it here if you don't already have it.
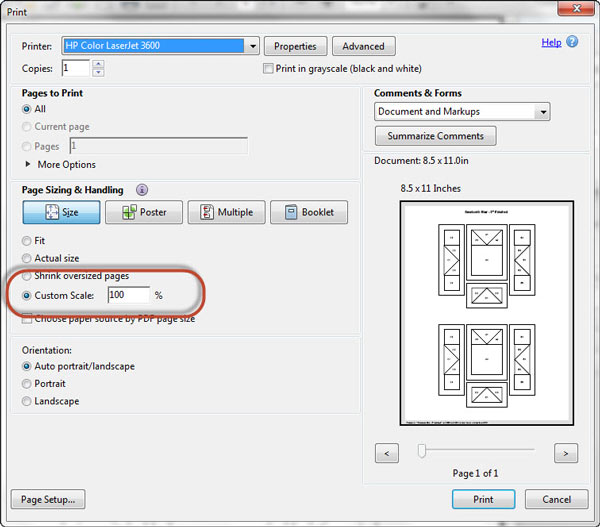
Next, open the downloaded file, and select the "Print" option.
To print blocks at the correct size, under 'Page Sizing and
Handling' in the Adobe print menu, set 'Custom Scale' to 100%. Click here to see what it looks like on the Print Menu page.
If you use something other than Adobe, you'll need to set 'Page Scaling' to 'None' to print at '100%'. Printing at 'Actual Size' tends to print blocks at weird sizes.
Once you've printed your pattern, use the information on the page to measure your block to confirm that it printed at the correct size. Most pages include a 1" square graphic to help you make this determination.
Choose the size you want and print from the links contained with the chart below.
| PRINT the Joyce's Mystery Paper Piecing Patterns | ||
|---|---|---|
| Finished Block Size | # of copies to print | Link to PDF Pattern |
| 4-1/2” | 1 | 4-1/2" |
| 6” | 1 | 6" |
| 9” | 1 | 9" |
Step 2: Cutting patches for Joyce's Mystery
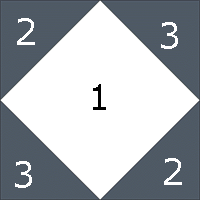
 Joyce's Mystery
Sample Size: 6" finished / 6½" unfinished
Grid: 6x6
Design Type: Uneven 9-patch, large center
There should be a strong contrast between the A and B fabrics so that the points don't get lost.
For smaller blocks, choose fabrics that read as a solid—tone-on-tone, low contrast designs or actual solid fabrics.
The center of the 9" block is large enough (4-1/4" finished) for a 4" machine embroidery design as along as it looks good on-point.
All the measurements in the cutting chart are for squares, i.e. 2-5/8" means to cut a 2-5/8" x 2-5/8" square.
Remember to subcut units #2-#6.
 |
Cutting Chart for a~ Paper Piecing ~ | |||||
|---|---|---|---|---|---|---|
| Patch | Fabric | Qty | Finished Block Size | Sub Cut | ||
| 4 1/2" | 6" | 9" | ||||
| 1 | Background | 1 | 2 5/8" | 3 3/8" | 4 3/4" | na |
| 2, 3 | Dark | 2 | 2 7/8" | 3 3/8" | 4 3/8" | |
| 4 | Dark | 1 | 3 1/8" | 3 5/8" | 4 5/8" | |
| 5 | Background | 2 | 3 1/8" | 3 5/8" | 4 5/8" | |
| 6 | Medium | 4 | 2 1/8" | 2 3/8" | 2 7/8" | |
| 7 | Medium | 4 | 1-1/4” | 1-1/2” | 2” | na |
| Unfinished Block Size | 5 " | 6 1/2" | 9 1/2" | na | ||
| Grid Size | 3/4" | 1" | 1 1/2" | na | ||
Step 3: Stitch the Joyce's Mystery units
General Sewing Machine Setup for Paperpiecing
- Reduce your stitch length to 16–20 stitches per inch (1.3-1.6 mm). This perforates the paper and stabilizes the seam when you remove the pattern. [Learn more about stitch length here.]
- Reduce your machine's speed or just plain slow down. Sew only as fast as you can stay on the stitching lines.
- Install an open toe appliqué foot (sometimes called an 'embroidery' or 'satin stitch' foot) if you have one (it's easier to see where you're stitching with one installed).
- Use a larger needle (90/14) if you have problems removing the pattern.
- If your machine has a needle stop up, use it. The stitching goes faster when you don't have to lift the presser foot with every seam.
- As you stitch each seam, start and stop a generous 1/4” before and after the solid stitching lines. ALWAYS. Future lines of stitching secure the ends.
After adding each patch, press the unit as it was sewn to set the seam and then open. The SA is automatically pressed towards the last patch added.
Before adding the next patch, take a look to make sure the one you just added covers the space plus seam allowance that it is supposed to.
Steam is optional and usually curls the pattern.
If that bothers you, don't use steam. Sometimes I do. Sometimes I don't.
It truly depends on my mood.
Remember, as you follow this paper piecing tutorial, the printed and the fabric sides of this block are mirror-images of each other.
At last!
Let's sew!
Center
Make 1
Use a dot of Elmer's Washable glue stick to position the wrong side of #1 to the unmarked side of the pattern. The dashed placement guides make this quick, easy and accurate.
 Arrows point to the placement guides.
With right sides together (RST) align the long edge of a #2 with #1. The point of #2 should lineup directly with the corner of the #2 patch on the pattern. (arrow)

Stitch.
 Remember to start and stop a quarter inch beyond the solid stitching line.
Add the second #2. Press both seams.
Repeat the process for the #3s. Before pressing, trim away the dog ears with a scissor to reduce bulk.
 Arrows point to where the dogears USED to be.
Press.
Trim the center to size. This is the finished center after removing the paper. As long as you stitched directly on the line, the points are a perfect 1/4" from the edges.

Sides
Make 4

With a bit of Elmer's glue stick, position #4 on the unprinted side of the pattern using the dashed guidelines.

With RST align the short edge of a #5 with either the left or right side of #4.
To minimize any trimming, position the #5 patch so that it extends a 1/4" past the printed line between #5 and #6 (right arrow below).

Stitch.
 Again, start and stop a quarter inch beyond the solid stitching line (arows).
Repeat for the second #5 and press.
Trim the seam allowance to 1/4" if it needs it.
With RST, align the long edge of #6 with the trimmed edge of #5.
 Line up the corner of the #6 patch with the corner of the pattern (red arrow).
Stitch and repeat for the other #6. Cut away any dog ears with a scissor to reduce bulk.
 A dog ear has been trimmed away at the arrow...only one left!
Press.
At this point. the untrimmed side units look like a hot mess!
 Pretty messy looking,..eh??!!
Cut the side units down to size with your rotary cutter and ruler and using the outlines of the block as guides. (I use my rotating Olfa mat for this.)
The 1/4" mark on my ruler (arrow) is laid directly on top of the solid black outline around the unit. The excess is cut away. This is repeated for every side of every unit.
 The arrow points to the 1/4" line.
Remove the paper from the units after they are all stitched.

The paper piecing is complete. From this point forward, return your stitch length to the one you regularly use for piecing and install your favorite 1/4" presser foot.
Step 4: Assemble the Joyce's Mystery quilt block
The paperpiecing is finished.
Install your favorite 1/4" foot and return the stitch length to what you normally use for piecing.
Arrange the patches (including the cut squares for the corners) into the Joyce's Mystery design.

Stitch the units in each row together, pressing the SA away from the side units to reduce bulk.

Stitch the rows together. I used pins to match the seams between the units, but didn't have to worry about the points in the valleys of the sides.
Sewing directly on the lines makes for perfect quarter inch seams.
 I've used pins to help match the seamlines and hold the beginning and ending edges even.
After the sewing is complete, the last step to complete this Joyce's Mystery quilt block is to press...using my favorite pressing technique!
This is the finished block.
 A finished Joyce's Mystery quilt block.
What about a different quilt block?
For a list of all the 220+ quilt block patterns on this site, start here.
If you know the name of the block, shorten your search by using these links:
Click here if you're looking for blocks with at least some paper piecing.
Click here if you're looking for the basic building blocks of quilting, i.e., Flying Geese, half square triangles, quarter square triangles, etc., along with several techniques to make each.
And finally, use these links to find blocks in these finished sizes:


Yummy fabrics
to drool over
Click any image below to see the full collection and find pricing and ordering information.


By Julie Baird
Copyright © 2008-2026 Generation Quilt Patterns, LLC
All Rights Reserved
Generations-quilt-patterns.com does not sell any personal information. (See Privacy Policy)