- Home
- Free Quilt Block Patterns
- Indian Hatchet Quilt Block
Indian Hatchet Quilt Block
From our Free Quilt Block Patterns Library
This post contains affiliate links, for which I receive compensation.
Skill Level: Beginner
Our Indian Hatchet quilt block (AKA Indian Hatchets) design is made using the Connector or Folded Corners technique.
No triangles to cut. No bias to contend with...it's just squares.
These connector corners are 3/4 the size of the finished block. Since they overlap, the only place to worry about matching a seam is at the corners of the units.
Truly a beginner friendly block!

If you really want to stretch your stash, you'll learn how to get either eight extra half square triangles (HSTs) out of each block with bonus HSTs. Pretty nifty!
At the end of this page, you'll find design ideas to make your own quilt.
Chop! Chop! It's time to make our Indian Hatchet quilt block.
📋 General Instructions

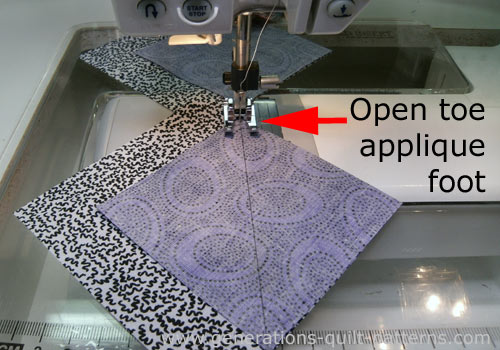
For the connector corners portion of the block, I prefer to use an open toe applique foot. It provides an unobstructed view of the stitching lines.
When pressing, first press units flat, in the 'unopened' position, to set the seam and squish or meld the thread into the fibers of your fabric. Then press the smaller square out and towards the corner.
If you starch your quilt fabric before cutting, you can usually fingerpress most of your seams. Always give your finished Indian Hatchet a final press with the iron.
Try our favorite technique for pressing for truly flat patchwork!
New quilt fabrics to tickle your fancy...
Click the images below to see the full collection. We share any commercial and/or free patterns that showcase them, too. (For inspiration, of course!)


Step 1: Cut the patches for an Indian Hatchet
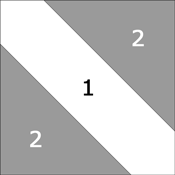
 Indian Hatchet
Sample Size: 8" finished / 8½" unfinished
Grid: 8x8
Attribution: Ladies Art Company
Design Type: 4-Patch
To save space and include more block sizes, all of the measurements in the table below are for cutting squares.
So 4-1/2" means a 4-1/2" square.
The example contains a block with a light #1, but there's no reason you can't swap values between the patches for a different look.
To download and print a copy of the block design and the cutting chart below, click here.
 | Cutting Chart for an~ Traditional Piecing ~ | ||||||
|---|---|---|---|---|---|---|---|
| Patch | Fabric | Qty | Finished Block Size | ||||
| 4" | 6" | 8" | 10" | 12" | |||
| 1 | A | 4 | 2½'' | 3½'' | 4½'' | 5½'' | 6½'' |
| 2 | B | 8 | 2'' | 2¾'' | 3½'' | 4¼'' | 5'' |
| Bonus triangles, unfinished size | 1 1/2" | 2 1/4" | 3" | 3 3/4" | 4 1/2" | ||
| Unfinished Block Size | 4 1/2" | 6 1/2" | 8 1/2" | 10 1/2" | 12 1/2" | ||
| Grid Size | 1/2" | 3/4" | 1" | 1 1/4" | 1 1/2" | ||
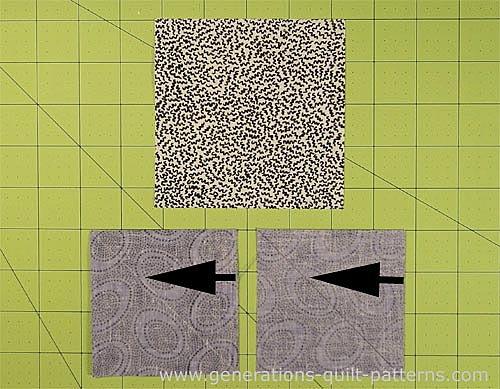
Step 2: Assembling the units
For each Indian Hatchet quilt block, you'll need to make four of the unit to the right.
On the back side of every #2 square, draw a diagonal line, just dark enough so that you can see it. It is the seam line and you don't want your mark to show through to the front of the block.
 On the left I marked with chalk, on the right with a mechanical pencil lead
With right sides together (RST) align two edges of a #1 and #2, positioning #2 as shown below.
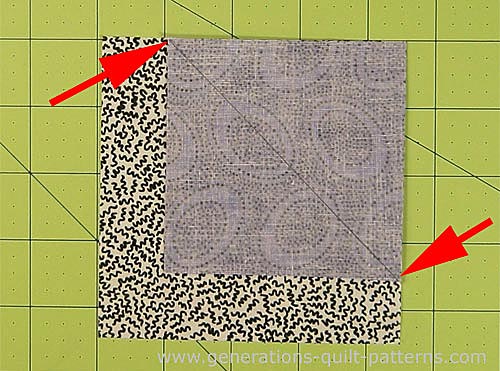 Red arrows point to the ends of the stitching line
Stitch on the line. I like to start and stop on a scrap of fabric—sometimes called a 'bunny tail' or 'spider—so that my machine doesn't chew up the fabric.
Repeat for all four #1s.
Press.
If you find that your #2 edges extend a just smidge past the edge of the #1, give them a little trim so that they're even.
If they fall short of the edge, double check that you've marked the diagonal in the correct place. Try a pencil that makes a finer mark (I like mechanical pencils for that reason). Try sewing on the side of the line closest to the corner to accommodate the turn of the cloth.
There's no need to stress about it because, ultimately, the only place we need to match these blocks when they're set together is at the corners. Sweet!
Let's get back to our Indian Hatchet quilt block. We've got...
Decisions! Decisions!
There are two options with connector corners. One saves fabric. One doesn't.
If your #2 squares are large enough, you can easily create a bonus half square triangle (HST) from each corner. It's quick, too!
Mark a 1/2" away from the original stitching line. (1/2" gives you a 1/4" inch seam allowance for both units.)
 You can just barely see it, the sewing is in white thread.
Stitch and press.
Cut between the two stitching lines with your scissors or a rotary cutter.
Voila! Bonus HST!

When our unit is finished, we've got two bonus HST. Store these away for the next time you need scrappy units!
NOTE: In our cutting chart there's a row, 'Bonus triangles, unfinished size'. If you sewed and cut accurately, your triangles will match these measurements.
 The back side of the finished unit and two bonus HST
Now having a bunch of HSTs laying around isn't going to blow everyone's skirt up.
In the photo below, our objective is to reduce the bulk created by the connector corner technique. Simply trim away the excess #2 fabric a 1/4" past the original stitching line (closest to the corner).
Press.

After adding both #2 in this manner, you have...
 The back side of the finished unit, and two spare triangles—for scrap or to make spiders out of
Now back to completing our units...
Repeat for the remaining diagonal corner of the #1 square using whichever trimming technique you prefer for the bonus triangles.
In the photo below, you can see my ratty-looking spider behind the needle as I add the second #2. Someone told me they were called 'spiders' because they have 'hairy legs'.
So true!

You can easily draw in the line for the bonus triangle at the sewing machine if you choose.

Step 3: Assemble your Indian Hatchet quilt block
Install your favorite 1/4" foot for the rest of the construction.
Lay out the units. Stitch them into two rows.
 Some of my #1 fabric is showing. Again, because the only match point is where the corners meet, there's no real need to go back and resew.
Stitch the rows together. Because I choose to cut away only the excess #2, there are extra layers to stitch through. I find I get a better match in the center when I pin.

Give your block a final press.
Your Indian Hatchet quilt block is done!

You've got options...
Seriously. This is a pretty simple block to make.
But what do you do with it?
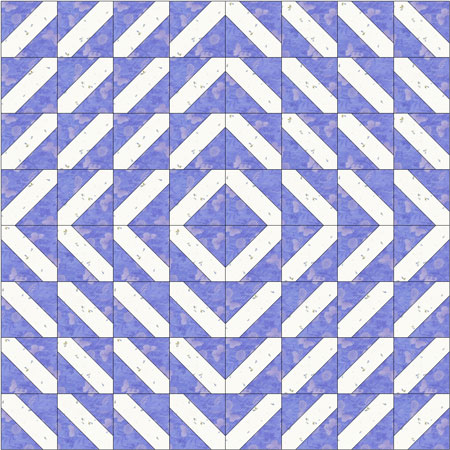
In this first one, the Indian Hatchet blocks are rotated to form a 'Barn Raising' look. The Indian Hatchet has a strong diagonal just like a Log Cabin block does. The optical illusion of the blocks bowing out is unexpected.
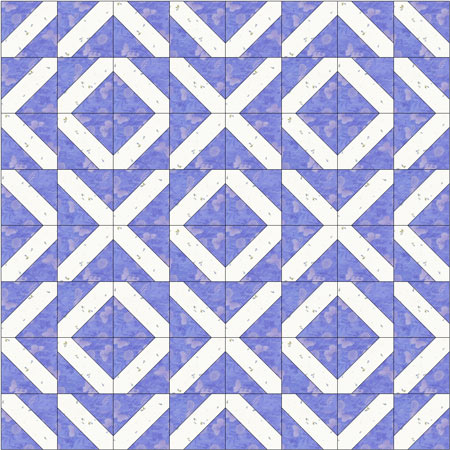
This would be a sweet and simple baby quilt, all X's and O's. It's made from blocks just like in the tutorial, only some have been rotated.
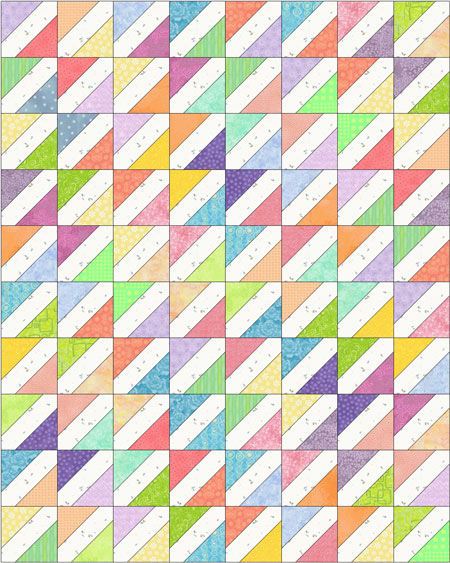
When you look at this last design, can you see a little girl's hairbows? (Tilt your head to the right a little if you can't.)
Use the same fabric in the corners of pairs of different units. To make construction and organization smoother, sew the units, lay them out to your liking and, only then, sew them into blocks.
Much easier to keep both 'loops' of the bow together that way.
What about a different quilt block?
For a list of all the 260+ quilt block patterns on this site, start here.
If you know the name of the block, shorten your search by using these links:
Click here if you're looking for blocks with at least some paper piecing.
Click here if you're looking for the basic building blocks of quilting, i.e., Flying Geese, half square triangles, quarter square triangles, etc., along with several techniques to make each.
And finally, use these links to find blocks in these finished sizes:


Yummy fabrics
to drool over
Click any image below to see the full collection and find pricing and ordering information.


By Julie Baird
Copyright © 2008-2026 Generation Quilt Patterns, LLC
All Rights Reserved
Generations-quilt-patterns.com does not sell any personal information. (See Privacy Policy)