- Home
- Free Quilt Block Patterns
- Fort Knox Quilt Block
Strike Gold with the Fort Knox Quilt Block Tutorial: 6", 9", and 12" finished blocks
From our Free Quilt Block Patterns Library
This post contains affiliate links, for which I receive compensation.
What if I told you the Fort Knox quilt block isn’t as hard to make as it looks? 😲 With my beginner-friendly tutorial, you can stitch this beauty and impress everyone with your master quilter skills! 😎
I’ll walk with you step-by-step through constructing this angular design, from cutting fabric and subcutting shapes to perfect paper piecing.
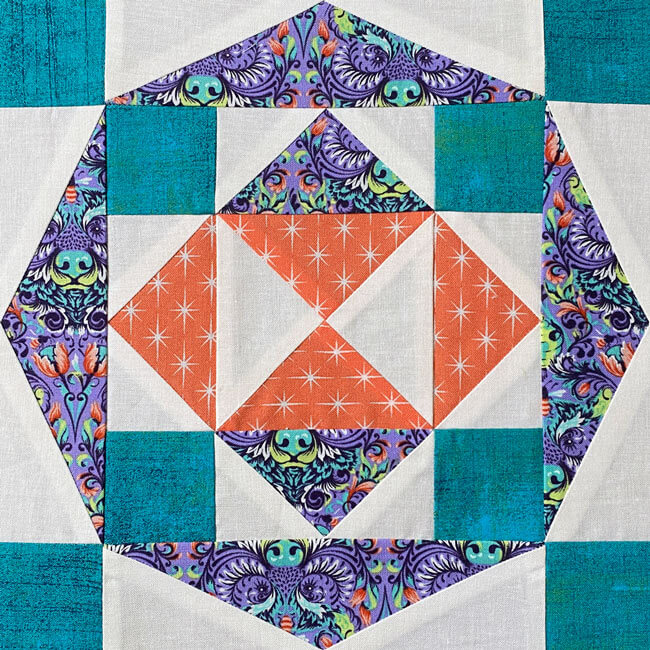
No more guessing how pieces fit together! 🤔✂️ With diagrams and photos guiding the way, you’ll align patches and sew seams like a pro. 📐🪡
Stitching on the line is quilting magic ✨ that turns even novices into confident piecing masters. And pressing tricks I’ll share ensure your Fort Knox block lies perfectly flat. 🧵
By the last triumphant seam, you’ll have pieced a glorious patchwork without breaking a sweat! 💪👏
As always, beginner-friendly, illustrated instructions are the backbone of the tutorial. There's more free goodies available for you to download. They include:
- A cutting chart in three sizes, with downloads of the chart and block design
- Give yourself a pat on the back. You DID the thing!
- Pin or bookmark this quilter’s happy place for your next creative break!
Cut. Sew. Press. Magical things happen at your sewing machine!
General Instructions
A number of abbreviations are used on this page. They are:
- SA - seam allowance
- RST - right sides together
- QST - quarter square triangles
- HDR - Half Diamond Rectangle
- FG - Flying Geese
A 1/4" SA is used in this tutorial.
Highlighted in yellow, pressing instructions are easy to spot.
To press, first press the patches in the closed position as they came off your sewing machine. This sets the seam, melding the fibers of the threads into the fibers of the fabric.
Then press the SA to the dark unless otherwise noted. Paper pieces SAs are always pressed towards the last patch added.
Since there are several points we want to match, and those matches can be lumpier than you'd like, do take a minute to review my super-secret pressing technique.
There's not a Clapper is sight if you don't have one. IMHO, the results are just as good.
Starching your quilt fabric
I love piecing with starched fabric, especially for paper piecing. Fingerpressing is more efficient when your fabric is stiff with starch.
Download and print paper piecing pattern
To download the pattern, use the most current version of Adobe.
For accurate results, on Adobe's Print Menu page, under 'Page Size and Handling' set 'Custom Scale' to 100%. Then print.
Click here to see what it looks like on the Print Menu page.
Find your finished block size from the chart below. Print the corresponding number of pages for a total of:
- 4 Flying Geese
- 4 Half Diamond Rectangles
Print the Patterns and Templates
|
|||||
|---|---|---|---|---|---|
| Finished Block Size |
FG | HDR | |||
| Copies to print |
FG Size | Copies to print |
HDR Size | Templates | |
| 6" | 1 | 1"x2" | 1 | 1" x 4" | Print 1 |
| 9" | 1 | 1½"x3" | 1 | 1½" x 6" | |
| 12" | 1 | 2"x4" | 2 | 2" x 8" | |
After printing, use the 1" square graphic on the printed page(s) to double-check that your patterns printed at the correct size.
Then cut out the required number of patterns from your copies. A rough cut is good enough—an 1/8"-1/4"-ish away from the outside dashed square.
Not sure which paper piecing paper to use?
Click here for "Does it really matter which paper piecing paper you use?" to help you make the best decision for your needs.
New quilt fabrics to tickle your fancy...
Click the images below to see the full collection. We share any commercial and/or free patterns that showcase them, too. (For inspiration, of course!)
Step 1: Cutting patches for a Broken Heart block
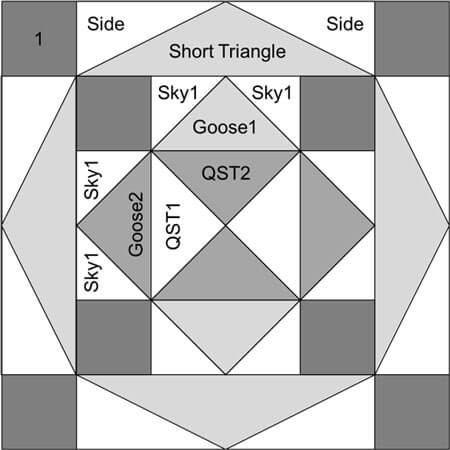
Sample Block Size: 9" finished / 9½" unfinished
Grid: 6×6
Design Type: Even 9-patch blocks | 12" blocks | Paper piecing
Fabric used in the Sample: Moda's Grunge, Tula Pink's Tiny Beasts, and Violet Craft's Modern Classics-Stars
Please label all your patches. We use their numbers throughout this tutorial.
To print a copy of the block design and cutting chart to use at your cutting table, click here.
 | Cutting Chart for a~ Paper & Traditional Piecing ~ | |||||
|---|---|---|---|---|---|---|
| Patch | Fabric | Qty | Finished Block Size | Sub Cut | ||
| 6'' | 9'' | 12'' | ||||
| 1 | Dark | 8 | 1½'' x 1½'' | 2'' x 2'' | 2½'' x 2½'' | --- |
| Short Triangle | Light | 4 | 5'' x 1¾'' | 7'' x 2¼'' | 9'' x 2¾'' | yes |
| Side | Bac | 4 | 2⅞'' x 3¼'' | 3⅜'' x 4¼'' | 3⅞'' x 5¼'' | yes |
| Goose1 | Light | 1 | 3⅝'' x 3⅝'' | 4⅝'' x 4⅝'' | 5⅝'' x 5⅝'' | |
| Goose2, QST2 | Medium | 1 | 3⅝'' x 3⅝'' | 4⅝'' x 4⅝'' | 5⅝'' x 5⅝'' | |
| Sky1 | Bac | 4 | 2⅜'' x 2⅜'' | 2⅞'' x 2⅞'' | 3⅜'' x 3⅜'' | |
| QST1 | Bac | 1 | 3⅝'' x 3⅝'' | 4⅝'' x 4⅝'' | 5⅝'' x 5⅝'' | |
| Unfinished Block Size | 6½'' | 9½'' | 12½'' | na | ||
| Grid Size | 1'' | 1½'' | 2'' | na | ||
Subcutting
Subcut all the QST and FG squares in half twice on the diagonal.
Cut out the Short Triangle template on the lines, For our 9" sample, we need the 1-1/2" x 6" finished template.
Match the edges of this template with the edges of the rectangular Patch for a Short Triangle.
I like to use a bit of Magic Tape to hold the template in place will cutting the four patches at one time. (This tape is easy to peel off your cutting mat with your fingernail.)
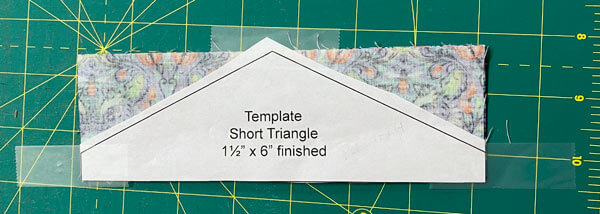
Use your rotary cutter and ruler to cut away the excess fabric to create the shape we need.
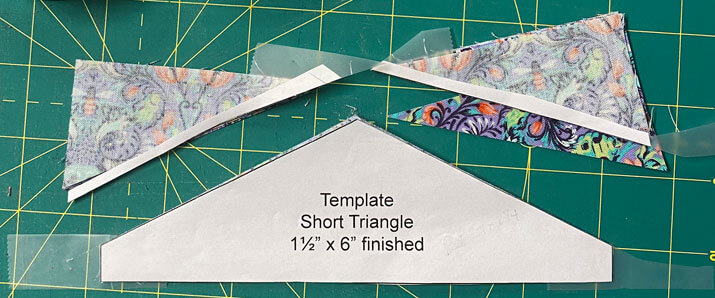 Don't worry, there's no tape to peel off your Short Triangle fabric patches. It's all on the template, the excess fabric or the cutting mat.
For the sides of the Half Diamond Rectangles, we need mirror imaged patches, so layer these Side rectangles in pairs that are RST.
IMPORTANT: The WIDTH measurement is on the top and bottom. The HEIGHT is on the left and right sides.
Make a mark 5/8" in from the top left edge and 5/8" in from the bottom right edge.
With your rotary cutter, cut the rectangles in half between the two points.
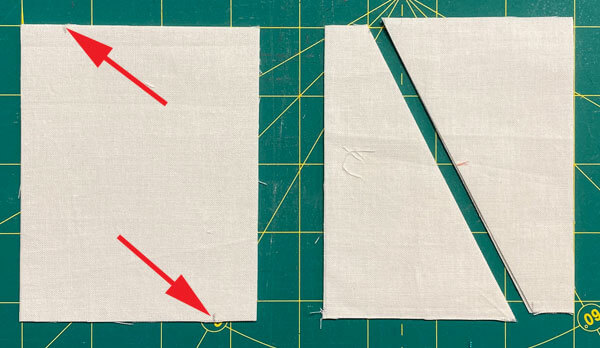 Remember, these are stacked in pairs of RST rectangle patches.
Step 2: Assemble the units for your Fort Knox block
Use a dot of Elmer's Washable Glue Stick to hold all the Short Triangle and Goose patches in position on the unprinted side of each pattern.
 The dashed lines make it quick work to position these patches accurately
Put the glue stick away, we're done with it.
Make these simple adjustments to your sewing machine to get ready to paper piece.
General Sewing Machine Setup for Paperpiecing
- Reduce your stitch length to 16–20 stitches per inch (1.3-1.6 mm). This perforates the paper and stabilizes the seam when you remove the pattern. [Learn more about stitch length here.]
- Reduce your machine's speed or just plain slow down. Sew only as fast as you can stay on the stitching lines.
- Install an open toe appliqué foot (sometimes called an 'embroidery' or 'satin stitch' foot) if you have one (it's easier to see where you're stitching with one installed).
- Use a larger needle (90/14) if you have problems removing the pattern.
- If your machine has a needle stop up, use it. The stitching goes faster when you don't have to lift the presser foot with every seam.
- As you stitch each seam, start and stop a generous 1/4” before and after the solid stitching lines. ALWAYS. Future lines of stitching secure the ends.
After adding each patch, press the unit as it was sewn to set the seam and then open. The SA is automatically pressed towards the last patch added.
Before adding the next patch, take a look to make sure the one you just added covers the space plus seam allowance that it is supposed to.
Steam is optional and usually curls the pattern.
If that bothers you, don't use steam. Sometimes I do. Sometimes I don't.
It truly depends on my mood.
Remember, as you follow this paper piecing tutorial, the printed and the fabric sides of this block are mirror-images of each other.
At last!
Let's sew!
Half Diamond Rectangle

Make 4
Why did I call it a 'Short Triangle'?
When you stand the Sides up, they are the 'tall' triangles.
With RST, line up the long bias edge of a Side with the Short Triangle patch. If you're new to making this unit, hold the patch in place and flip it open to make sure it's positioned properly.
Since I'm adding a much lighter patch to a darker one AND I don't want the dark fabric showing through the light, I nudge the light patch a few threads past the dark edge. You can see it below where the Side patch is a bit lighter/brighter at the edge.
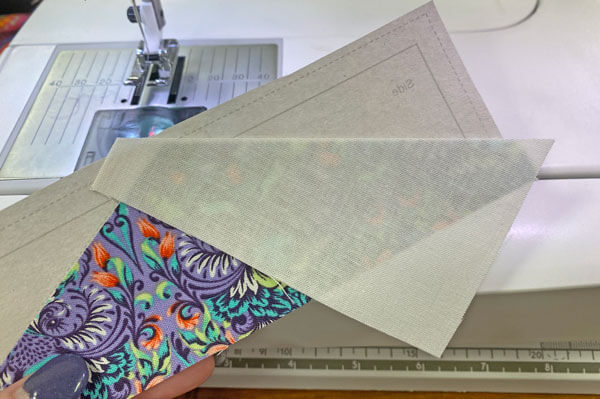
Starting from outside the dashed line that surround the units, sew on the solid line between 'Short Triangle' and 'Side'. End your stitches past the outside dashed line.
Press.
Did you give your fabrics a good starching before you cut?
If so, you can probably do just a fingerpress here and avoid jumping up to the iron. Double check that you fingerpressed the patch completely open with no tucks at the seam.
Add the second Side following these same steps.
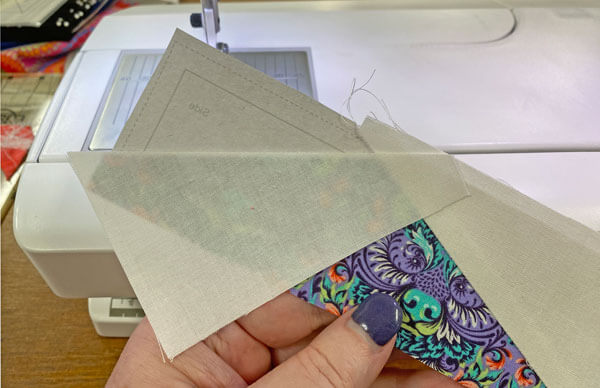
After completing all four, move your nicely pressed HDRs to the cutting mat.
Paper side up, match the 1/4" ruler marking to one of the solid lines surrounding the block (red arrow, left, below).
Cut away the excess with your rotary cutter. (#1 below)
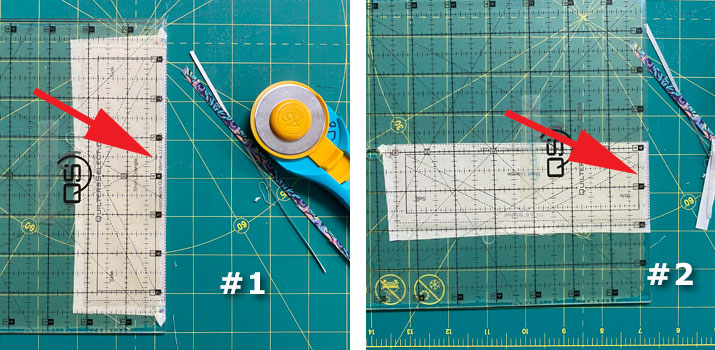
Turn the HDR or the mat a 1/4 turn and repeat. (#2 above)
Continuing until all four sides of all four HDRs are trimmed to perfection.
For a unit you don't make very often in quilting, this is a terrific result, don't you think? No special tools needed. Quite doable with accurate results.
Even for relatively new quilters!
 Untrimmed HDR, top, and trimmed to perfection, bottom
Flying Geese (FG)
Make 2 each

With RST, add a Sky patch to each side of the two different FG. You'll do this—stitch/trim/press—like you did for the HDRs you just finished above.
After trimming, you'll have two Goose1 and two Goose2 FG.
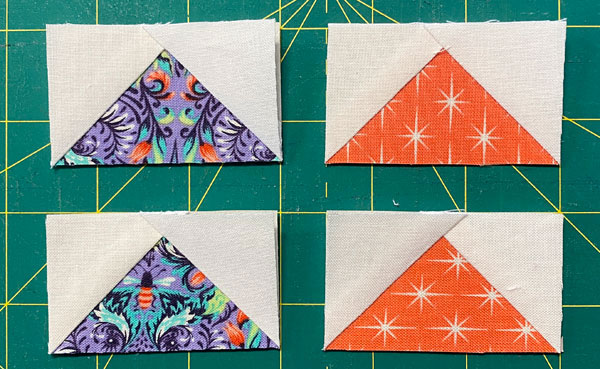 Goose1, left, and Goose2, right
The paper piecing is complete. From this point forward, return your stitch length to the one you regularly use for piecing and install your favorite 1/4" presser foot.
Remove the paper from all your patches. It no longer has a function.
We purposefully cut our oversized shapes, paying attention to the direction of the grainline.
All these units have straight of grain on the outside edges. They are as stable as any pieced with traditional techniques.
Adding/using up all the #1 patches
With RST, add a #1 to both short ends of two of the HDRs. Seams are pressed in toward the HDR.
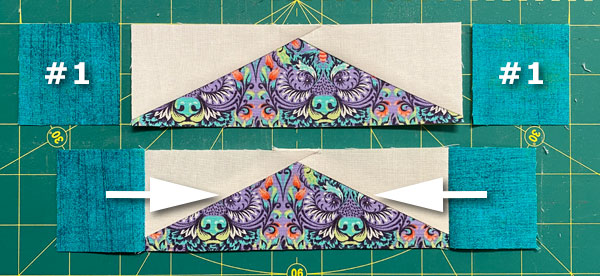 Make 2
With RST, add a #1 to both short ends of the two Goose1s. Make 2.
 Make 2.
These SAs are pressed out towards the #1s.
Quarter Square Triangle (QST)
Make 1
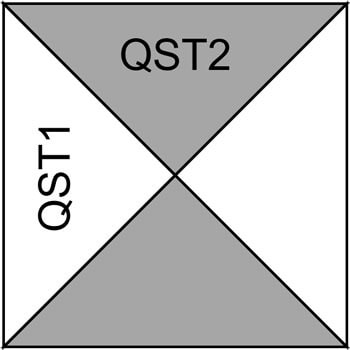
With RST, match the edges of a QST1 and QST2 and stitch along one of the shorter bias edges.
IMPORTANT: The QST1 should be on top for both pairs as you stitch from blunt end to triangle point. That way, you have usable patches for the next step.
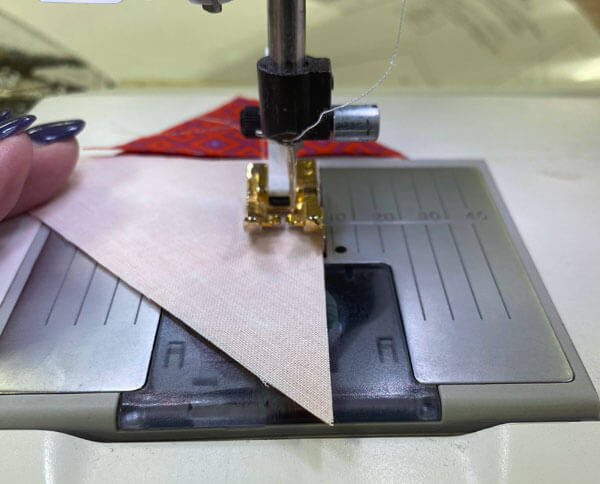 To prevent your sewing machine from chewing up the point, start your stitching from the flat side.
These SAs are pressed to the dark.
For a QST that lays flat, it's important that each half of the QST is square and, when finished, all its seams are at 90° angles to each other.
Position a ruler over one half with a straight line on the seam. The long edge should be perpendicular to this seam. If not, give it a little trim.
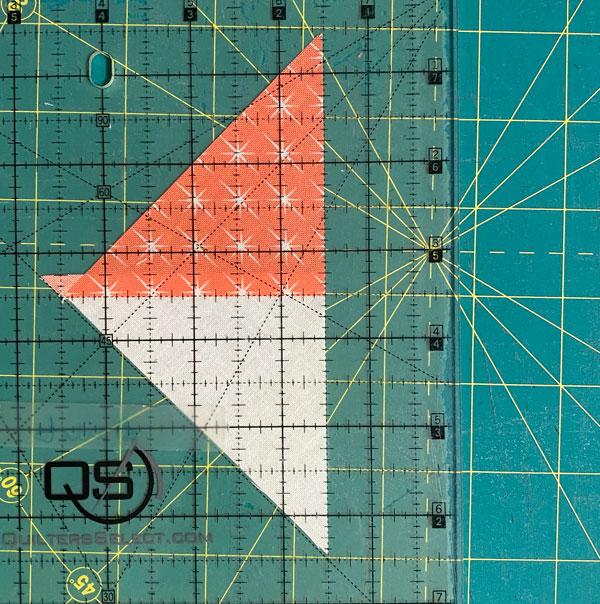 The long, vertical edge of this half-QST lines up with a straight line on the ruler. Perpendicular to the sewn seam.
With RST and fabrics alternating, sew the two halves together. I use pins to hold the seams for a good match.
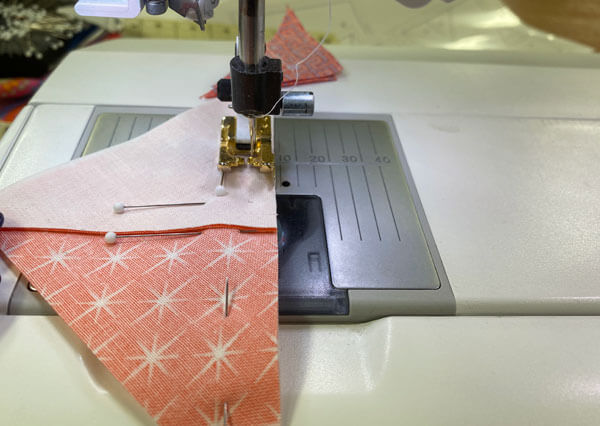
To reduce the bulk in the center of a QST, I like to twirl or fan the SA. Loosen the stitches in the center—DO NOT CUT THEM—and twist the seam. You'll be able to press the SAs counterclockwise around the center.
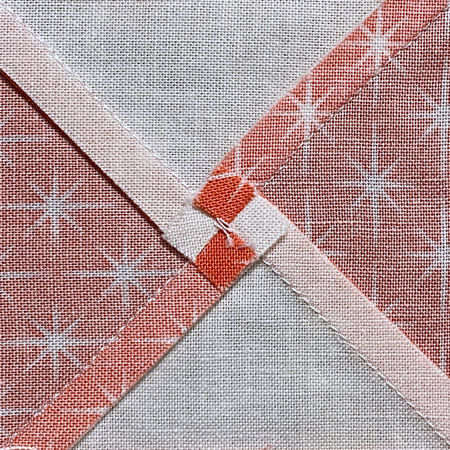 The result is much flatter than pressing the final SA to one side. It makes a cute little 4-patch, doesn't it?!!
Use the chart below to find the Center measurement that goes with your chosen Finished Block Size.
For our 9" sample, that number 1-3/4" inches.
QST Dimensions | ||
|---|---|---|
| Finished Block Size | Center Measurement | Trim QST to… |
| 6" | 1¼" | 2½" x 2½" |
| 9" | 1¾" | 3½" x 3½" |
| 12" | 2¼" | 4½" x 4½" |
Position the Center Measurement over the middle of your QST where all the seams meet. (red arrows in both images below).
Align the points and lines on your ruler so that:
- The 45° diagonal dashed line is directly over the seam running from upper right to lower left
- The unfinished size (for our 3" finished QST, it's 3½") at the top and right-side of your ruler is directly over the seam that runs in the opposite direction (upper left to lower right)
Nudge things as needed to get everything to line up.
Once you are confident with the alignment, trim away the excess fabric on the top and right-hand side of your block. (below, left)
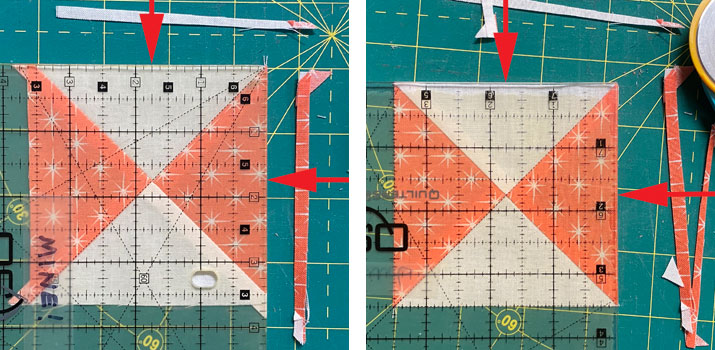 Trim the first two sides of our QST (left), turn the block 180° and trim the last two sides.
Lift the ruler, turn the QST or mat 180°. The unfinished size of the block (3½" for the sample) is directly over the freshly cut edges. (left, above)
Line up the ruler marks again, just like we did for the first side.
Once satisfied, trim away the excess again from the top and right.
Center
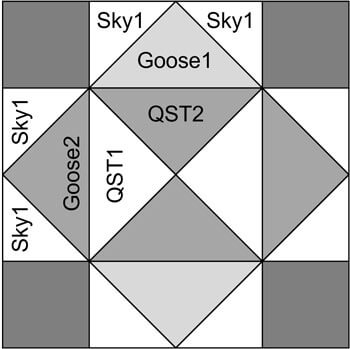 Center design for our Fort Know block
With RST, add a Goose2 to each QST1 (light) side of the QST.
These seams all nest, making it easier to get a good match.
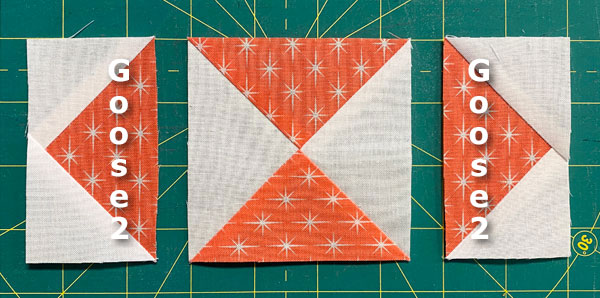
These SAs are pressed toward the QST.
Arrange the previously stitched Goose1/#1 on both sides of our QST/Goose2.
With RST, sew the units together. Again, we've got nesting SAs to help with the matching.
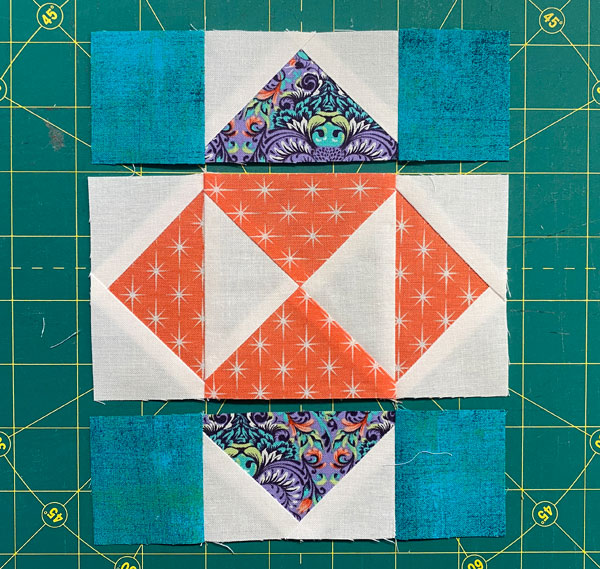
These two SAs are pressed away from the FGs .
Join the rows together, pinning as needed to hold things in place while you sew.
A final turn at the ironing board, and we're ready to put this little beauty together.
Step 3: Assemble your Fort Knox quilt block
Almost there!
The HDR/#1 are the top and bottom rows. An HDR are added to both sides of the Center. All the HDRs point outward.
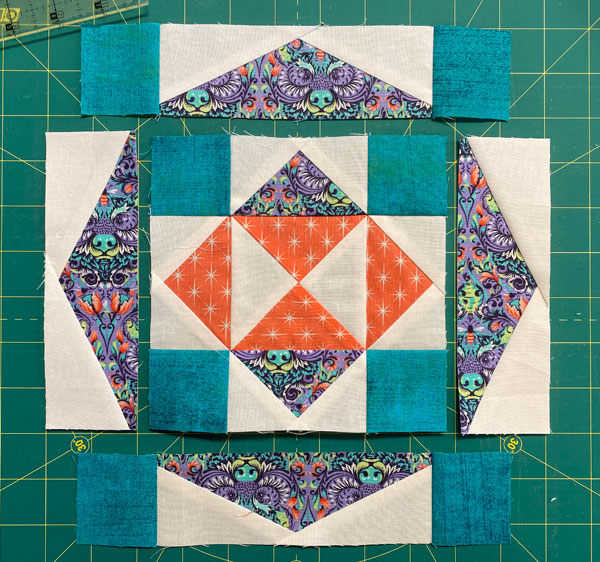
In the middle row, with RST, stitch the HDTs to the Center.
Press these SAs toward the HDRs.
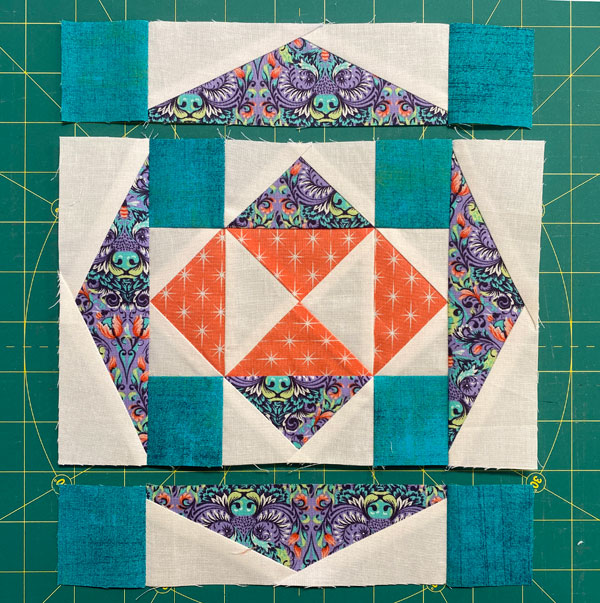
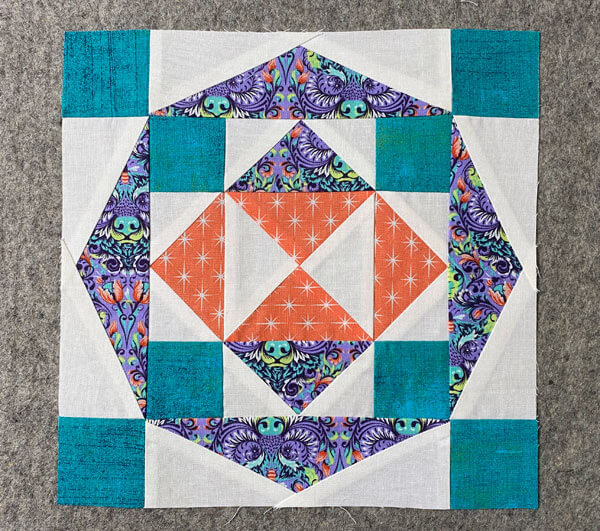
Our sample Fort Knox quilt block is finished.
It's a striking little block, easier to make using our basic paper pieced units.
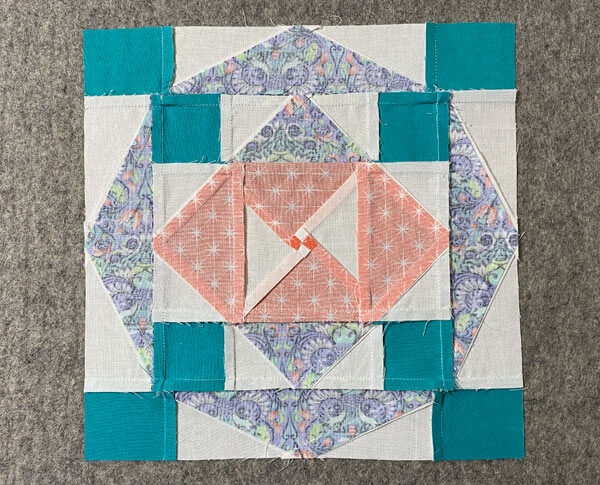
From the back, you can see how all the seams were pressed.
You DID the thing!
What fortunes await thanks to your masterful skills!
Having successfully brought the dazzling Fort Knox quilt block to life, nothing can stop you from quilting greatness now—the boldest patterns quiver in anticipation! 🏆🏆🏆
For even MORE blocks to make… 🧩🎨

...visit our Free Quilt Block Pattern Library, with over 260+ blocks to choose from in multiple sizes.
Free downloads are included in all sizes for any blocks require paper piecing patterns or templates.
- Home
- Free Quilt Block Patterns
- Fort Knox Quilt Block
