- Home
- Free Quilt Block Patterns
- Blazing Arrows Quilt Block
Blazing Arrows Quilt Block
From our Free Quilt Block Patterns Library
This post contains affiliate links, for which I receive compensation.
Our Blazing Arrows quilt block tutorial includes two ways to make Flying Geese units—No Waste and Connector or Folded Corners— so you can choose the method that works best for YOU.
In this tutorial, you'll find:
It's time to cut up and sew!

General Instructions
Please read through all the instructions first. Two different Flying Geese techniques are shared. Each has it's own cutting chart.
Several abbreviations are used on this page. They are:
- SA - seam allowance
- RST - right sides together
- HST - half square triangle
- QST - quarter square triangle
- FG - Flying Geese units
1/4" SA are used through this tutorial.
Highlighted in yellow, pressing instructions are easy to spot.
First press the patches in the closed position as they came off your sewing machine. This sets the seam, melding the fibers of the threads into the fibers of the fabric.
Then press the SA to the dark unless otherwise noted.
New quilt fabrics to tickle your fancy...
Click the images below to see the full collection. We share any commercial and/or free patterns that showcase them, too. (For inspiration, of course!)


Step 1: Cutting patches for a Blazing Arrows block

Sample Size: 6" finished / 6½" unfinished
Grid: 4x4
AKA: Blazing Arrow Point
Design Type: Uneven 9-patch-large center, Star
Please label your patches. We refer to their numbers throughout this tutorial.
Regardless of the piecing technique you choose below, the patch numbers are the same for both.
Choose your Flying Geese method and click on the corresponding option underlined and in blue to download and print the chart and block design.
Option #1 - Includes No Waste Technique
 | Cutting Chart for a~ Traditional Piecing with No Waste Flying Geese ~ | |||||
|---|---|---|---|---|---|---|
| Patch | Fabric | Qty | Finished Block Size | |||
| 4'' | 6'' | 8'' | 12'' | |||
| HST-1 | Light | 2 | 2¼'' x 2¼'' | 2¾'' x 2¾'' | 3¼'' x 3¼'' | 4¼'' x 4¼'' |
| HST-2 | Dark | 2 | 2¼'' x 2¼'' | 2¾'' x 2¾'' | 3¼'' x 3¼'' | 4¼'' x 4¼'' |
| QST-1 | Light | 1 | 3½'' x 3½'' | 4½'' x 4½'' | 5½'' x 5½'' | 7½'' x 7½'' |
| QST-2 | Dark | 1 | 3½'' x 3½'' | 4½'' x 4½'' | 5½'' x 5½'' | 7½'' x 7½'' |
| FG-1 | Light | 1 | 3½'' x 3½'' | 4½'' x 4½'' | 5½'' x 5½'' | 7½'' x 7½'' |
| Sky-1 | Dark | 4 | 2¼'' x 2¼'' | 2¾'' x 2¾'' | 3¼'' x 3¼'' | 4¼'' x 4¼'' |
| FG-2 | Dark | 1 | 3½'' x 3½'' | 4½'' x 4½'' | 5½'' x 5½'' | 7½'' x 7½'' |
| Sky-2 | Light | 4 | 2¼'' x 2¼'' | 2¾'' x 2¾'' | 3¼'' x 3¼'' | 4¼'' x 4¼'' |
| Unfinished Block Size | 4½'' | 6½'' | 8½'' | 12½'' | ||
| Grid Size | 1'' | 1½'' | 2'' | 3'' | ||
or...
Option #2 - Includes Folded or Connector Corners Technique
Cutting Chart for aTraditional Piecing | ||||||
|---|---|---|---|---|---|---|
| Patch | Fabric | Qty | Finished Block Size | |||
| 4'' | 6'' | 8'' | 12'' | |||
| HST-1 | Light | 2 | 2¼'' x 2¼'' | 2¾'' x 2¾'' | 3¼'' x 3¼'' | 4¼'' x 4¼'' |
| HST-2 | Dark | 2 | 2¼'' x 2¼'' | 2¾'' x 2¾'' | 3¼'' x 3¼'' | 4¼'' x 4¼'' |
| QST-1 | Light | 1 | 3½'' x 3½'' | 4½'' x 4½'' | 5½'' x 5½'' | 7½'' x 7½'' |
| QST-2 | Dark | 1 | 3½'' x 3½'' | 4½'' x 4½'' | 5½'' x 5½'' | 7½'' x 7½'' |
| FG-1 | Light | 2 | 1½'' x 2½'' | 2'' x 3½'' | 2½'' x 4½'' | 3½'' x 6½'' |
| Sky-1 | Dark | 4 | 1½'' x 1½'' | 2'' x 2'' | 2½'' x 2½'' | 3½'' x 3½'' |
| FG-2 | Dark | 2 | 1½'' x 2½'' | 2'' x 3½'' | 2½'' x 4½'' | 3½'' x 6½'' |
| Sky-2 | Light | 4 | 1½'' x 1½'' | 2'' x 2'' | 2½'' x 2½'' | 3½'' x 3½'' |
| Unfinished Block Size | 4½'' | 6½'' | 8½'' | 12½'' | ||
| Grid Size | 1'' | 1½'' | 2'' | 3'' | ||

Step 2: Assemble the units for a Blazing Arrows block
HSTs and the QST is created the same way regardless of which chart you chose.
HSTs and QSTs
 Make 4 per block
 Make 1 per block
Since both units start out exactly the same, so we'll do all that marking, stitching, pressing and trimming all together now.
To mark the back side of the lighter HST-1 and QST-1 squares, either:
- Use any ruler and mark a single diagonal line on the wrong side of #1. Layer the two square RST. Stitch a 1/4" away from both sides of it with your favorite 1/4" presser foot (below left), or
- Use a Quick Quarter ruler and mark two diagonal lines both a 1/4" from the center diagonal of one pair of corners. Layer the two squares RST. Stitch directly on the markings with an open toe applique foot—if you have one. It makes it easy to see and stay on the lines (below right).
Regardless of which marking-method you choose, mark only as dark as YOU need to see to stitch. (Markings are in black in the illustration below to make them easy to see).

I used the Quick Quarter and a mechanical pencil for marking.
 Marked pairs for a QST (l) and 2 pairs for four HSTs (r), Quick Quarter Ruler (below).
Stitch as described above. It's easy to see the marking with this open toe applique foot.

Give all three pairs a good press—flat to set the seam.
Cut in half between the two lines of sewing.

Press.
The four smaller HST units are ready for trimming. Use the table below. Find the 'Trim to' measurement that corresponds to your Finished Block Size.
For our 6" sample, that measurement is 2".
HST Dimensions | |
|---|---|
| Finished Block Size | Trim HST to… |
| 4" | 1½" x 1½" |
| 6" | 2" x 2" |
| 8" | 2½" x 2½" |
| 12" | 3½" x 3½" |
Set these four trimmed HST aside until Step 3.
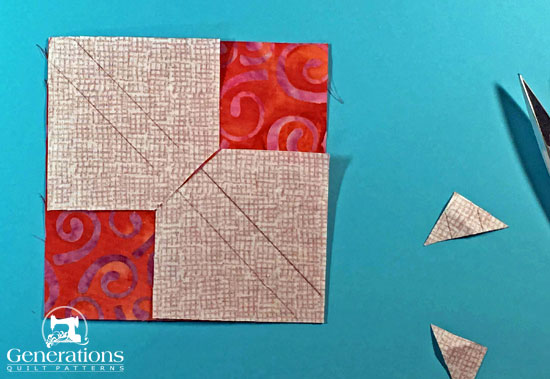
On the back of one of the larger HSTs created from the QST patches, draw the lines again, just as you did before.
The Quick Quarter makes for quick marking again.
With RST sew these large HST together, pinning if needed to hold them in position for a good match at the center.
 My pins are placed for easy removal
Press flat.
Cut in half between the stitches.
 While patch alignment is pretty good, it is off a bit. It's why I prefer to cut oversized patches for HST and QSTs. Stitch up a couple of units perfectly? OK. But 100s? Um, not so much.
Use the chart below to trim your QST to perfection.
Quarter Square Triangle Dimensions | ||
|---|---|---|
| Finished Block Size | Center Measurement | Trim QST to… |
| 4" | 1¼" | 2½" x 2½" |
| 6" | 1¾" | 3½" x 3½" |
| 8" | 2¼" | 4½" x 4½" |
| 12" | 3¼" | 6½" x 6½" |
For a quick refreshed on trimming QSTs to perfection click here for 'Step 8 Trimming' from the Quick Pieced QST tutorial on this site. (These instructions open in a new window.)
Flying Geese
Make 2 of each combination
 Combo #1
 Combo #2
While the sample is made with the No Waste method, it's important for you to work in manner that best suits your own work flow.
The No Waste method creates four FGs which means two from each combo are leftover. If you're a scrap quilter, probably not a problem.
However, if you prefer to minimize the leftover pieces, a quick refresher is included using the Folded or Connector Corners method.
If you used the GREEN cutting chart for the Folded Corners technique, click here to skip directly to those instructions now.
If you used the BLUE cutting chart for the No Waste Technique, simply continue below.
Option #1: Blue Cutting Chart - No Waste
Mark the wrong sides of all eight Sky small squares with diagonal lines just like we did for the quick pieced HSTs and QST—one diagonal if you're using a quarter inch foot, or two if you're using an open toe applique foot.
In the photos below, are the dark FG-2 and light Sky-2 squares. Repeat the process for Combo #1.
With RST, position 2 Skys in opposite corners (below). It's possible to mark two at a time if you're careful.
Marked again using the Quick Quarter ruler.

With your ruler, mark a diagonal line perpendicular to the marking(s) ONLY on the small squares.
With a scissor, cut through both small squares ONLY. Pin to hold the patches in place if helpful.

Click here to see what is cut away.
Stitch lines 1/4" away from both sides of the center diagonal.
 Pins are inserted so that they're easy to remove while stitching.
After stitching, press flat to set the seams.
Cut in half between the stitches.

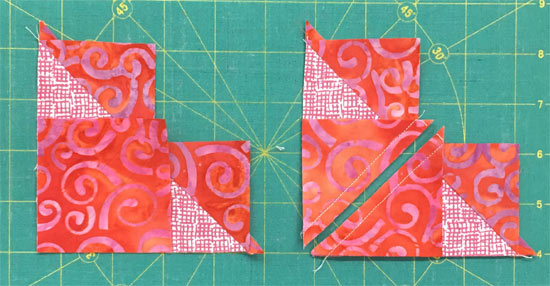
Press the small triangles away from the larger one. Yes, SAs are towards the light for this Combo#2.
You now have what look like little hearts.

With RST, position the third marked Sky square in the corner of the FG, pin as needed.
The point of this patch intersects the valley created between the two triangles (below, left).
Stitch two lines of stitching each a 1/4" away from the center diagonal on the small square.
Press flat to set the seams.
Cut in half between the stitching (below, right).

Click here to see how Combo #1 looks at this point.
Press the SA towards the Skys.
Repeat for the remaining Combo#2 pair and the two Combo#1 pairs.
After the stitching and pressing is complete, you have a total of 8 FGs. You need only two of each to make our Blazing Arrows block. Leftovers can be added to your scrappy stash of pre-made units.
Trimming
A specialty ruler isn't needed to trim Flying Geese (YEA!), but you do need a ruler with a 45° line running from corner to corner. Every square ruler I've ever used has this line.
Some rectangular ones do. Some don't. Check your square rulers first.
Using the table below find YOUR block's Finished Size and the corresponding dimensions.
Flying Geese Dimensions | ||
|---|---|---|
| Finished Block Size | Center Measurement | Trim to… |
| 4" | 1¼" | 1½" x 2½" |
| 6'' | 1¾" | 2" x 3½" |
| 8" | 2¼" | 2½" x 4½" |
| 12'' | 3¼" | 3½" x 6½" |
First find the center of the Goose.
For our 6" sample its Center is 1¾". Align that measurement on your rule with the point of the Goose (below).
The 45° marking is aligned with the seam line (blue arrow).
The point of the Goose is 1/4" away from the smaller of the 'Trim to' measurements (blue line). For our sample that's 1¾" (2" - ¼") down from the top edge of the ruler.
Trim the excess fabric from the exposed edges.

Flip the unit 180°.
This time line up the trimmed edges with the 'Trim to' measurements—for the sample it's 2"x3½".
The tip of the Goose is still at the 'Center' measurement of 1¾" AND NOW ¼" away from the top edge of the ruler (blue line, below). There's nothing to align the 45° line on the ruler with now.
Trim away the excess.
Voila! A perfectly sized Flying Goose for your Blazing Arrows block.

Repeat the trimming process for two of each Combo.

If you're in to specialty rulers, there's a really sweet one for FGs, The Wing Clipper from Studio 180.
Read my review of it here. See how it's used to make trimming virtually foolproof.
We're ready to assemble our Blazing Arrows block. Click here to skip to that spot in the instructions.
Option #2: Green Cutting Chart - Folded Corners
For a quick tutorial on making Flying Geese with Connector (or Folded) Corners, click here.
Step 3: Assembly your Blazing Arrows block
Arrange the sewn units to create the Blazing Arrow design.

With RST, sew the units in each row together, always pressing away from the FGs.

With RST, stitch the rows together. Pin as neede to help match points.
Our finished Blazing Arrows quilt block...

Our Blazing Arrows from the backside for one last look at how the seams are pressed.
 I'd neglected to take a photo from the backside while putting the block together and shot this at a later date...that's why the lighting is different. Enquiring minds, et al. :)
🔭 Looking for something truly stellar?
You've finished your star quilt block, and you're ready for more!
Browse our collection of 70 stellar star quilt block patterns. All have instructions and cutting charts in multiple sizes. If templates or paper piecing is used in the tutorial, there's a free download for you of those materials.

Eeny. Meenie. Miney. Moe.
Which star quilt block will you sew?
For a star-studded quilting experience, choose from 100+ bedazzling star quilt patterns—for beginners and beyond—click here.
For even MORE blocks to make… 🧩🎨

...visit our Free Quilt Block Pattern Library, with over 260+ blocks to choose from in multiple sizes.
Free downloads are included in all sizes for any blocks require paper piecing patterns or templates.
What about a different quilt block?
For a list of all the 260+ quilt block patterns on this site, start here.
If you know the name of the block, shorten your search by using these links:
Click here if you're looking for blocks with at least some paper piecing.
Click here if you're looking for the basic building blocks of quilting, i.e., Flying Geese, half square triangles, quarter square triangles, etc., along with several techniques to make each.
And finally, use these links to find blocks in these finished sizes:
- Home
- Free Quilt Block Patterns
- Blazing Arrows Quilt Block


Yummy fabrics
to drool over
Click any image below to see the full collection and find pricing and ordering information.


By Julie Baird
Copyright © 2008-2026 Generation Quilt Patterns, LLC
All Rights Reserved
Generations-quilt-patterns.com does not sell any personal information. (See Privacy Policy)