- Home
- Free Quilt Block Patterns
- Maple Leaf Quilt Block
Maple Leaf Quilt Block
Not your Grandma's Maple Leaf!
This post contains affiliate links, for which I receive compensation.
Skill Level: Beginner
This Maple Leaf quilt block is a variation of the traditional Maple Leaf. Both are 9-patch blocks. Both are pointy. And this version, even with all it's extra pieces, is no more difficult to make.
A little paper piecing, a bit of Log Cabin and we'll be raking up the leaves in no time!
Not into paper piecing?
Leave it to me, I've got you covered.

Alternate instructions with no paper piecing are provided further down on this page, as well as a stemmed version of this block.
Let's get started with our Maple Leaf quilt block!
📋 General Instructions
These abbreviations are used in this tutorial:
- SA - seam allowance
- RST - right sides together
- BAC - background fabric
SA are all 1/4". Pressing instructions are given at each step.
Starching your quilt fabric before cutting makes fingerpressing seams quick, easy, and accurate.
Step 1: Download and print the paper piecing pattern
⚡ PRINTING TIP: Need help printing this tutorial? Click here for easy instructions!
You'll need the Adobe Reader installed on your computer to print the paper piecing portion of this block. If you don't have Adobe, you can it get free by clicking here (a new window opens, follow Adobe's instruction for installation).
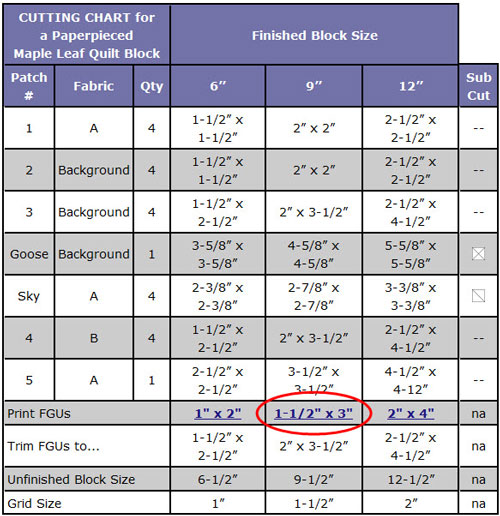
For each Maple Leaf block you'll need to print one copy. The links are in the Cutting Chart below in the row, 'Print FGUs'.
Find the column for your Finished Block Size. At the intersection is the link. For the 9" finished block used in this example, I printed 1-1/2" x 3" Geese. (Click here to see where it's at in the chart.)
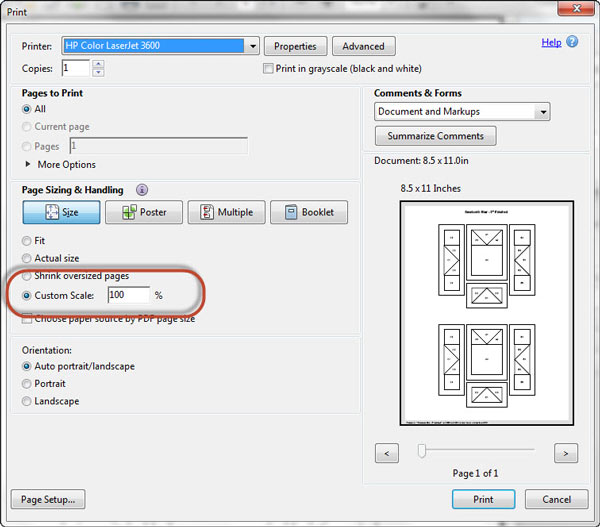
To print blocks at the correct size, under 'Page Sizing and
Handling' in the Adobe print menu, set 'Custom Scale' to 100%. Click here to see what it looks like on the Print Menu page.
Use the 1" square on the printed page to confirm that the pattern is printed correctly.

Not sure which paper to use?
Take a look at my review of several of the most popular brands available to us quilters on the market.
You want a super-easy paper to tear away—less stress on the stitches.
New quilt fabrics to tickle your fancy...
Click the images below to see the full collection. We share any commercial and/or free patterns that showcase them, too. (For inspiration, of course!)


Step 2: Cut patches for a Maple Leaf block
 Maple Leaf design
Sample Size: 9" finished / 9½" unfinished
Grid: 6x6
Attribution: Aunt Martha Studios
Design Type: Even 9-patch
While the diagram shows a light for the background fabric, I've chosen a dark purple background for the example. It's important there be enough contrast between the A and background fabrics so that your piecing shows.
These instructions include paper pieced Flying Geese units. If you prefer all traditional piecing, click here for that complete cutting chart.
 |
Cutting Chart for a~With Some Paper Piecing ~ | |||||
|---|---|---|---|---|---|---|
| Patch | Fabric | Qty | Finished Block Size | Sub Cut | ||
| 6” | 9” | 12” | ||||
| 1 | A | 4 | 1½" x 1½" | 2” x 2” | 2½" x 2½" | -- |
| 2 | BAC | 4 | 1½" x 1½" | 2” x 2” | 2½" x 2½" | -- |
| 3 | BAC | 4 | 1½" x 2½" | 2” x 3½" | 2½" x 4½" | -- |
| Goose | BAC | 1 | 3⅝" x 3⅝" | 4⅝" x 4⅝" | 5⅝" x 5⅝" | |
| Sky | A | 4 | 2⅜” x 2⅜" | 2⅞" x 2⅞" | 3⅜" x 3⅜" | |
| 4 | B | 4 | 1½" x 2½" | 2” x 3½" | 2½" x 4½" | -- |
| 5 | A | 1 | 2½" x 2½" | 3½" x 3½" | 4½" x 4½" | -- |
| Print FGUs | 1" x 2" | 1½" x 3" | 2" x 4" | na | ||
| Trim FGUs to... | 1½" x 2½" | 2” x 3½" | 2½" x 4½" | na | ||
| Unfinished Block Size | 6½" | 9½" | 12½" | na | ||
| Grid Size | 1” | 1½" | 2” | na | ||
Don't forget to subcut the Goose and Sky squares.

Step 3: Assemble the Flying Geese units (FGU)
Make 4
Install an open toe applique foot if you have one. It makes seeing the line easier. Reduce your stitch length to 15-18 stitches/inch.
With a dot of Elmer's Glue Stick, adhere the wrong side of a Goose patch to the unprinted side of the pattern. Use the dashed guidelines to simplify positioning. (black arrows)
The edge of your fabric sticks out past the outside dashed line on purpose. You'll trim these later for perfect sizing.

With right sides together (RST), align the bottom and side edge of a Sky triangle with the Goose patch.
 This photo was taken at my machine and is on an angle...that's why it looks a bit wonky.
Stitch, starting before and ending after the outside dashed lines (black arrows below). If you add your Sky patches all on the same side first, you'll be able to chain piece these with ease through your sewing machine.
 Stitching with an open toe applique foot installed on my machine.
Press. Repeat for the other Sky patch.
Press.
After all the FGUs are complete, trim them to size.
Flying Geese are part of my Beginner Quilt Block Patterns and Units series. Click here if you want more detailed instructions.

With RST, stitch a FGU to #4 with the point in this seamline.

Press the SAs toward #4.
The FGUs are complete.
Step 4: Assemble the corners
Make 2 each
Install your quarter inch foot and return your stitch length to normal.
With RST, stitch a #1 to a #2, pressing toward #2.

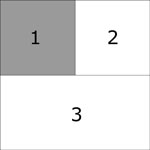
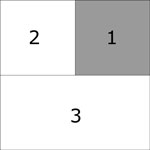
With RST, stitch #1/#2 to #3. Follow the photo below so that 2 units have #1 on the upper right corner and two in the upper left. Press SA toward #3s.

Step 5: Assemble your Maple Leaf quilt block
Lay out the cut and pieced units into rows to create the Maple Leaf design. Notice how the long seamline in the corners is parallel to the top and bottom of the block.

Stitch the units in each row together. Press all SA away from the FGUs.

Stitch the rows together. Since there are four seam intersections in each row, I pin for accuracy. It's much faster to pin than to rip!
 All the SA nest if you followed the pressing instructions.
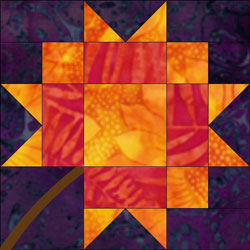
After one last trip to the ironing board, this is your finished Maple Leaf quilt block! To ensure the flattest block ever, check out this simple technique for pressing quilt blocks.
 The Maple Leaf quilt block
If paperpiecing's not your thing...
...and you'd still like to make this block, leaf it to me.
Below is the complete cutting chart where the Flying Geese are made with connector corners. A sure-fire way to make them!
|
|
Cutting Chart for a~ Traditional Piecing w/Connector Corners ~ | ||||
|---|---|---|---|---|---|
| Patch | Fabric | Qty | Finished Block Size | ||
| 6” | 9” | 12” | |||
| 1 | A | 4 | 1-1/2” x 1-1/2” | 2” x 2” | 2-1/2” x 2-1/2” |
| 2 | BAC | 4 | 1-1/2” x 1-1/2” | 2” x 2” | 2-1/2” x 2-1/2” |
| 3 | BAC | 4 | 1-1/2” x 2-1/2” | 2” x 3-1/2” | 2-1/2” x 4-1/2” |
| Goose | BAC | 4 | 1-1/2” x 2-1/2” | 2” x 3-1/2” | 2-1/2” x 4-1/2” |
| Sky | A | 8 | 1-1/2” x 1-1/2” | 2” x 2” | 2-1/2” x 2-1/2” |
| 4 | B | 4 | 1-1/2” x 2-1/2” | 2” x 3-1/2” | 2-1/2” x 4-1/2” |
| 5 | A | 1 | 2-1/2” x 2-1/2” | 3-1/2” x 3-1/2” | 4-1/2” x 4-12” |
| Unfinished Block Size | 6-1/2” | 9-1/2” | 12-1/2” | ||
| Grid Size | 1” | 1-1/2” | 2” | ||
Click here if you need instructions for the connector corner method. Start at 'Step 2' on that page. Hit the 'Back' button on your Browser Bar to return here.
All the rest of the directions to make the Maple Leaf quilt block are the same.
FREE Pattern Alert
If you like this quilt block, have a look at the free quilt pattern that uses it, 'Maple Stars' by Elise Lea for Robert Kaufman fabrics.
What about a bit more traditional looking Maple Leaf?
Simply cut one less each of #1, #2 and #3—you'll only need to make 3 corner units—and replace the fourth with a single square from the background fabric cut the same size as your #5 patch.
Then embroider a stem after the block is stitched.
Voila!
What about a different quilt block?
For a list of all the 220+ quilt block patterns on this site, start here.
If you know the name of the block, shorten your search by using these links:
Click here if you're looking for blocks with at least some paper piecing.
Click here if you're looking for the basic building blocks of quilting, i.e., Flying Geese, half square triangles, quarter square triangles, etc., along with several techniques to make each.
And finally, use these links to find blocks in these finished sizes:
- Home
- Free Quilt Block Patterns
- Maple Leaf Quilt Block


By Julie Baird
Copyright © 2008-2026 Generation Quilt Patterns, LLC
All Rights Reserved
Generations-quilt-patterns.com does not sell any personal information. (See Privacy Policy)