- Home
- Free Quilt Block Patterns
- Texas Quilt Block
Texas Quilt Block Tutorial in 3 Sizes:
6", 9", and 12" finished
From our Free Quilt Block Patterns Library
This post contains affiliate links, for which I receive compensation.
Ready to show off your quilting skills?
The Texas quilt block is a fun little block that uses the 'Peaky and Spike' unit (AKA a Triangle in a Square) popularized by Doreen Speckmann many years ago,
You might also recognize the basic design of this block as a 54-40 or Fight. There's an extra fabric in that version of the patchwork design.
Instead of using a specialty ruler to make ours, we're using a bit of paper piecing—perfection every time, and it's not a big deal to remove the paper pattern from this particular unit. (The pattern is a free download below.)
You won't be messin' with Texas if you give paper piecing a try.
It's a game-changer for improving the accuracy of your piecing with little effort.
Howdy, partner! 🤠 Looking to lasso a
specific part of our Texas quilt block tutorial?
Use these handy trail markers to find your way:
- 16 inspiring Texas quilt design ideas to contemplate. There's some really amazing ideas that come out of using a simple sashing and cornerstone.
- No time for quilting today? Pin this for later.
Cut. Sew. Press. Turn your fabric into a rootin' tootin' masterpiece!"
📋General Instructions
You'll see several common abbreviations used on this page. They are:
- SA—seam allowance
- RST—right sides together
- TiaS—triangle in a square
- 4P—four patch
1/4" SA are used through this tutorial.
Pressing instructions are highlighted in yellow throughout this tutorial to make them easy to spot.
When instructed to press, first press the patches in the closed position just as they came off your sewing machine. This sets the seam, melding the fibers of the threads into the fibers of the fabric.
Then press the SA to the dark unless otherwise noted.
Download and print the TiaS paper piecing pattern
You'll need the most current version of Adobe installed on your computer to download the pattern.
On the Adobe Print Menu page, under 'Page Size and Handling' set 'Custom Scale' to 100% before printing for accurate results. Click here to see what it looks like on the Print Menu page.
Choose your finished block size from the chart below and print the corresponding number of pages for the paper piecing patterns and a single copy for the templates.
DO NOT select 'Fit to Page' or 'Scale to Fit' in your printer settings. Doing so enlarges or reduces the templates and patterns. They will be the wrong size and need to be reprinted.
Triangle in a Square Units (TiaS) | ||||
|---|---|---|---|---|
| Finished Texas Block Size | TiaS Paper Piecing Patterns | TiaS Templates | ||
| Finished Size | Finished Size | |||
| 6" | 2" x 2" | 1 | Print 1 copy of templates (all sizes on one page) | 1 |
| 9" | 3" x 3" | 1 | 1 | |
| 12" | 4" x 4" | 2 | 1 | |
After printing, use the 1" square graphic on the printed page(s) to double-check that your patterns printed at the correct size.

Not sure which paper to use?
Take a look at my review of several of the most popular brands available to us quilters on the market.
You want a super-easy paper to tear away—less stress on the stitches.
New quilt fabrics to tickle your fancy...
Click the images below to see the full collection. We share any commercial and/or free patterns that showcase them, too. (For inspiration, of course!)


✂️Cutting patches for your Texas quilt block
 Texas quilt block design
Sample Block Size: 9" finished / 9½" unfinished
Grid: 6×6
Attribution: Nancy Page
AKA: Garden Walk (Kansas City Star), Garden Patch, An Old-Fashioned Pinwheel
Design Type: Even 9-patch | Stars
For the sample, I used a Bella Solid from Moda and a print from Tula Pink's True Colors collection from Free Spirit—one of the most USABLE fabric lines around...IMHO.
Please label all your patches. We refer to their numbers throughout this tutorial.
 | Cutting Chart for a~ Paper & Traditional Piecing ~ | ||||
|---|---|---|---|---|---|
| Patch | Fabric | Qty | Finished Block Size | ||
| 6'' | 9 '' | 12'' | |||
| 1 | Light | 1 | 1½'' x 16'' | 2'' x 21'' | 2½'' x 26'' |
| 2 | Dark | 1 | 1½'' x 16'' | 2'' x 21'' | 2½'' x 26'' |
| Center | Dark | 4 | 3'' x 2¾'' | 4'' x 3¾'' | 5 '' x 4¾'' |
| Side, Side.R** | Light | 4 | 3'' x 2¾'' | 4'' x 3¼'' | 5 '' x 3¾'' |
| Unfinished Block Size | 6½'' | 9½'' | 12½'' | ||
| Grid Size | 1'' | 1½'' | 2'' | ||

🪡Assemble the units for a Texas quilt block
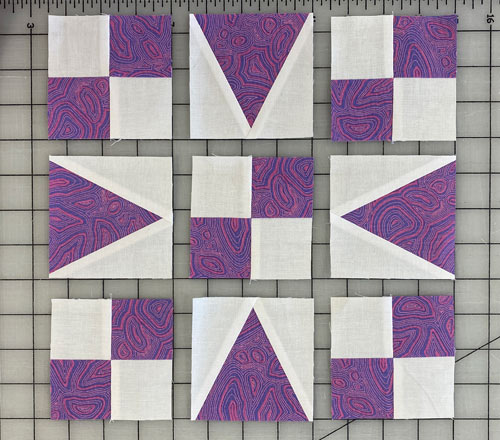
4-patch Corner Unit
Make 5
 4-patch
With RST, sew a #1 to #2 along the long edge.
With starched quilt fabrics and my trusty 1/4" foot with a flange or guide on the right-hand side, this is a piece of cake.
Just don't sew so fast that your seam allowance gets wiggly.
 Stitch the #1/#2 strip set
Press.
Use the chart below, find YOUR finished block size and the corresponding Strip Set Width. Check that your strip set measures correctly. Make changes as needed.
StripSet Widths | ||
|---|---|---|
| Finished Block Size | Stripset Width after stitching | SubCut Width |
| 6" | 2½" | 1½" |
| 9" | 3½" | 2" |
| 12" | 4½" | 2½" |
At your cutting mat, with your rotary cutter and ruler, straighten one short side of the strip set, creating a 90° angle to the seam.
While these strips are generously sized, trim away only what you must to straighten the edge.
 The red arrow points to the line on my ruler that's directly over the seam allowance.
Using the chart again, find the 'Sub Cut Width' that goes with your block size. For our 9" finished sample, the Sub Cut Width is 2".
Cut a total of 10—two for each four patch.

Alternate the patches to match the lights and darks of the unit (diagram above).
With RST, stitch pairs of these subcuts together, pinning if needed for a good match at the center. Feed them all through your sewing machine so that a dark #2 patch is on top and feeds through your sewing machine first.
 Yep. I'm a pinner—even for 4-patches. I admit it! :)
To reduce the bulk in the center of our 4-patches, we'll twirl or fan the SAs.
Undo the few stitches at the center—DO NOT cut away these thread tails. Leave them.
Then twirl or fan the SAs around the center. A cute little four patch forms in the SA.

At this point, for a 6" finished block, this unit measures 2½" square from edge to edge. For a 9" block (shown here), it's 3½" x 3½", and for a 12" finished it's 4½" x 4½".
Double check and make any adjustments. Then set these aside for now.
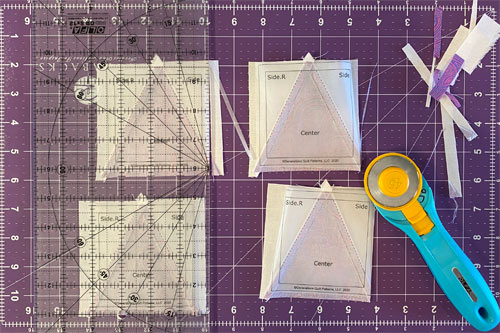
Triangle in a Square Unit (TiaS)
Make 4
 Triangle in a Square
My go-to method for making this type of patch is paper piecing.
If you groan at the thought, allow me to explain why—and know that I've got a ruler technique to help you out if you just can't bear the idea of paper piecing.
With paper piecing, I don't need to go find THE specialty ruler...and more importantly, its instructions.
I don't make TiaSs all the time, so my old tottering brain cells do need a refresher periodically. And in my studio that can take some time...this from the quilter who regularly compares her cutting table to an archeological dig.
With paper piecing, I need paper piecing paper. Check.
A rotary cutter, ruler, and mat. Check.
A computer and the internet to download the pattern. Yep. I download the patterns from my site. I don't have to go looking. :)
All of that I've got. Handy. Always.
All I require is to be able to reduce the stitch length and the ability to sew on a line.
That's it.
And the best part?
They come out perfect.
Layer your four Center rectangles and using the template you downloaded that corresponds to your chosen Finished Block Size, cut out the patch. The top and bottom of this template will match the cut edges of your cut rectangles.
 Right side up or not, it doesn't matter how these squares are layered because the shape is the same regardless.
With your rotary cutter and ruler, cut away the excess.
 The extra that's cut away is scrap, rarely big enough for anything else.
To cut the correct Side and Side.R (where R stands for 'reversed') patches, for each block we need to stack our 4 cut rectangles so that there are two pairs of RIGHT SIDES TOGETHER layered on top of each other. That's the only tricky thing about this technique.
With all the edges even, make a small tick mark on the short top edge 5/8" in from the left side. Make the same mark 5/8" in from the right on the bottom short side. (See red arrows)
 If I'd been smart enough to use a fabric with a definite right and wrong side, it'd be easier to see that I've layered these cut rectangles in two pairs, each RST.
Align a rotary ruler with these top and bottom edges at the tick marks and cut through all four rectangles.

You have created the 4 pairs of mirror imaged Side and Side.R triangles. We're ready to piece these TiaSs.
Use a tiny dab of Elmer's Washable Glue Stick, goes on purple, dries clear, to hold the Center patch in place between the dashed guidelines, wrong side to the unprinted side of the pattern.
On this translucent vellum, you know when we're looking at the printed side of the pattern because the words and symbols are readable.
 The bottom edge of the Center extends roughly a 1/4" past the outside dashed lines. When we trim to perfection, we WANT something to trim.
We need to make a few adjustments to our sewing machine settings to paper piece.
- Reduce your stitch length to 16–20 stitches per inch (1.3-1.6 mm). This perforates the paper and stabilizes the seam when you remove the pattern. [Learn more about stitch length here.]
- Reduce your machine's speed or just plain slow down. Sew only as fast as you can AND stay on the solid stitching line.
- Install an open toe appliqué foot (sometimes called an 'embroidery' or 'satin stitch' foot) if you have one (it makes it easier to see where you're stitching).
- Use a larger needle (90/14) IF you have problems removing the pattern. Personally, I use an 80/12 Microtex Sharp for paper piecing without any issues.
With RST, layer a Side with the Center. The wide end of the Side to the top point of the center.
Because the Sides are a lighter fabric, I've scooched (love the technical quilting term, right?!!!) the generously sized Side patch just a smidge past the cut edge of the Center.
That way the darker fabric won't shadow through the lighter one, AND I won't have to come back with scissors to trim away a bit of the darker Center patch.
 You can see how I positioned the side just a wee bit past the cut edge of the center patch—a smidge is just a few threads wide.
From the printed side of your pattern, sew the seam starting and ending past the outside edge of the unit.
 Stitch from the printed side
Press.
While I LOVE working with vellum paper, it does have a tendency to curl when pressed. It's the tradeoff for being able to see through the pattern.
 I'll put up with the vellum curling, even though it's not my favorite thing.
Sew the second seam just like the first one.
 You might be able to make out that I've 'crunched' the vellum a bit to make it lay flatter.
And yes, Virginia, it's possible to chain piece when you're paper piecing.
As long as the seam starts at the outside edge on one side, and ends at the outside on the other, you can chain piece—saving both time and thread!
 You can chain piece these TiaSs
Give your TiaSs a good press.
At your cutting mat, trim them to perfection.
My preference is to lay the 1/4" mark on the ruler directly over one line around the inside solid square—that is the finished edge of the TiaS.
This way, we establish a perfect quarter inch seam allowance. It's also much easier (and more accurate) to line up than trying to match the edge of your ruler with the outside dashed line of the block—the unfinished size.
Trim all four.
Utter perfection.
Since we precut our paper piecing patches on the straight of grain, you can remove the paper now without fear of stretching any of those edges.
 Nothing, but NOTHING beats the precision of this simple technique!
The paper piecing is complete. From this point forward, return your stitch length to the one you regularly use for piecing and install your favorite 1/4" presser foot.
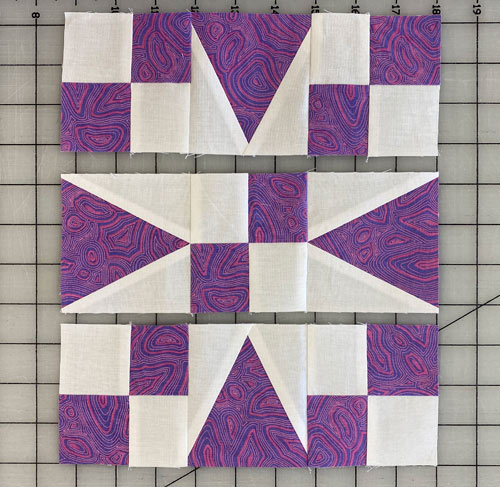
🧩Assemble our Texas quilt block
Arrange all the units we stitched into the Texas quilt block design. The dark squares in the 4-patches all move from upper right to lower left.
Sew the units in each row together. Use pins to match the seam in the 4-patch with the point of the TiaS.
Learn more about Pinning for Perfect Points here.
All that's left is to sew the rows together. Use pins as you need them for good matches.
Yippee-ky-yay! Here's our finished Texas quilt block.
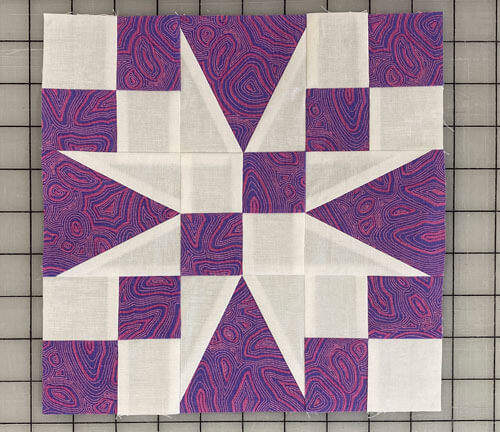
That was easy! What can we do with the blocks?

Blocks with something going on in the corners tend to lead to some very interesting design ideas, and our Texas block is no different.
But I have to admit. It really blew my skirt up just how intricate some of these beauties are using the simple four-patches, TiaS, and simple sashing.
I think you'll be surprised, too.
🤠 Lasso this tutorial for future quilting adventures! 📌
Pin it faster than a tumbleweed in a tornado! 🌪️

🔭 Looking for something truly stellar?
You've finished your star quilt block, and you're ready for more!
Browse our collection of 70 stellar star quilt block patterns. All have instructions and cutting charts in multiple sizes. If templates or paper piecing is used in the tutorial, there's a free download for you of those materials.

Eeny. Meenie. Miney. Moe.
Which star quilt block will you sew?
For a star-studded quilting experience, choose from 100+ bedazzling star quilt patterns—for beginners and beyond—click here.
For even MORE blocks to make… 🧩🎨
...visit our Free Quilt Block Pattern Library, with over 260+ blocks to choose from in multiple sizes.
Free downloads are included in all sizes for any blocks require paper piecing patterns or templates.
- Home
- Free Quilt Block Patterns
- Texas Quilt Block


Yummy fabrics
to drool over
Click any image below to see the full collection and find pricing and ordering information.


By Julie Baird
Copyright © 2008-2026 Generation Quilt Patterns, LLC
All Rights Reserved
Generations-quilt-patterns.com does not sell any personal information. (See Privacy Policy)