- Home
- Free Quilt Block Patterns
- Sunny Lanes Quilt Block
Sunny Lanes Quilt Block
From our Free Quilt Block Patterns Library
This post contains affiliate links, for which I receive compensation.
A Sunny Lanes quilt block uses the Connector or Folded Corners technique to avoid messing with any half square triangles—terrific for anyone brand new to quilting.
Simple strip piecing makes the four patch units a breeze.
Twirl or fan the seams and you have a bulk free block.
It's time to cut up and sew!

📋 General Instructions

All seam allowances (SA) are 1/4"
These abbreviations are used in this tutorial:
- SA - seam allowance
- CC - connector or folded corner
- RST - right sides together
New quilt fabrics to tickle your fancy...
Click the images below to see the full collection. We share any commercial and/or free patterns that showcase them, too. (For inspiration, of course!)


Step 1: Cut patches for a Sunny Lanes
 Sunny Lanes
Sample Block: 8" finished / 8½" unfinished
Grid: 8x8
Attribution: Nancy Page
Design Type: 4-patch
Four fabrics are needed for our Sunny Lanes sample block—a background, a light, a medium and a dark.
For the 8" sample, I choose a light and a medium that are pretty close together in value.
They make for a rather 'mushy' four patch.
Choose fabrics for #3(medium) and #4(light) with higher contrast if you prefer more distinctive patchwork.
 | Cutting Chart for a~Traditional Piecing w/Connector Corners ~ | ||||
|---|---|---|---|---|---|
| Patch | Fabric | Qty | Finished Block Size | ||
| 8" | 12" | 16" | |||
| 1 | BAC | 4 | 2½" x 4½" | 3½" x 6½" | 4½" x 8½" |
| 2 | Dark | 8 | 2½" x 2½" | 3½" x 3½" | 4½" x 4½" |
| 3 | Med | 1 | 1½" x 25" | 2" x 33" | 2½" x 41" |
| 4 | Light | 1 | 1½" x 25" | 2" x 33" | 2½" x 41" |
| Unfinished Block Size | 8½" | 12½" | 16½" | ||
| Grid Size | 1" | 1½" | 2" | ||
Step 2: Assemble the units
 Make 8
Four Patches
Make 8
With RST, stitch the #3 to the #4 along the long edge.
I love my quarter inch foot with a guide on the right-hand side for sewing strips together. They almost sew themselves!
 The darker of the two fabrics, #3 with the brick-like design, is on top in this photo.
Press. First with the patches unopened to set the seam, then open with the SA towards the darker #3.
Use the chart below to check the accuracy of your stitching. Make any necessary adjustments.
StripSet Widths | |||
|---|---|---|---|
| Finished Block Size | Stripset Width after stitching | SubCut Width | |
| 8" | 2½" | 1½" | |
| 12" | 3½" | 2" | |
| 16" | 4½" | 2½" | |
Straighten one short end of your strip set with your rotary cutter and ruler.
 Match a line on your ruler with the seam line. Trim away up to a scant 1/4" to straighten the edge.
Subcut into 16 units. Use the chart above to find the Subcut width for your finished block size.
For our 8" sample block, the subcut is 1-1/2" wide.
 Pair up the subcuts matching lighter to darker squares.
This next bit is IMPORTANT.
To stitch the pairs into four patches, feed each into your sewing machine the same exact way, medium #3 patch first on top.

After stitching and before trimming the threads in between each pair...
 These four patches were all fed into the machine with the darker #3 patch on top going first. Every.Single.Time. Unfortunately the #3 looks lighter on the backside than the light fabric #4—sorry for the confusion.
Press flat to set the seams.
Then undo the threads in the center (do not cut the threads) to help 'twirl' or 'fan' the seam allowance in a clockwise direction, pressing one final time.
This reduces bulk in the center of each.
If you make a whole quilt of nothing but Sunny Lanes blocks, the SAs between blocks will nest. That makes quilt top assembly so much easier, faster and more enjoyable to quilt.
With the patches laid out below, you can see that all the SA will nest to make matching seams pretty darn easy.
Slick!

Set four 4-patches aside for Step 3.
 Make 1 Center Unit
Center Unit
Make 1
With the remaining four patches we create the center unit.
Arrange the four patches with the #3 patch in the upper left corner of each unit (shown below).

Stitch the two pairs of four-patches together.
This next part is important.
When you stitch the units together, the #3 patch is on top and fed into the sewing machine first.

Twirl the SA.

Press the SA in the direction of the arrows.

Now stitch the two rows together. Pin if needed to help match seam lines.
 Pinning helps to keep all the SA aligned during sewing
If you've sewn the units as instructed you'll be able to twirl or fan every single intersection of seams in this center unit.
Here it is from the back.
 Every SA is twirled
Why go through all this rigmarole?
Twirling seams reduces the bulk at the intersections. Less bulk means it's easier to quilt on your home sewing machine!
An added advantage occurs when Sunny Lanes blocks are set edge-to-edge with no sashing. ALL the SA nest between blocks.
Sides
Make 2 each
 Top and bottom
 Left and right
We use the Connector Corners technique to create these units for our Sunny Lanes block.
If you have an open toe applique foot, install it now. It makes it much easier to see where you are sewing.
On the wrong side of each #2, draw one diagonal line from corner to corner. Mark only as dark as you need to see the line.
With RST, align the edges of a #1 and #2 and stitch on the drawn line.
On two sides the lines of stitching will go down from the left and two will go up from the left to create mirrored units.

I like to use my open toe applique for stitching on the line.
 Open toe applique foot installed!
After stitching, trim away the excess #2 square leaving behind a scant quarter inch SA. Press.
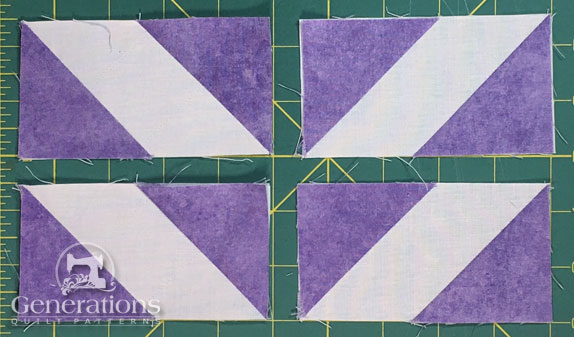
 Remember two sides have stitching down from the left as shown here. Two have stitching up from the left to create mirror image units.
Add the second #2 to the opposite end. The stitching is parallel to the first stitching in the first #2.

Trim as before.
After one final pressing, the sides are ready for your Sunny Lanes block.
Step 3: Assemble your Sunny Lanes
Return to your favorite 1/4" foot if it isn't installed already.
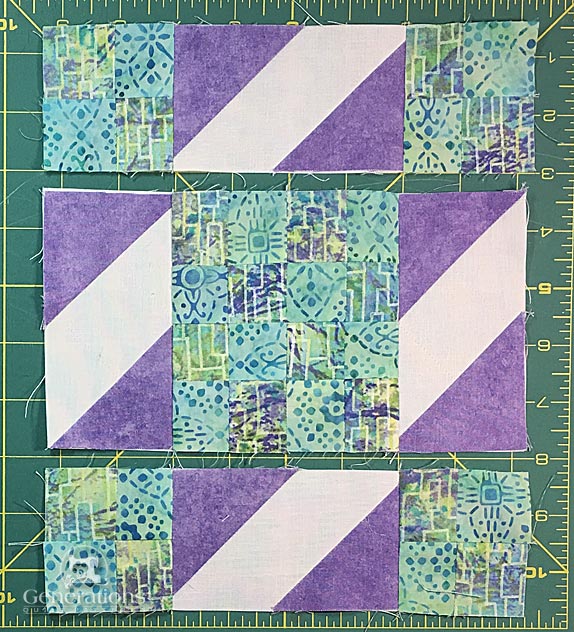
Arrange the units into the Sunny Lanes design paying particular attention to the orientation of the #1/#2 units—their centers form light colored lines/bar diagonally through the block.
All of the four patches are set with their #3 (brick fabric) medium patches in the upper left corner.

Stitch the units into rows. SA are pressed toward the four-patches.
Stitch the rows together using pins where needed.
Our Sunny Lanes quilt block is done.

Here's how it looks from the back side.
 Hmmm!!! Looks like someone's got a few threads to trim away before putting this beauty in a quilt.
What about a different quilt block?
For a list of all the 260+ quilt block patterns on this site, start here.
If you know the name of the block, shorten your search by using these links:
Click here if you're looking for blocks with at least some paper piecing.
Click here if you're looking for the basic building blocks of quilting, i.e., Flying Geese, half square triangles, quarter square triangles, etc., along with several techniques to make each.
And finally, use these links to find blocks in these finished sizes:


Yummy fabrics
to drool over
Click any image below to see the full collection and find pricing and ordering information.


By Julie Baird
Copyright © 2008-2026 Generation Quilt Patterns, LLC
All Rights Reserved
Generations-quilt-patterns.com does not sell any personal information. (See Privacy Policy)