- Home
- Free Quilt Block Patterns
- State Fair Quilt Block
State Fair Quilt Block
From our Free Quilt Block Patterns Library
This post contains affiliate links, for which I receive compensation.
Looks can be deceiving!
While it looks tricky, the State Fair quilt block is made using basic quilting units. Those pointy-points are easy-peasy—whether you choose traditional or paper piecing to make them.

In this tutorial you have:
- Cutting charts in three sizes with downloads of the chart and block design for both traditional and paperpiecing
Time to cut up and sew!
Hate to paper piece?
Don't worry, I've got you covered.
📋 General Instructions

These abbreviations are used in this State Fair quilt block tutorial:
- SA - seam allowance
- RST - right sides together
- FG - Flying Geese unit
- FGS - Flying Geese Side unit
- BW - Brave World unit
- SiaS - Square in a Square unit
- Bac - background fabric
1/4" SA are used throughout this tutorial.
For paper piecing I like to use heavily starched quilt fabric. It cuts, sews and presses more accurately in my experience.
Learn more about the hows and why of starching quilt fabric here.
Pressing instructions are highlighted in yellow to make them easy for you to spot.
When instructed to press, first press the patches in the closed position just as they came off your sewing machine. This sets the seam, melding the fibers of the threads into the fibers of the fabric.
Then press the SA to the dark unless otherwise noted.
Download and print paperpiecing pattern
You'll need the most current version of Adobe installed on your computer to download the pattern.
On the Adobe Print Menu page, under 'Page Size and Handling' set 'Custom Scale' to 100% before printing for accurate results. Click here to see what it looks like on the Print Menu page.
Choose your finished block size from the chart below and print the corresponding number of pages/copies.
Print Patterns | |||
|---|---|---|---|
| Finished Block Size | Square in a Square | Brave World | Flying Geese |
| 6" | 1 | 1 | 1 |
| 9" | 1 | 1 | 1 |
| 12" | 1 | 2 | 1 |
After printing, use the 1" square graphic on the printed page(s) to confirm the patterns are printed at the correct size.

Not sure which paper to use?
Take a look at my review of several of the most popular brands available to us quilters on the market.
You want a super-easy paper to tear away—less stress on the stitches.
New quilt fabrics to tickle your fancy...
Click the images below to see the full collection. We share any commercial and/or free patterns that showcase them, too. (For inspiration, of course!)


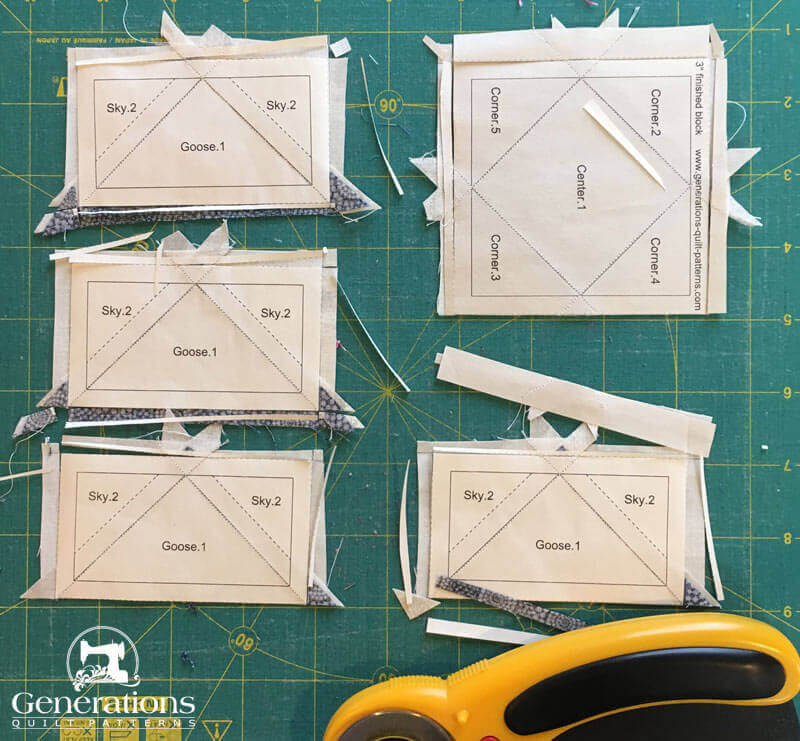
Step 1: Cutting for a State Fair quilt block
 State Fair design
Sample Block Size: 9" finished / 9½" unfinished
Grid: 6x6
Design attributed to: Nancy Cabot
Please label all your patches. We use their numbers and identifiers throughout this tutorial.
Print a copy of just the block design and cutting chart to use at your cutting table.
 | Cutting Chart for a~ Paper PLUS Traditional Piecing ~ | |||||
|---|---|---|---|---|---|---|
| Patch | Fabric | Qty | Finished Block Size | Sub Cut | ||
| 6'' | 9 '' | 12'' | ||||
| 1 | Bac | 4 | 1¾'' x 1¾'' | 2¼'' x 2¼'' | 2¾'' x 2¾'' | na |
| 2, 3 | Dark | 4 | 2⅜'' x 2⅜'' | 2⅞'' x 2⅞'' | 3⅜'' x 3⅜'' | |
| 4 | Bac | 2 | 3⅜'' x 3⅜'' | 4⅜'' x 4⅜'' | 5⅜'' x 5⅜'' | |
| 5 | Bac | 5 | 1½'' x 2½'' | 2 '' x 3½'' | 2½'' x 4½'' | na |
| Goose | Dark | 1 | 3⅝'' x 3⅝'' | 4⅝'' x 4⅝'' | 5⅝'' x 5⅝'' | |
| Sky | Bac | 4 | 2⅜'' x 2⅜'' | 2⅞'' x 2⅞'' | 3⅜'' x 3⅜'' | |
| Center | Dark | 1 | 1⅞'' x 1⅞'' | 2⅝'' x 2⅝'' | 3⅜'' x 3⅜'' | na |
| C.2, C.3, C.3, C.4 | Bac | 2 | 2⅜'' x 2⅜'' | 2⅞'' x 2⅞'' | 3⅜'' x 3⅜'' | |
| Unfinished Block Size | 6 1/2'' | 9 1/2'' | 12 1/2'' | --- | ||
| Grid Size | 1'' | 1 1/2'' | 2'' | --- | ||

Step 2: Assembling the units for a State Fair block
Cut out each pattern just a bit outside the dashed lines. There's no brownie points for trimming exactly on the line.
No need to waste any time being exact here.
General Sewing Machine Setup for Paperpiecing
- Reduce your stitch length to 16–20 stitches per inch (1.3-1.6 mm). This perforates the paper and stabilizes the seam when you remove the pattern. [Learn more about stitch length here.]
- Reduce your machine's speed or just plain slow down. Sew only as fast as you can stay on the stitching lines.
- Install an open toe appliqué foot (sometimes called an 'embroidery' or 'satin stitch' foot) if you have one (it's easier to see where you're stitching with one installed).
- Use a larger needle (90/14) if you have problems removing the pattern.
- If your machine has a needle stop up, use it. The stitching goes faster when you don't have to lift the presser foot with every seam.
- As you stitch each seam, start and stop a generous 1/4” before and after the solid stitching lines. ALWAYS. Future lines of stitching secure the ends.
After adding each patch, press the unit as it was sewn to set the seam and then open. The SA is automatically pressed towards the last patch added.
Before adding the next patch, take a look to make sure the one you just added covers the space plus seam allowance that it is supposed to.
Steam is optional and usually curls the pattern.
If that bothers you, don't use steam. Sometimes I do. Sometimes I don't.
It truly depends on my mood.
Remember, as you follow this paper piecing tutorial, the printed and the fabric sides of this block are mirror-images of each other.
At last!
Let's sew!
When should the paper be removed?
I prefer to remove mine after the units are given a final trim, before they are sewn together into a block. Because we use precut patches, the outside edges are all on straight of grain to minimize any stretching.
If you've starched your fabrics, that helps, too.
 Quickly, accurately position your first patch using the dashed guidelines
Position the first patch(es)
And finally, let's get the glueing done first so we can put our glue stick away.
Apply the tiniest dab of Elmer's Washable Glue Stick to adhere the Center, Goose and #1 patches to the unprinted side of their respective patterns.
Use the dashed guidelines around this first patch to position it.
Square in a Square

Make 1
With RST, align the long edge of C.2 with the Center.
Stitch, starting a generous 1/4" before and ending a good 1/4" after the solid line between Center and C.2.
If the block size you're working on is big enough, you can add C.3 to the opposite side in the same manner before pressing.
On our 9" finished sample there is plenty of room to add C.3 before going to the ironing board.

Helpful Hint
If you look closely in the photo above, you can see I scooched the C.2 a couple of threads past the cut edge of the dark Center.
This serves two purposes:
- Prevent the darker fabric from shadowing through the top of the quilt
- Avoid having to come back and trim away the offending darker fabric with a scissor—why waste the time?
Now back to our State Fair block...
Press the patches out from the Center.
Add C.4 and C.5 in the same manner.

Give your SiaS a good press.
To trim the unit to perfection, align the 1/4" line on your ruler with the solid outside line of the SiaS (not the dashed one). This cut ends up pretty much on the dashed line.
Trim. Rotate the unit a 1/4 turn and repeat. Continue until all four sides are trimmed.
This is the finished SiaS with points a perfect 1/4" away from the outside edge. I LOVE PAPER PIECING for just this reason!

Flying Geese Sides (FGSs)

Make 4
With RST, line up the long edge of a Sky with the cut edge of the Goose.
It doesn't really matter which side you start with—left or right—unless you are making many blocks. Then be consistent with which side goes first to make your quilting time more efficient.
Stitch starting and ending past the outside dashed line.
Since the seam goes from one side to the other you can effectively chain piece these patches.
In fact, every seam you sew in a FGS can be chain pieced! :)
 Chain piecing the first Sky in our FGSs
Press.
Repeat for the second Sky, pressing to complete the FG.
 Again, I've nudged the lighter Sky a few threads past the dark edge of the Goose to avoid any shadowing
Trim the FG to size exactly how you trimmed the SiaS.
To complete our FGS, with RST, stitch a #5 rectangle to the bottom of each of your FGs.

Press with SA to the dark Goose patch. If the seam is a little lumpy, try my favorite method for pressing quilt blocks.
Repeat for all four pairs.

Brave world (BW) units

Make 4
Paperpiecing is my absolute FAVORITE way to make these.
No matter how tired this quilter is, they always come out perfect just by sewing on a line.
With RST, align the short cut edge of #2 with #1 as shown below.

Stitch, starting and stopping past the outside dotted line.

Press.
With RST, align the short edge of #3 with #1 and stitch the seam as before.

Press.
Before adding #4, it's time to give our BW a trim.
At your cutting mat, align the edge of your ruler with the solid line between #2/#3 and #4.

Use your finger to make a crease on that line (blue arrow).
 There's no way to escape tearing the paper on a BW
Fold the paper back on the crease and align the 1/4" line (blue arrow) on your ruler directly on top of the folded edge.
Trim away the excess with your rotary cutter.

You've just created the perfect 1/4" edge to align #4 with.
With RST, add #4.
Again, I scooched the edge of #4 a bit past the cut edges of #2/#3 (blue arrow below) to avoid any chance of the darker fabric shadowing through the lighter one.
Did you tear the paper on your pattern?
It's unavoidable with this type of design. You can see where it's torn on my sample below. It's just part of the process of making our State Fair quilt block.
If you think you've torn the paper a bit too much, you can always use Scotch Brand Magic Tape® to repair it. Just don't iron directly on the tape.
Because this last seam runs from outside corner to outside corner, you can chain piece when adding #4.
A nice little time saver, isn't it?!!!

Give your BW a good press. Then trim to size.
Here they are after trimming to perfection and removing the paper.

Time to finish our State Fair quilt block
Click here for instructions to finish your State Fair block, or...
...here, if you'd prefer to use traditional piecing methods.
The choice is yours!
For even more blocks to make...

For you, are quilt block patterns like potato chips?
You can't have just one?!!
Check the fantastic resources I rely on for the majority of the quilt block designs you see on this website.
To see if they're worthy of a spot in YOUR quilting library, read about them HERE.
NOTE: All the attribution and alternate names shared in the Free Quilt Block Patterns Library came from these four resources.


My
Favorite Paper
Piecing Tools
For a complete list of all the tools I personally use, click here to read 'The Right Tools Make Your Job Easier', part of my series called, "Essential Paper Piecing Skills".


The serrated edge on this short-bladed scissor make it easy to trim seam allowances—my all-time favorite scissor.

By Julie Baird
Copyright © 2008-2026 Generation Quilt Patterns, LLC
All Rights Reserved
Generations-quilt-patterns.com does not sell any personal information. (See Privacy Policy)