- Home
- Free Quilt Block Patterns
- Pigeon Toes Quilt Block
Winging It with Precision: Master the Pigeon Toes Quilt Block
Toe-tally awesome quilting ahead! 🧵✨
This post contains affiliate links, for which I receive compensation.
Hey quilters, don't settle for sad little nubs when you can be rocking razor-sharp points instead!
The Pigeon Toes quilt block tutorial will have you stitching effortless pointy goodness right off the bat. It's as easy as stitching on a printed line. No specialty rulers required.
Unruffle those feathers. Perfect points are just clicks away.

🧭Ready to spread your quilting wings?
Use these handy perches to navigate our Pigeon Toes tutorial with ease.
It's time to cut up and sew! Flock to fabulous with every stitch
📋 General Instructions
Several abbreviations are used on this page. They are:
- SA - seam allowance
- RST - right sides together
- HRT - half rectangle triangles
1/4" SA are used through this tutorial.
Pressing instructions are highlighted in yellow throughout this tutorial to make them easy to spot.
To press, set the seam first by pressing the patches in the closed position just as they came off your sewing machine. This melds the fibers of the threads into the fibers of the fabric for a flatter block.
📥Download and print paper piecing pattern
You'll need the most current version of Adobe installed on your computer to download the pattern.
On the Adobe Print Menu page, under 'Page Size and Handling' set 'Custom Scale' to 100% before printing for accurate results. Click here to see what it looks like on the Print Menu page.
Choose your finished block size from the chart below and print the corresponding number of pages for a total of 4 pairs of mirror image HRT pairs—or 8 units total.
DO NOT select 'Fit to Page' or 'Scale to Fit' in your printer settings. Doing so enlarges or reduces the templates and patterns. They will be the wrong size and need to be reprinted.
 | Printing Chart for~ Paper Piecing ~ | ||
|---|---|---|---|
| Finished Block Size |  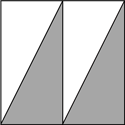 # of HRT pairs per copy | Copies to print per block | Finished Size of HRT Pairs |
| 10" | 3 | 2 | 2" |
| 12½" | 2 | 2 | 2½" |
| 15" | 2 | 2 | 3" |
| 20" | 1 | 4 | 4" |
After printing, use the 1" square graphic on the printed page(s) to double check that your patterns printed at the correct size.
Cut around the outside dashed markings. This is a rough cut, no need for perfection here.

Not sure which paper to use?
Have a look at my review of several of the most popular brands available to us quilters on the market.
My personal preference is for a super-easy paper to tear away—less stress on the stitches.
New quilt fabrics to tickle your fancy...
Click the images below to see the full collection. We share any commercial and/or free patterns that showcase them, too. (For inspiration, of course!)


✂️Cutting patches for your Pigeon Toes
 Pigeon Toes design
Sample Block Size: 10" finished / 10½" unfinished
Grid: 10x10
Attribution: Beth Gutcheon
Design Type: Uneven 9-patch | 5 patch | Paper Piecing
This block looks a lot like the Farmer's Daughter quilt block, except that pairs of HRTs are swapped for the HSTs and reversed. While the spiky HRTs look like they'd be harder to piece, the paper piecing technique makes them effortless.
Set yourself up for success by labeling all patches.
To print a copy of the block design and cutting chart to use at your cutting table, click here.
| Cutting Chart for a~ Paper PLUS Traditional Piecing ~ | |||||
|---|---|---|---|---|---|---|
| Patch | Fabric | Qty | Finished Block Size | |||
| 10" | 12½" | 15" | 20" | |||
| 1, 3 | Dark | 8 | 3'' x 2¾'' | 3½'' x 3" | 4" x 3¼'' | 5" x 3¾'' |
| 2, 4 | Light | 8 | 3'' x 2¾'' | 3½'' x 3" | 4" x 3¼'' | 5" x 3¾'' |
| 5 | Dark | 4 | 2½'' x 2½'' | 3 '' x 3'' | 3½'' x 3½'' | 4½'' x 4½'' |
| 6 | Light | 13 | 2½'' x 2½'' | 3 '' x 3'' | 3½'' x 3½'' | 4½'' x 4½'' |
| Unfinished Block Size | 10½'' | 13'' | 15½'' | 20½'' | ||
| Grid Size | 1'' | 1¼'' | 1½'' | 2 '' | ||
Subcutting patches 1-4
Layer your dark #1/#3 patches in pairs of RIGHT SIDES TOGETHER rectangles. Do the same for your light #2/#4 patches.
It's this layering of our patches that creates the mirror image patches that we need.
For accuracy, we're cutting through only 4 layers of fabric at a time.
At your cutting mat, use a pencil and make a tiny mark 5/8" in from the top-left side and 5/8" in from the bottom-right side.
I'm showing the light #2s and #4s first because it's easier to see the pencil marks.
 Make a tick mark on the short edges 5/8" in from the top left and bottom right. These are #2s and #4s layered RST.
Align your ruler with the top and bottom edges at the mark and cut the rectangles in two.
 REMEMBER to position the rectangles with the shorter edges at the top and bottom.
Repeat for all the pairs of RST pairs.
This shows how pairs of darker #1 and #3 rectangles are layered RST.
 #1s and #3s layered in pairs right sides together
Now even up all the edges. Mark the layered pairs, right sides together.

After subcutting, this stack of #1 and #3 patches looks like this. (There's another stack of these to subcut.)

Mark and cut the remaining #1-#4 patches in the same way.
🪡Create the units for a Pigeon Toes block
Half Rectangle Pairs Unit
Make 4 each
 Half Rectangle Triangles, mirror-image pairs
Unit A (right) and Unit B (left)
Use a dot of Elmer's Washable Glue stick on the unprinted side of the pattern to position the #1s on the A and B versions of the HRT units.
The dashed placement guide (red arrow) makes it easy to quickly position these patches.

We need to make a few adjustments to our sewing machine settings to paper piece.
- Reduce your stitch length to 16–20 stitches per inch (1.3-1.6 mm). This perforates the paper and stabilizes the seam when you remove the pattern. [Learn more about stitch length here.]
- Reduce your machine's speed or just plain slow down. Sew only as fast as you can AND stay on the solid stitching line.
- Install an open toe appliqué foot (sometimes called an 'embroidery' or 'satin stitch' foot) if you have one (it makes it easier to see where you're stitching).
- Use a larger needle (90/14) IF you have problems removing the pattern. Personally, I use an 80/12 Microtex Sharp for paper piecing without any issues.
Align the #1 and #2 along the bias cut. Since I'm adding a light over a much darker fabric, I nudge the lighter one a thread or two past the edge of the dark. This prevents the dark from shadowing through on the front of my quilt.
 The very edge of the light #2 is noticeably lighter than the rest of it. This is where it was nudged over a bit.
After pressing, check that the #2 patch covers the #2 space plus SAs. This does.

At your cutting mat, pattern side up, fold the paper back along the line between #2 and #3. I use my ruler and crease the fold with my thumbnail.
The pattern will tear away from the stitches a bit. This is normal.
If the tear distorts the pattern, you can use a piece of Scotch Brand Magic Tape® to mend it.

Position the 1/4" mark on your rule over the fold and trim away the excess fabric, which creates the exact placement line for #3.

Layer #3 and #2 RST. The wide bottom of #3 is on the same side as the wide bottom of #1.

Press.
Back to your cutting mat. Trim the SA as before.

With RST, add #4.
After stitching these are an A and a B HRT. Of course, I didn't notice until the block was completely pieced that the one on the right is upside-down. <blushing!>

Trim each side of the HRT by positioning the 1/4" line on your ruler with the solid inner square around each HRT.

Finally, all the completed A and B HRTs are trimmed and pressed. All that's left is to remove the paper pattern.
We cut our patches so that every outside edge is on the straight of grain. There is no bias to worry about stretching out of shape. Remove the paper now.


The paper piecing is complete. From this point forward, return your stitch length to the one you regularly use for piecing and install your favorite 1/4" presser foot.
Sides
Make 4 each
 Side units
With RST, sew an HRT-A to the left side of #6 and an HRT-B to the right side.
Do take a second and flip these open after pinning (or while they're in hand if you don't pin) to make sure they're oriented correctly.
I ripped one side three times while making this sample block. (That'll learn me for watching old 50's sci-fi movies while I was sewing. <Blushing again! Twice in one tutorial!>)

Press with the SA away from the HRTs to reduce bulk.
9-Patch Unit
Make 1
 9-patch unit
With RST, sew 3 pairs of #6 and #5.
Press SAs toward the dark #5s.
With RST, add a #6 to 2 of the pairs of squares, and a #5 to the other to form these three units.

Again, pressing the SA to the light #6s.

With RST, sew the units together so the light #6's are in the outside corners. The SAs are pressed toward the light corners.

📏Check for accuracy
Use the chart below to check the accuracy of your 9-patch. Make adjustments as needed.
After sewing, the 9-patch measures... | |
|---|---|
| Finished Block Size | Edge-to-edge Measurement |
| 10" | 6½" x 6½" |
| 12½'' | 8" x 8" |
| 15" | 9½" x 9½" |
| 20" | 12½" x 12½" |
🧩Assemble the Pigeon Toe Quilt Block
Lay out the sides, #6 corner squares and center 9-patch to create the Pigeon Toes quilt block design.

With RST, sew the units in each row together.
SAs are pressed away from the HRTs to minimize bulk.

Finally, sew the rows together. Pin as needed.
 I try to avoid shoving the pin through all the layers of the SAs. Rather I pin through the block and NOT the SAs when I can.
Press these last two seams towards the center of the block.
You'll love my favorite pressing technique if you haven't tried it yet. For something so simple, it does a remarkable job of flattening those SA. All without the cost of a clapper.

And here is our Pigeon Toes quilt block from the back side, so you can see how everything was pressed.

Toe-tally Awesome!
You've mastered the Pigeon Toes block with precision and flair. Let this be just the beginning of your quilting adventures. Spread your creative wings and soar to new heights with your designs! 🌈🦅
Until our next quilting journey, may your points be sharp and your seam ripper idle! 👣✨
📌Don't wing it later
Pin this tutorial now and soar through your next quilting project! 🚀📌

For even MORE blocks to make… 🧩🎨
...visit our Free Quilt Block Pattern Library, with over 260+ blocks to choose from in multiple sizes.
Free downloads are included in all sizes for any blocks require paper piecing patterns or templates.
- Home
- Free Quilt Block Patterns
- Pigeon Toes Quilt Block


Yummy fabrics
to drool over
Click any image below to see the full collection and find pricing and ordering information.


By Julie Baird
Copyright © 2008-2026 Generation Quilt Patterns, LLC
All Rights Reserved
Generations-quilt-patterns.com does not sell any personal information. (See Privacy Policy)