- Home
- Free Quilt Block Patterns
- Odds and Ends Quilt Block
Odds and Ends Quilt Block
Where every scrap finds its perfect place
This post contains affiliate links, for which I receive compensation.
Ready to turn your fabric odds and ends into a quilting masterpiece? 🧵✨ Meet the Odds and Ends quilt block—;a charming design that's as fun to make as it is to look at! 🎨
This block is perfect for quilters of all levels, combining simple techniques to create a stunning result. 🌟 We use the quick pieced method for Half Square Triangles 📐 and easy strip piecing for the sides and four-patches. 🧩 Before you know it, you'll have a beautiful block that looks complex but comes together in a snap. ⚡
So, grab your favorite fabrics, 🧶 fire up that sewing machine, 🪡 and let's start stitching some magic with the Odds and Ends quilt block. Your scrap basket is about to become a treasure trove! 💎🪄
🧭Quick Navigation🔍
Need to find something specific? Use these handy links to navigate through our Odds and Ends quilt block tutorial.
Cut. Sew. Press. Where every piece finds its perfect place.
📋 General Instructions
This tutorial uses these abbreviations:
- SA - seam allowance
- RST - right sides together
- BAC - background fabric
- HST - half square triangle
SA are 1/4" and pressed towards the darker fabric unless noted otherwise.
Starch your quilt fabric for more accurate cutting and sewing (in my humble opinion).
Not sure how to do it? Click here to learn how.
New quilt fabrics to tickle your fancy...
Click the images below to see the full collection. We share any commercial and/or free patterns that showcase them, too. (For inspiration, of course!)


✂️Cut patches for your Odds and Ends quilt block
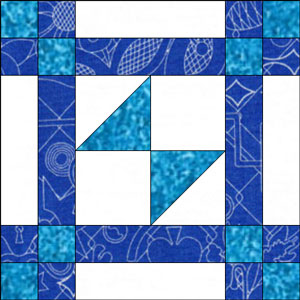
 Odds and Ends patchwork design
Sample Block: 8" finished / 8½" unfinished
Grid: 8×8
Attribution: Ladies Art Company
Design Type: Uneven 9-patch, large center
Our version of Odds and Ends uses two fabrics with strong contrast.
I love a blue and white combination—even though I don't consider myself a 'blue and white' kind of gal!
It always looks so fresh and clean.
The blue print fabric in the block is from Alison Glass' Sun Print line. I've been having a lot of fun playing with the bright colors!
You can find more fabrics from Alison Glass here and here.
To print a copy of the block design and cutting chart to use at your cutting table, click here.
 | Cutting Chart for a~ Traditional Piecing ~ | ||||
|---|---|---|---|---|---|
| Patch | Fabric | Qty | Finished Block Size | ||
| 6'' | 8'' | 12'' | |||
| 1** | Light | 1 | 2⅜'' x 2⅜'' | 2⅞'' x 2⅞'' | 3⅞'' x 3⅞'' |
| 2** | Dark | 1 | 2⅜'' x 2⅜'' | 2⅞'' x 2⅞'' | 3⅞'' x 3⅞'' |
| 3 | Dark | 2 | 2'' x 2'' | 2½'' x 2½'' | 3½'' x 3½'' |
| 4 | Light | 1 | 1¼'' x 25'' | 1½'' x 31'' | 2'' x 43'' |
| 5 | Dark | 1 | 1¼'' x 25'' | 1½'' x 31'' | 2'' x 43'' |
| Unfinished Block Size | 6½'' | 8½'' | 12½'' | ||
| Grid Size | ¾" | 1'' | 1½'' | ||
There is a chart further down in these instructions where you need it for trimming them to size.

🧵Stitch the units for your Odds and Ends block
HST
Make 2

We'll use the Quick Pieced method for making our HST—the perfect method when you just need a couple of units.
Making oodles of blocks?
For more efficient piecing, consider another HST method like 8-at-a-time or triangle paper.
Let's get started.
On the backside of the #1 or #2 square draw a diagonal line from corner to corner—mark whichever one it's easier to see the line on.
Here I've used my Bohin Mechanical Chalk Pencil for this marking. Because it's a white chalk, I've marked the darker #2 square.
 I've layered the #1 and #2 squares...you can just see the light background #1 peeking out.
After stitching a quarter inch away from both sides of the line, press the unit flat to set the seams.
Cut the unit in half with a rotary cutter or scissors along the line you drew.
Press the two resulting HST with the SA toward the darker fabric.
 Trimming to size gets rid of those pesky 'dog ears'
Use the chart below to check the accuracy of your stitching. Trim your HST as needed.
HST Dimensions | |
|---|---|
| Finished Block Size | Trim HST to… |
| 6" | 2" |
| 8" | 2-1/2" |
| 12" | 3-1/2" |
These are the two, perfectly trimmed HST.
 A-bra-ca-da-bra! Dog ears are gone, too!
Center
Make 1

Arrange your HST and #3s as shown below.

Stitch the units into rows and press toward the #3 squares to avoid bulk.

Press SA toward the #3 to avoid bulk.
The finished center from the front.

Check the accuracy of your Center using the chart below.
Center Dimensions | |
|---|---|
| Finished Block Size | Edge-to-Edge |
| 6" | 3½" |
| 8" | 4½" |
| 12" | 6½" |
To reduce bulk in the center, pick out the stitching to the seam line and twirl the seam allowance.
Press the SAs counterclockwise.
It looks like this from the backside.
 Love that little adorkable four patch that forms in the center!
Side Units
Make 4
With RST, stitch the #4 and #5 strips together along their long edge.
 Starched quilt fabric and a 1/4" foot with a guide make sewing strip sets a easy as can be.
Press the pair flat to set the seam and then open with the SA toward the dark fabric.
Use the chart below to check the width of your sewn strip set. Make any adjustments needed before subcutting.
StripSet Widths and SubCutting | |||
|---|---|---|---|
| Finished Block Size | StripSet Width after stitching | SubCut Width #1 Cut 4 | SubCut Width #2 Cut 8 |
| 6" | 2" | 3-1/2" | 1-1/4" |
| 8" | 2-1/2" | 4-1/2" | 1-1/2" |
| 12" | 3-1/2" | 6-1/2" | 2" |
Straighten one short end of your stripset.
 Align a line on your ruler with the seam line and trim away just enough of the unit to create a straight edge.
Referring back to the chart above, make the required subcuts.
For this 8" sample block, that means four 4-1/2" and eight 1-1/2" subcuts.

Set aside the four longers units. The remaining eight little ones are used next.
Four Patches
Make 4

Arrange four pairs of #4/#5 patches so that the background and Fabric A alternate as shown below.
Pin as needed.
 Make 4
With RST, stitch the pairs together.
Press flat to set the seams.
In order for the seams to nest when assembling the block, press this last sewn SA toward the #5 dark square. It's in the lower right corner of the four patch.
This is how the four patches look from the backside after pressing.
 Press the SA in the direction of the arrows for all four units
So why aren't the four patch SAs twirled?
A good question!
If we twirled the SAs they won't nest with the SA of the strip pieced side units.
It's always good to know why!
🧩Put your Odds and Ends together
Arrange the units into the Odds and Ends pattern. The darker patches are on the outside edges and corners.

Stitch the units in each row together. If you've followed the pressing directions, all the seams will nest together.
 Press the SA in the direction of the arrows
And finally, sew the rows together. Use pins if you need to to keep everything lined up.
Give you block a final press.
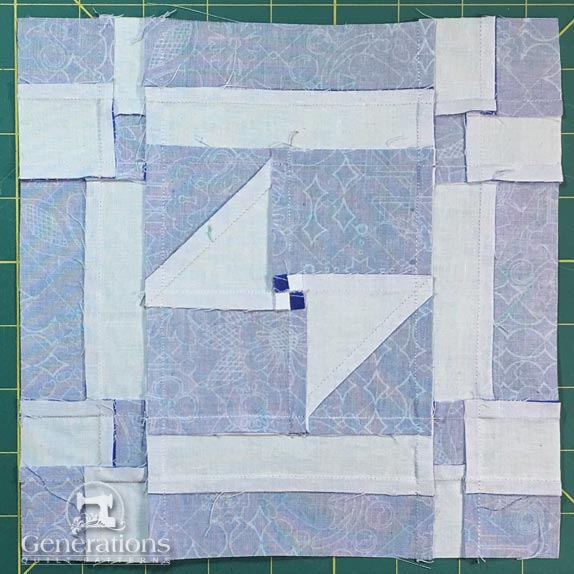
The finished Odds and Ends quit block looks like this from the front...
 Our Odds and Ends is complete.
...and like this from the back.
📌 Don't let this tutorial become the odd one out! 🧵
Pin it to your board and keep your creativity in stitches. 🪡✨

Variations on an Odds and Ends Block
This first variation uses three fabrics instead of two—a light, a medium and a dark.

This one completely loses the center HST. It'd be perfect for showcasing a machine embroidery collection.
Same name, different block

This Odds and Ends block reminds me of an Ocean Waves design.
The only thing in common with our sample are the HSTs.
Beautiful design, though. It'd be a terrific scrap-buster!
For even MORE blocks to make… 🧩🎨

...visit our Free Quilt Block Pattern Library, with over 260+ blocks to choose from in multiple sizes.
Free downloads are included in all sizes for any blocks require paper piecing patterns or templates.
- Home
- Free Quilt Block Patterns
- Odds and Ends Quilt Block


By Julie Baird
Copyright © 2008-2026 Generation Quilt Patterns, LLC
All Rights Reserved
Generations-quilt-patterns.com does not sell any personal information. (See Privacy Policy)