- Home
- Free Quilt Block Patterns
- Heart Quilt Block
Free Heart Quilt Block Pattern
From our Free Quilt Block Patterns Library
This post contains affiliate links for which I receive compensation
Our free heart quilt block tutorial is a paper pieced design whose construction mimics a half log cabin block. With its simple piecing and strips cut to size it's a quick one to whip up.
In this tutorial you'll find:
And finally, a quick story on the journey to make this heart block.
Time to cut up and sew!
📋 General Instructions
Several abbreviations are used on this page. They are:
- SA - seam allowance
- RST - right sides together
- HST - half square triangles
- QST - quarter square triangles
1/4" SA are used through this tutorial.
Pressing instructions are highlighted in yellow throughout this tutorial to make them easy to spot.
When instructed to press, first press the patches in the closed position just as they came off your sewing machine. This sets the seam, melding the fibers of the threads into the fibers of the fabric.
Then the patch is pressed open.
When you're paperpiecing, the last seam sewn is always pressed toward the last patch added.
I prefer starched quilt fabrics for piecing. That way I can fingerpress first and then press with my iron.
Download and print paper piecing pattern
You'll need the most current version of Adobe installed on your computer to download the pattern.
On the Adobe Print Menu page, under 'Page Size and Handling' set 'Custom Scale' to 100% before printing for accurate results. Click here to see what it looks like on the Print Menu page.
| |
|---|---|
| Click on the Finished Block Size | Copies needed for 1 block |
| 4" | 1 |
| 6" | 1 |
| 7" | 1 |
After printing, use the 1" square graphic on the printed page(s) to double check that your pattern printed at the correct size.
After printing, notice that the pattern looks like a mirror image of the block drawing below. This is correct.
Since the block is asymmetrical it needs to be a mirror image in order the the finished block to look like the drawing.
With scissors, cut the block out just past the outside dashed lines. No need to be precise here. A rough cut is good enough. Our Heart quilt block gets trimmed at the very end to clean up all the edges.
New quilt fabrics to tickle your fancy...
Click the images below to see the full collection. We share any commercial and/or free patterns that showcase them, too. (For inspiration, of course!)


Cut the patches for your Heart block
 Heart block design
Sample Block Size: 6" finished / 6½" unfinished
Grid: 14x14
Design Type: Heart, pictorial | Paper Pieced
Please label your patches. Their numbers are used to throughout this tutorial.
We've gone with a scrappy look for our Valentine Heart using a different fabric for each of the red patches (#2-#11).
You can do the same, or maybe alternate the patches between light and dark, or even cut every two patches from the same fabric to create a kind of 'stripe-y' heart.
The choice is up to you. Use the cutting chart you print below to remember where you want the fabrics to go.
And finally, hearts don't have to be red.
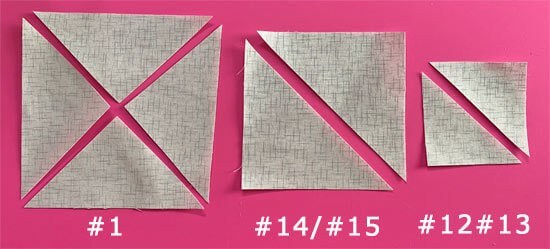
Remember to subcut your squares. #1 is cut twice on the diagonal to create QSTs. You'll use only one square per block so there is some waste.
#12/#13 and #14/#15 are cut once on the diagonal to create HSTs.
Click here to see what those subcuts look like.
The reason for precutting these patches is to have a finished block with as much straight of grain on the outside edges for stability.
[To learn more about grain line and why it matters, click here.]
And finally, since the 'logs' are relatively narrow (from cut from ⅞" to 1¼") using fabrics with allover prints will probably work better. Big prints with lots of negative space can look blotchy when cut into narrow strips.

 | Cutting Chart for a~ Paper Piecing ~ | |||||
|---|---|---|---|---|---|---|
| Patch | Fabric | Qty | Finished Block Size | Sub Cut | ||
| 4" | 6" | 7" | ||||
| 1 | Bac | 1 | 4⅛'' x 4⅛'' | 5¼'' x 5¼'' | 5¾'' x 5¾'' | |
| 2 | A | 1 | ⅞" x 2⅝'' | 1⅛'' x 3⅜'' | 1¼'' x 3⅞'' | --- |
| 3 | A | 1 | ⅞" x 3'' | 1⅛'' x 4'' | 1¼'' x 4½'' | --- |
| 4 | A | 1 | ⅞" x 3'' | 1⅛'' x 4'' | 1¼'' x 4⅝'' | --- |
| 5 | A | 1 | ⅞" x 3⅜'' | 1⅛'' x 4⅝'' | 1¼'' x 5¼'' | --- |
| 6 | A | 1 | ⅞" x 3⅜'' | 1⅛'' x 4⅝'' | 1¼'' x 5½'' | --- |
| 7 | A | 1 | ⅞" x 3⅞'' | 1⅛'' x 5¼'' | 1¼'' x 6'' | --- |
| 8 | A | 1 | ⅞" x 3⅞'' | 1⅛'' x 5¼'' | 1¼'' x 6'' | --- |
| 9 | A | 1 | ⅞" x 4¼'' | 1⅛'' x 5⅞'' | 1¼'' x 6⅝'' | --- |
| 10 | A | 1 | ⅞" x 3⅞'' | 1⅛'' x 5¼'' | 1¼'' x 6'' | --- |
| 11 | A | 1 | ⅞" x 4¼'' | 1⅛'' x 5⅞'' | 1¼'' x 6⅝'' | --- |
| 12, 13 | Bac | 1 | 2½'' x 2½'' | 3'' x 3'' | 3⅛'' x 3⅛'' | |
| 14, 15 | Bac | 1 | 3¾'' x 3¾'' | 4¾'' x 4¾'' | 5¼'' x 5¼'' | |
| Unfinished Block Size | 4½'' | 6½'' | 7½'' | na | ||

Set up your sewing machine for paperpiecing
We need to make a few adjustments to our sewing machine settings to paper piece.
- Reduce your stitch length to 16–20 stitches per inch (1.3-1.6 mm). This perforates the paper and stabilizes the seam when you remove the pattern. [Learn more about stitch length here.]
- Reduce your machine's speed or just plain slow down. Sew only as fast as you can AND stay on the solid stitching line.
- Install an open toe appliqué foot (sometimes called an 'embroidery' or 'satin stitch' foot) if you have one (it makes it easier to see where you're stitching).
- Use a larger needle (90/14) IF you have problems removing the pattern. Personally, I use an 80/12 Microtex Sharp for paper piecing without any issues.
Stitch your Heart quilt block
While I don't usually use vellum in my free tutorials, in this instance it seemed like a good idea to make it easier to see where the untrimmed patches are lining up.
Learn more about my travails here.
Use the tiniest dab of Elmer's Washable Glue Stick to hold #1 in place on the unprinted side. Use the dashed guidelines to quickly, accurately position this patch.
 The purple glue stick disappeared before I shot the photo...my bad!
With RST, align the long edge of #2 with #1. The short edge of #2 aligns with the cut edge of #1 as well as the dashed lines as shown below.
 The numbers are reversed because we're adding our patched to the unprinted side of the vellum.
For a secure seam, from the printed side, sew on the line between #1 and #2, starting and ending a generous 1/4" past the ends. Future lines of stitching secure these seams (just as in traditional piecing).
No backstitching required.
 My stitches will end at about the point of the white arrow
Press.
To keep things neat, trim away any thread tails within the four sides of the block.
With RST, position the long cut edges of #3 with #1. The short edge is even with the short edge of the previously sewn #2.
If your patches extend past the dashed lines, give them a trim to make them even with the dashes (white arrow).

Stitch.
Press.
 Protecting my wool pressing mat from toner transfer while pressing
Add #4 in the same manner.
 Lining up #4 with the long edge of #2 and the dashed guidelines
Keep adding logs (#5-#11), trimming anytime the patch extends past the dashed guidelines.
 All the thread tails in the center of the block are trimmed as the seams are sewn. The outer tails are trimmed when the block is trimmed.
Now it's time to trim before adding the #12 and #13 triangles.
From the printed side, fold the pattern back on the solid line between #12 and #2-#10. You'll have to pull the it away from the stitches. It may tear a bit. If too much use a bit of Scotch Brand Magic® Tape to repair it from the printed side—and then don't ever press directly on the tape or it'll melt.
Here I'm using an Add-A-Quarter Plus ruler to add the 1/4" seam allowance past the folded edge. This ruler makes trimming foolproof.
If you don't have one, line up the 1/4" line on a regular rotary ruler with the fold and trim.
 This trim establishes the SA—so there's no need for a guideline here.
With RST, add #12 to your heart with the point of the triangle directly opposite the corner of the block design (white arrow).

I like to scooch the edge of the lighter background a few thread past the cut edge so the darker patches don't shadow through.
Press.
Repeat for the #13 triangle.
Next add the #14 and #15 triangles. Again, I've scooched the lighter triangle a bit past the dashed line to avoid any shadowing.
Make sure your stitches start and end past the outside dashed line around the block—me I just stitch completely off the edge.

The stitching's complete.
And it rather looks like a hot mess right now.
But that's part of the 'charm' of this technique.

Give your heart a good press and take it to the cutting mat.
Printed side up, align the 1/4" marking on your ruler with the solid outer line of the block. Trim away the excess with your rotary cutter.
.")
Repeat for the 3 remaining sides.
After a good press (and I strongly urge you to check out my secret pressing technique for a professional press-job) and after it's cooled, remove the paper.

And we've finished our free heart quilt block!

And here's our heart from the backside.
See how the background triangles (bottom left and right corners) extend just a wee bit past the pink logs to avoid any of the darker pink fabrics from shadowing through the lighter background.
 There's no messy thread tails around the outside edges after trimming.
📌 This Heart Block Tutorial: Because Your Fabric Stash Isn't Going to Use Itself 💝
Finally, a paper piecing project worthy of that special fabric you've been "saving for the right time." This free tutorial breaks down every step, teaching core quilting skills while creating a block so pretty, you'll actually finish it instead of adding it to your UFO collection.

On the way to creating this tutorial
If you use the tutorials and lessons on this site, you probably know I'm a firm believer in testing things before committing to a technique or product to make a large quilt.
In this free heart block tutorial, I tried a new-to-me vellum foundation.
In my review of a number of paperpiecing alternatives, I said I really love vellum for this technique, but find it much too expensive for large projects without enough benefit.
So I continued my search for a cheaper source for vellum and found one.
Well, it's cheaper—$12.99/100 sheets vs $13.36/30 sheets.
The laser printed copies are nice and clear, no smudging.
But, since I've invested (heavily) in wool pressing mats (read my review here)—a 20" x 60", an 18" x 24", and a 12" x 14"—I really don't want to crap them up.
So, I did a quick test pressing from the back side of the printed pattern onto a white piece of paper.
WHOA!
 Even with all that transfer it didn't make the pattern un-readable.
That's a whole lotta toner transfer.
Does it make this cheaper option unusable?
No.
However, I did choose to continue to press on a white sheet of paper on top of my wool pressing mat, to keep the mat clean.
The other thing I found was that a shot of steam REALLY made the vellum curl. Something I'm not fond of.

Again, it didn't make the vellum unusable. It just meant:
- No steam
- Use my secret pressing technique when it curls too much for my taste
To check out this vellum for yourself, you can find it here on Amazon.com.
The vellum I previously reviewed is here.
For a savings of almost 70%, if I want to use vellum, I'll put up with the cheaper brand's idiosyncrasies.
The lesson?
A stitch in time saves nine...always test the unknown.
🔍 More heart quilt blocks to make and other inspo
Looking for more free patterns to make heart blocks?
Try these!
")
")

And for even more heartfelt inspiration check out the free and commercial patterns along with the latest heart quilt fabrics.


For even MORE blocks to make… 🧩🎨

...visit our Free Quilt Block Pattern Library, with over 260+ blocks to choose from in multiple sizes.
Free downloads are included in all sizes for any blocks require paper piecing patterns or templates.
- Home
- Free Quilt Block Patterns
- Heart Quilt Block


Yummy fabrics
to drool over
Click any image below to see the full collection and find pricing and ordering information.


By Julie Baird
Copyright © 2008-2026 Generation Quilt Patterns, LLC
All Rights Reserved
Generations-quilt-patterns.com does not sell any personal information. (See Privacy Policy)