- Home
- Free Quilt Block Patterns
- Woven Heart Quilt Block Pattern, 5x5 grid
Woven Heart Quilt Block Pattern
Part Deux
From our Free Quilt Block Patterns Library
This post contains affiliate links, for which I receive compensation.
In this rendition of the Woven Heart quilt block pattern (there's another drafted on a 6x6 grid here), you learn a simple technique of strip piecing a single 9-patch unit.
What better way to get a taste of the technique without having to make a whole quilt—that just makes your heart go pitter-patter, doesn't it?
And if the technique's not for you then...
No problem.
There's a cutting chart and instructions for a traditionally pieced unit, too.
What works best for you, is what's best for you!

🧭 Looking for Something Specific? We've Got Your Shortcut Fix! 🏃♀️
Use these quick links to hop, skip, and jump to exactly what you need.
- A cutting chart in four sizes with downloads of the chart and block design for each method
- If you'd rather make a whole quilt for your special someone, have a look at these commercial heart- and love-themed quilt designs.
It's time to cut up and sew!
📋 General Instructions
NOTE: Please read through the instructions first to help you choose which version of the pattern you prefer.
Several abbreviations are used on this page. They are:
- SA - seam allowance
- RST - right sides together
- Bac - background fabric
1/4" SA are used through this tutorial.
Pressing instructions are highlighted in yellow throughout this tutorial to make them easy to spot.
When instructed to press, first press the patches in the closed position just as they came off your sewing machine. This sets the seam, melding the fibers of the threads into the fibers of the fabric.
Then press the SA to the dark unless otherwise noted.
New quilt fabrics to tickle your fancy...
Click the images below to see the full collection. We share any commercial and/or free patterns that showcase them, too. (For inspiration, of course!)


✂️ Cutting for your Woven Heart block
Choose either...
 Strip Piecing a Single 9-patch
Blue Chart
OR
 Traditional
Green Chart
Sample Size: 7½" finished / 8" unfinished
Grid: 5x5
Please label all your patches. We refer to their numbers throughout this tutorial.
The sample block is made of selections from the Tula Pink 'True Colors' line. Yummy pinks, and the rest are pretty cool, too!
The background is from Kimberbell's Winter Basics line.

To print a copy of the strip piecing (blue) cutting table below, click here.
 |
~ With Strip Piecing a Single 9-Patch Unit ~Woven Heart (5x5) Quilt Block | |||||
|---|---|---|---|---|---|---|
| Patch | Fabric | Qty | Finished Block Size | |||
| 5'' | 7½'' | 10'' | 15'' | |||
| 1 | Bac | 4 | 1½'' x 1½'' | 2" x 2" | 2½'' x 2½'' | 3½'' x 3½'' |
| 2 | Light | 1 | 2½'' x 3½'' | 3½'' x 5" | 4½'' x 6½'' | 6½'' x 9½'' |
| 3 | Dark | 1 | 2½'' x 3½'' | 3½'' x 5'' | 4½'' x 6½'' | 6½'' x 9½'' |
| 4 | Bac | 1 | 2½'' x 2½'' | 3½'' x 3½'' | 4½'' x 4½'' | 6½'' x 6½'' |
| 5 | Light | 1 | 1½'' x 5½" | 2'' x 7" | 2½'' x 8½" | 3½'' x 11½" |
| 6 | Light | 1 | 1½'' x 4" | 2" x 5" | 2½'' x 6" | 3½'' x 8" |
| 7 | Dark | 1 | 1½" x 5½" | 2" x 7" | 2½" x 8½" | 3½" x 11½" |
| 8 | Dark | 1 | 1½" x 2" | 2" x 2½" | 2½" x 3" | 3½" x 4" |
| Unfinished Block Size | 5½'' | 8'' | 10½'' | 15½'' | ||
| Grid Size | 1'' | 1½'' | 2'' | 3'' | ||
To print a copy of the traditional (green) cutting table below, click here.
 | Cutting Chart for a~ Traditional Piecing ~ | |||||
|---|---|---|---|---|---|---|
| Patch | Fabric | Qty | Finished Block Size | |||
| 5'' | 7½'' | 10'' | 15'' | |||
| 1 | Bac | 4 | 1½'' x 1½'' | 2'' x 2'' | 2½'' x 2½'' | 3½'' x 3½'' |
| 2 | Light | 1 | 2½'' x 3½'' | 3½'' x 5'' | 4½'' x 6½'' | 6½'' x 9½'' |
| 3 | Dark | 1 | 2½'' x 3½'' | 3½'' x 5'' | 4½'' x 6½'' | 6½'' x 9½'' |
| 4 | Bac | 1 | 2½'' x 2½'' | 3½'' x 3½'' | 4½'' x 4½'' | 6½'' x 6½'' |
| 5 | Light | 5 | 1½'' x 1½'' | 2'' x 2'' | 2½'' x 2½'' | 3½'' x 3½'' |
| 6 | Dark | 4 | 1½'' x 1½'' | 2'' x 2'' | 2½'' x 2½'' | 3½'' x 3½'' |
| Unfinished Block Size | 5½'' | 8'' | 10½'' | 15½'' | ||
| Grid Size | 1'' | 1½'' | 2'' | 3'' | ||
🪡 Assemble the units for your Woven Heart
Heart Tops
Make 1 of each


With a pencil or chalk marker draw a diagonal line on the backs of all four #1s. Make your marks only as dark as you need to see them at your sewing machine.
I prefer a mechanical pencil because the line stays the same width no matter how many times you mark.
Layer a #1 with each top corner of your #2 and #3 rectangles. The lines should touch the top and side edges for correct placement.
Pin in place.
At your sewing machine, stitch just off the center of the markings—this gives you room for the 'turn of the cloth' and makes for more accurate piecing with these Connector corners.
 Using an open toe applique foot makes quick work of stitching just off the center of these lines.
Press the heart tops flat, as they were sewn, to set the seams.
At your cutting mat, trim away the excess between your stitches and the outside, upper corners, leaving behind a 1/4" SA. Scissors work, too, if you prefer.
After trimming, return to the ironing board and press the patches as shown below, right, for both the #2 and #3 rectangles.
 For this size (7-1/2" finished) block, those leftover triangles aren't big enough to go in my scrap basket.
Nine Patch
Make 1
Follow Method #1 (strip piecing) or Method #2 (traditional) depending on which cutting instructions you are using/downloaded.
Method #1 - Strip Piecing a Single 9-patch (blue chart)

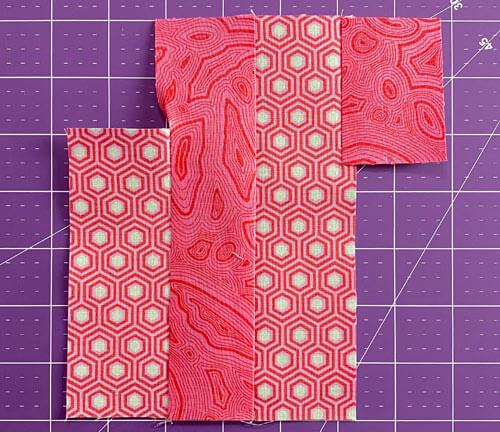
Arrange Patches #5, #6, #7, and #8 as shown below.
#6 and #8 are aligned with opposite edges of the #5 and #7 strips.
This positioning is correct.

With RST, sew these strips together, pressing towards the darker fabric.
Use the table below to check for accuracy. It shows the edge-to-edge measurement through 3 strips for both ends of this strip pieced unit.
| |||
|---|---|---|---|
| Finished Block Size | Stripset Width After Sewing | SubCut Width | 9 Patch Edge-to-Edge Dimensions |
| 5" | 3½" | 1½" | 1½" x 1½" |
| 7½'' | 5" | 2" | 2" x 2" |
| 10" | 6½" | 2½" | 2½" x 2½" |
| 15" | 9½" | 3½" | 3½" x 3½" |
At your rotary mat, align a straight line on your ruler with one of the seam lines (white arrow) on the #7/#5/#8 side and trim off just enough to straighten the edge.

Using the table above, make one subcut from this side. Set this single subcut aside for now.
Flip the unit and straighten the #6/#7/#5 edge.
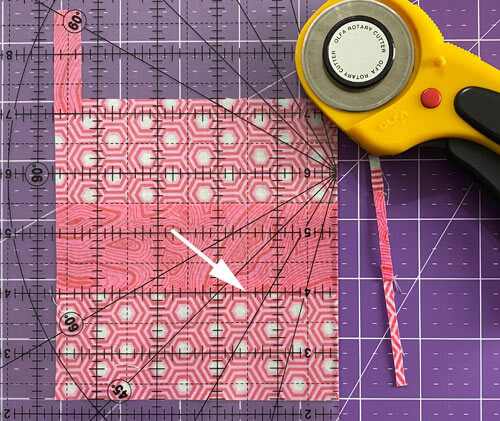
Make two subcuts the same width as the first.
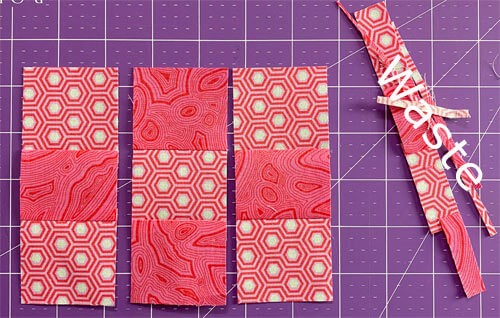
You now have the units needed to piece the 9-patch.
Method #2 Traditional (green chart)
Make 1

If you cut 9 squares instead for this unit, with RST, sew three pairs of #5/#6 squares together.
Press SA towards the dark.
To complete these units, sew the two #5 and one #6 to create the same strata.
 If you used the 'Traditional' green chart, sew the squares together, alternating #5s and #6s as shown above.
Once these units are stitched to form a 9-patch the rest of the block is assembled exactly the same.
Continuing on...
All that's left to do—regardless of which method you used to make your 9-patches—is sew the 3 strata together. The #5 patches are in all four corners. The seams nest to make matching them a breeze.
To check the accuracy of your unit, use the far right column of the StripSets Table above that corresponds to the finished block size you are working on.
 At this point, regardless of the method you used, the unit looks the same.
Twirling/Fanning the seams
Oops! Missed taking a photo of the pink 9-patch at this point. This purple and teal one will have to do...
I like to twirl or fan the SAs to create a truly flat unit. To do so, simply loosen the threads in the SAs at the joins.
DO NOT CUT OR TRIM THESE THREADS in order to maintain the integrity of the unit.
Press. Sometimes it helps to fingerpress the SAs in the direction they should go before taking an iron to them.
If you choose not to twirl the SAs then press the last two sewn seams towards one side or the other. This time is doesn't matter to construction because we won't need to match these seams to any other.
However, IMHO, the unit is much flatter with twirled SAs.
 You'll see the pink block in the last photo in this tutorial
🧩 Assemble your Woven Heart quilt block
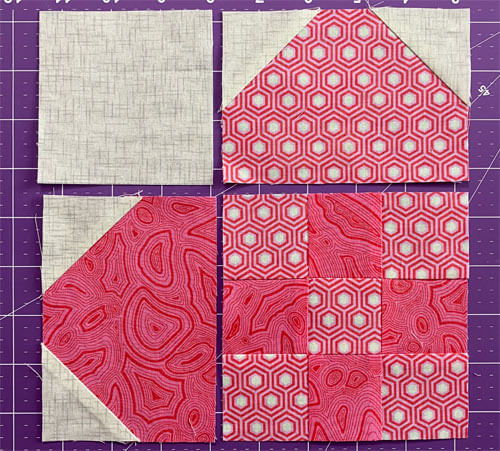
Arrange the units for your own Woven Heart quilt block pattern as shown below.
With RST, sew the units in each row together, pinning as needed.
When stitching a patch with lots of SAs to one without/fewer SAs, I usually sew with the 'more SAs' on top to keep an eye on those seams that might want to flip as I sew.
Press with the SA toward the Heart Top in both rows.
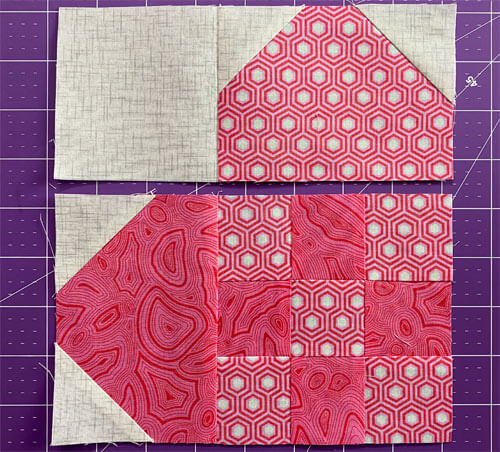
With RST, sew the rows together. Use pins as you need them.
This last seam in our Woven Heart is also pressed towards the Heart Top.
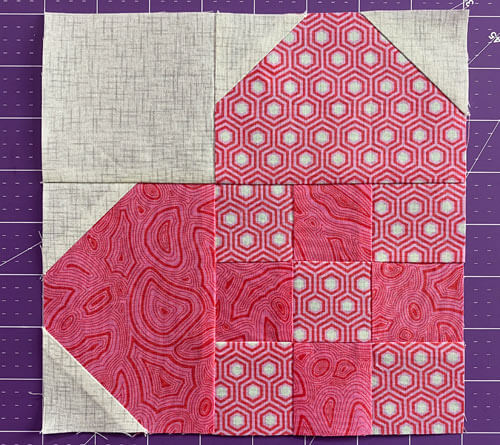
And finally, here's our finished Woven Heart block pattern from the back side.
 Here you can finally see how the SAs in the pink 9-patch are twirled. They are unbelievably flat.
📌 Pin this before you lose your heart to another project! ❤️
Let's be honest—;your Pinterest boards are overflowing with gorgeous quilt tutorials, but this one's a keeper! Save this block now because flat seams, nested points, and a dash of quilty confidence are always in style. ✨

🔍 More heart quilt blocks to make and other inspo
Looking for more free patterns to make heart blocks?
Try these!
")

And for even more heartfelt inspiration check out the free and commercial patterns along with the latest heart quilt fabrics.


For even MORE blocks to make… 🧩🎨

...visit our Free Quilt Block Pattern Library, with over 260+ blocks to choose from in multiple sizes.
Free downloads are included in all sizes for any blocks require paper piecing patterns or templates.
- Home
- Free Quilt Block Patterns
- Woven Heart Quilt Block Pattern, 5x5 grid


Yummy fabrics
to drool over
Click any image below to see the full collection and find pricing and ordering information.


By Julie Baird
Copyright © 2008-2026 Generation Quilt Patterns, LLC
All Rights Reserved
Generations-quilt-patterns.com does not sell any personal information. (See Privacy Policy)