- Home
- Free Quilt Block Patterns
- Woven Heart Quilt Block Pattern, 6x6 grid
Woven Heart Quilt Block Pattern: Create Magic with Basic Skills
💝 Piece with confidence, stitch with love
This post contains affiliate links, for which I receive compensation.
Our Woven Heart quilt block pattern uses simple piecing techniques—folded corners and a bit of strip piecing, and a dash of twirled seam allowances added for good measure.
Quick to whip up with beginner-friendly instructions.
Perfect for confident beginners ready to expand their skills, our detailed tutorial guides you through each step—from precise cutting to our special seam twirling technique that ensures beautifully flat blocks
🧭 Ready to start your Woven Heart journey?
Use these quick links to navigate the tutorial with ease. Whether you're gathering supplies, ready to cut, or looking for our free downloads, you'll find everything you need right where you want it.
- A cutting chart in three sizes with downloads of the chart and block pattern
- No time to quilt now? Pin this tutorial for later!
It's time to cut up and sew!

📋 General Instructions
These abbreviations are used on this page:
- SA - seam allowance
- RST - right sides together
- BAC - background fabric
SA are 1/4" and pressed towards the darker fabric unless noted otherwise.
Pressing instructions are highlighted in yellow throughout these pattern instructions to make them easy to spot.
I like to use starched fabric when using the Folded or Connector Corners technique.
Starch makes finger pressing easy as pie. And there's less chance for tucks at the seams. Always a good thing.
My favorite is ia liquid starch concentrate mixed 50/50 with water.
New quilt fabrics to tickle your fancy...
Click the images below to see the full collection. We share any commercial and/or free patterns that showcase them, too. (For inspiration, of course!)


✂️ Cutting your patches for a Woven Heart

Sample Size: 9" finished / 9½" unfinished
Grid: 6x6
Please label all your patches. We refer to their numbers throughout this tutorial.
The fabrics in the sample block are from Tula Pink's True Colors line, and the background is from Kimberbell's Winter Basics.
As you choose your fabric for this heart pattern, stand back and squint.
Can you see the two different fabrics?
Remember, we want to see the 'woven' effect. To be enough contrast, you should be able to easily see them both.
To print a copy of just the block design and cutting chart to use at your cutting table, click here.
 |
~ Traditional Piecing ~Woven Heart Quilt Block | |||||
|---|---|---|---|---|---|---|
| Patch | Fabric | Qty | Finished Block Size | |||
| 6'' | 9'' | 12'' | ||||
| 1 | Bac | 4 | 1½'' x 1½'' | 2" x 2" | 2½'' x 2½'' | |
| 2 | Dark | 1 | 2½'' x 4½'' | 3½'' x 6½'' | 4½'' x 8½'' | |
| 3 | Light | 1 | 2½'' x 4½'' | 3½'' x 6½'' | 4½'' x 8½'' | |
| 4 | Bac | 1 | 2½'' x 2½'' | 3½'' x 3½'' | 4½'' x 4½'' | |
| 5 | Light | 1 | 1½'' x 13'' | 2'' x 17'' | 2½'' x 21'' | |
| 6 | Dark | 1 | 1½'' x 13'' | 2" x 17'' | 2½'' x 21'' | |
| Unfinished Block Size | 6½'' | 9½'' | 12½'' | |||
| Grid Size | 1'' | 1½'' | 2'' | |||

🪡 Assemble the units for a Woven Heart
Woven Heart Tops
Make 1 of each


We'll use the Folded or Connector Corner technique to make the tops of our Woven Heart. (This technique is also known as Sew-n-Flip or Stitch-n-flip.)
On the wrong side of all four #1s, draw a diagonal line from corner to corner. I like to use a mechanical pencil for this because the width of the line never changes. (below, left)
Draw with a light touch—only a dark as you need to see the line at your sewing machine.
 I prefer a mechanical pencil for this—light touch—because the line is always the same thickness.
With RST, align two edges of a #1 with the top corner of the #2 and #3 rectangles. Repeat for the opposite top side.
The ends of your markings touch the top and sides edges.
Pin to hold the patches in place.
Since I'll sew up the left side and down the right, the pins are inserted in opposite directions, making them easy to pull out while sewing.
Stitch on the line, just ever so slightly off its center toward the outside corner. This gives you a bit of room for the 'turn of the cloth' captured in the seam.
 An open toe applique foot is perfect for this stitching. It's easy to see the light pencil mark.
Press flat to set the seams.
With your rotary cutter and ruler (or scissors if you prefer) cut away the excess fabric between the sewn line and the outside top corners leaving behind a 1/4" SA.
Below, is the purple top after sewing and pressing flat.
Below that is the turquoise heart top, after trimming away the excess. Its right side has had its final pressing.

Complete for all four top corners.
4-Patches
Make 4
 4-patches
Next up is a bit of strip piecing for the 'woven' part of our Heart pattern.
With RST align the long edges of#5 and #6 and stitch. There's a bit extra for straightening the ends.
Press flat to set the seams, pressing a second time with the SA towards the darker #5.
Use the chart below to check the accuracy of your stitching.
| |||
|---|---|---|---|
| Finished Block Size | Stripset Width after stitching | SubCut Width | 4-Patch Dimensions |
| 6" | 2½" | 1½" | 2½" x 2½" |
| 9" | 3½" | 2" | 3½" x 3½" |
| 12" | 4½" | 2½" | 4½" x 4½" |
For our 9" sample, the strip set should measure 3½" wide. From the picture below, you can see that it does.
Straighten one short end of the strip set by aligning a straight line on your ruler with the seam line.
 The white arrow points to the line on the ruler that aligns with the seam.
Find your Finished Block Size in the chart above and the corresponding SubCut Width.
Cut a total of eight patches.
We're after seams that nest because it makes matching them so much easier.
Align a pair of patches, RST, so that the #5s (turquoise) and #6s (purple) alternate.

THIS NEXT PART IS IMPORTANT.
Stitch them together so that the #6 (purple) patch is on top and feeds under your presser foot first—ALWAYS—for all 4 pairs.
 The cut edges of your SA should feed into the sewing machine before the seam does. (white arrow)
Check that you're satisfied with the match at the center, then press the 4-patches flat as they were sewn.
Now we're going to 'twirl' or 'fan' the SAs in the center of each one.
Undo the few stitches in the SA at the center match—do not rip or cut these threads—they are needed to maintain the stability of the block.
Now twirl or fan the SAs clockwise around the center (from the wrong side of the block).
Press.
I fingerpress these first; it makes the job easier.
 SA twirl or fan clockwise around the unit
With RST, pin two of the four patches together so that the #6 patch (purple) feeds through your sewing machine first.

If you look closely at the white arrow below, you can see that the threads in the center SA have been undone BUT NOT cut or trimmed away. Again, we need them for the stability in the unit.
From this vantage point, you can see after the SAs are twirled or fanned, two of them are pressed toward the dark, two are pressed toward the light.
This is correct.

With RST, sew the two pairs together to finish the field of squares.

Take a peek at the backside to see how the SA alternate all through this unit.

So why did we bother with all this twirling and fanning?
Simple. It makes for an incredibly flat block after pressing.
If you're doing the quilting yourself, and are ditch quilting this unit, once you feel where the thick side of the SA is, you know that the ditch alternates sides with every square. You don't have to hunt for it.
Furthermore, if you're using the technique making scrappy 4-patches, by twirling the SA, all your patches can be pressed as they are made. The SAs will always nest correctly with lights and darks alternating to create a checkerboard pattern.
Again, the secret is to feed all the patches through your machine exactly the same, remembering to UNDO the stitches and NOT cut them.
🎯 Time to Watch the Magic Happen!
Finishing up this block pattern is pretty quick because there aren't any SAs to match between the units. Just one match in the center—we love a block that makes us look good!
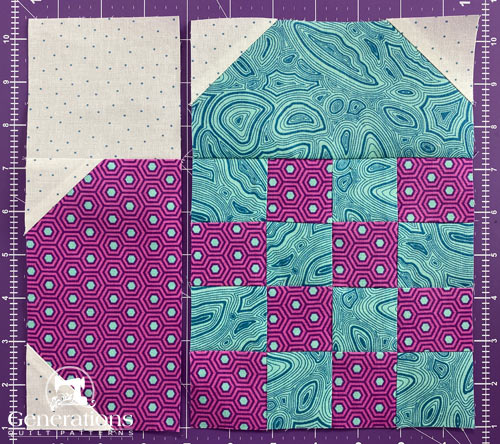
Arrange your sewn units and cut #4 patch as shown below.
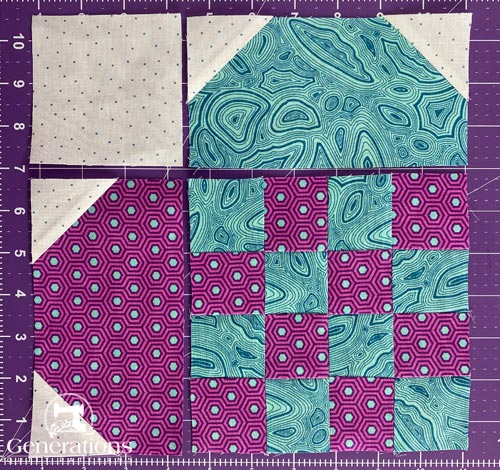
With RST, stitch #4 (background square) to #1/#2/#1.
With RST, stitch #1/#3/#1 to the four 4-patch unit.
In both rows the SAs are pressed toward the Heart top (the #2 purple and #3 turquoise patches).
To complete our Woven Heart pattern, with RST sew the two rows together.
When stitching, I like to have the side with the most seams on top to keep an eye out for little rascals that want to flip the other way.
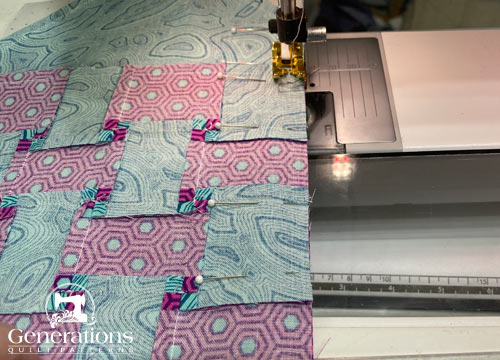
This final seam is pressed away from the field of squares to reduce bulk.
drumroll please 🥁
Ta-da! Your Woven Heart block is complete! Between the starching and our fancy seam twirling, this block is so flat it could slide under a door! Okay, maybe not quite, but it's definitely going to make your quilt top look absolutely amazing.
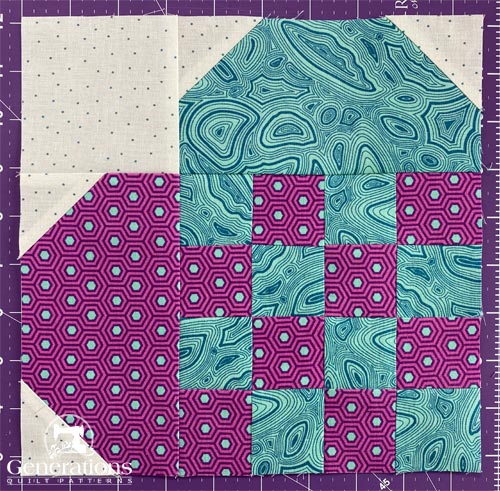
Take a moment to flip it over and admire those perfectly nested seams on the back. Go ahead, do a little victory dance—you've earned it! 💃✨
 block pattern") Between the starching and the twirling of the SA, this block is wickedly flat!
Between the starching and the twirling of the SA, this block is wickedly flat!📌 Pin Now, Wow Later!
You've seen how achievable this block is—now save it to your "Must Make" board so you can find it when you're ready to create your own gorgeous Woven Heart blocks. Your future self will thank you (and so will those perfectly nested seams)! ❤️
")
🔍 More heart quilt blocks to make and other inspo
Looking for more free patterns to make heart blocks?
Try these!
")
")

And for even more heartfelt inspiration check out the free and commercial patterns along with the latest heart quilt fabrics.


For even MORE blocks to make… 🧩🎨

...visit our Free Quilt Block Pattern Library, with over 260+ blocks to choose from in multiple sizes.
Free downloads are included in all sizes for any blocks require paper piecing patterns or templates.
- Home
- Free Quilt Block Patterns
- Woven Heart Quilt Block Pattern, 6x6 grid


Yummy fabrics
to drool over
Click any image below to see the full collection and find pricing and ordering information.


By Julie Baird
Copyright © 2008-2026 Generation Quilt Patterns, LLC
All Rights Reserved
Generations-quilt-patterns.com does not sell any personal information. (See Privacy Policy)