- Home
- Free Quilt Block Patterns
- Dutchmans Puzzle Quilt Block
🧩
Unlock the Secrets of the Dutchman's Puzzle Quilt Block! 🔑
From our Free Quilt Block Patterns Library
This post contains affiliate links, for which I receive compensation.
Unravel the mystery of the Dutchman's Puzzle quilt block! This captivating design is a riddle wrapped in fabric, just waiting for you to decode its secrets.
Paper piecing streamlines the piecing process, reducing the amount of trimming, and minimizing a bit of the bulk created where the Flying Geese meet.
It's a sweet method!
Get ready to piece together the clues and create a block that'll leave your quilting friends puzzled with admiration!
Use these links to jump to the information you're looking for:
Cut. Sew. Press. Unravel the mystery of perfect points!
📋 General Instructions
Please read all the instructions before piecing the block.
Check out this trick for making the flattest blocks possible. It's simple. It's quick. And you don't need any fancy-shmancy tools to make your Dutchman's Puzzle quilt block lay flat!
Download and print the paper piecing pattern
To download the pattern, use the most current version of Adobe.
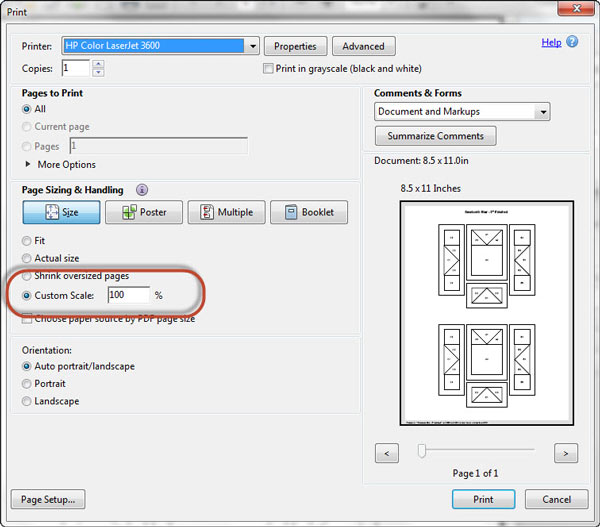
To print blocks at the correct size, under 'Page Sizing and Handling' in the Adobe print menu, set 'Custom Scale' to 100%.
Click here to see what it looks like on the Print Menu page.
Choose your finished block size from the chart below and print the corresponding number of pages for a total of 2 units.
Not sure which paper piecing paper to use? Read my review and comparisons here.
Download and print the Dutchman's Puzzle units | |
|---|---|
| Finished Block Size | Copies needed per block |
| 4" | 1 |
| 5" | 1 |
| 6" | 1 |
| 8" | 2 |
| 10" | 2 |
After printing, use the 1" square graphic on the printed page(s) to double-check that your patterns printed at the correct size.
New quilt fabrics to tickle your fancy...
Click the images below to see the full collection. We share any commercial and/or free patterns that showcase them, too. (For inspiration, of course!)


✂️Cut the patches for a Dutchman's Puzzle

Sample Size: 6" finished / 6½" unfinished
Grid: 4x4
Attribution: Ladies Art Company
AKA: Dutchman's Wheel (Ohio Farmer), Wheel (Ohio Farmer), Wild Goose Chase (Beth and Jeffrey Gutcheon)
Design Type: Pinwheel | 4-patch | Paper Piecing
Label your patches as we'll use their numbers in the tutorial.
 | Cutting Chart for a~ Paper Piecing ~ | |||||||
|---|---|---|---|---|---|---|---|---|
| Patch | Fabric | Qty | Finished Block Size | Sub Cut | ||||
| 4'' | 5'' | 6'' | 8'' | 10'' | ||||
| 1, 5 | A | 1 | 3⅝'' x 3⅝'' | 4⅛'' x 4⅛'' | 4⅝'' x 4⅝'' | 5⅝'' x 5⅝'' | 6⅝'' x 6⅝'' | |
| 2, 4, 6, 8 | Bac | 8 | 2⅜'' x 2⅜'' | 2⅝'' x 2⅝'' | 2⅞'' x 2⅞'' | 3⅜'' x 3⅜'' | 3⅞'' x 3⅞'' | |
| 3, 7 | A | 1 | 3⅝'' x 3⅝'' | 4⅛'' x 4⅛'' | 4⅝'' x 4⅝'' | 5⅝'' x 5⅝'' | 6⅝'' x 6⅝'' | |
| Unfinished Block Size | 4½'' | 5½'' | 6½'' | 8½'' | 10½'' | na | ||
| Grid Size | 1" | 1¼" | 1½" | 2" | 2½" | na | ||
🪡Assemble the Dutchman's Puzzle units
The first thing you'll notice when you start to piece is that the fabric side is the reverse of the pattern side. That's because the design of the unit is asymmetrical.

We need to make a few adjustments to our sewing machine settings to paper piece.
- Reduce your stitch length to 16–20 stitches per inch (1.3-1.6 mm). This perforates the paper and stabilizes the seam when you remove the pattern. [Learn more about stitch length here.]
- Reduce your machine's speed or just plain slow down. Sew only as fast as you can AND stay on the solid stitching line.
- Install an open toe appliqué foot (sometimes called an 'embroidery' or 'satin stitch' foot) if you have one (it makes it easier to see where you're stitching).
- Use a larger needle (90/14) IF you have problems removing the pattern. Personally, I use an 80/12 Microtex Sharp for paper piecing without any issues.
Update 7/24: Since this tutorial was first published, I've added additional dashed guidelines to the patterns to help with positioning the fabric patches.
Position Patch 1 using the dashed placements lines. I use a dab of Elmer's Washable Glue Stick to hold it in place. In the photo below, you can see where I've marked the goose patches with an 'L' (#3 and #6) and a 'D' (#1 and #5) as a reminder where the different colors go.

Align the long bias edge of a #2 with #1. It doesn't matter which side you add to first.

Stitch from the printed side of the pattern, starting and ending a generous 1/4" before and after the solid sewing line.
Press.
Repeat to add the second #2.
With RST, position the #3 goose a 1/4" past the stitching line (red arrow). You should be able to see its shadow through the paper. Stitch starting before and ending after the line.

Trim away the excess (arrow) with a scissor...

...so it looks like this...

Press,
Add the #4 triangles the same as the #2s.
To add the #5 triangle, position it RST as you did the #3—a quarter inch past the sewing line. In the photo below, you can see it from the fabric side of the pattern.

Stitch, trim, and press.
Continue adding the remaining sky and goose triangles just as you did for Patches #2-#4.
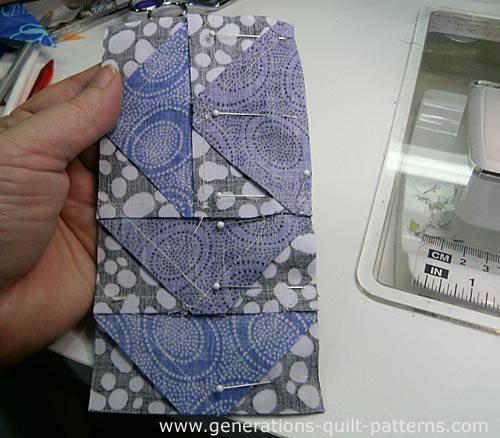
Trim the units to size by lining up the 1/4" mark on your ruler with the solid black line around each unit. Trim with your rotary cutter.
Repeat for each side of both units. And you have this...
")
Remove the paper. Press again if needed.

The paper piecing is complete. From this point forward, return your stitch length to the one you regularly use for piecing and install your favorite 1/4" presser foot.
🧩Assemble your Dutchman's Puzzle quilt block
As you lay out the two units, remember that the geese all point to the outside edge of the block.
Since both units are identical and paper pieced, the seam allowances in the center automatically nest, which makes getting a good match in the center pinwheel so much easier.
Still, I do use pins to hold everything in position while I sew.
After stitching, your finished Dutchman's Puzzle quilt block looks like this…

From the back it looks like this...

Same name, different block...
There are two blocks that also go by the Dutchman's Puzzle name.

A completely different block but drawn on the same 4x4 grid. You'll need to do set in seams and a bit of applique to stitch it!
AKA: The Breeches Quilt, Britches Quilt, Dutchman's Breeches, Mississippi Daisy

Again, drawn on a 4x4 grid but completely different, this one is also known as 'Aircraft'. Click here for instructions to make this block.
Don't let challenging designs clip your quilting wings!
Pin our Dutchman's Puzzle guide now, and you'll always have the key to unlock this block's secrets. Stitch with confidence later!

🌀More playful pinwheel quilt blocks to stitch!

You've finished your pinwheel quilt block, and you're ready for more!
Our pinwheel quilt blocks are a delightful blend of playful interlocking patterns and vivid, eye-catching color. The interlocking patterns dazzle your eyes and inspire your creativity, while our step-by-step instruction ensures that you can create these stunning blocks with ease.
Click here to dive in and turn your fabric into MAGIC!
For even MORE blocks to make… 🧩🎨
...visit our Free Quilt Block Pattern Library, with over 260+ blocks to choose from in multiple sizes.
Free downloads are included in all sizes for any blocks require paper piecing patterns or templates.
- Home
- Free Quilt Block Patterns
- Dutchmans Puzzle Quilt Block


Yummy fabrics
to drool over
Click any image below to see the full collection and find pricing and ordering information.


By Julie Baird
Copyright © 2008-2026 Generation Quilt Patterns, LLC
All Rights Reserved
Generations-quilt-patterns.com does not sell any personal information. (See Privacy Policy)