- Home
- Free Quilt Block Patterns
- Castle Garden Quilt Block
🌹 Castle Garden Quilt Block: Your Quilted Secret Garden 🗝️
🌿 Plant the seeds of advanced quilting—watch your skills bloom!
This post contains affiliate links, for which I receive compensation.
🌷 Let's be honest—this Castle Garden quilt block looks like a lot, doesn't it?
But here's what I love about paper piecing: it turns potentially frustrating construction into a confidence-building win! Like a well-planned garden where every plant has its perfect spot, we'll use paper piecing to master those Brave World units and Flying Geese that might otherwise give you grief.
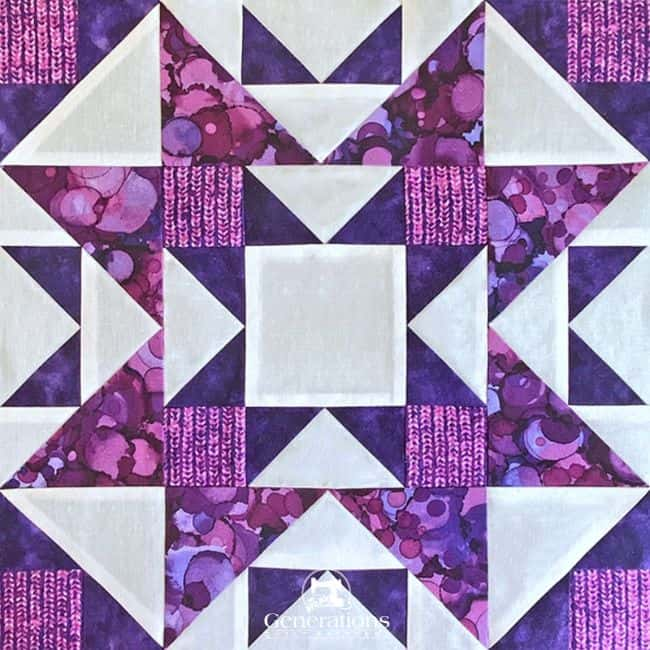
I've simplified every technique and included tons of support because when your units are perfectly sized, the final block practically sews itself! 🌿😊
🧭 Quick Garden Tour Guide🌸
Choose your adventure! Whether you need patterns, cutting guides, or assembly help, your perfect garden path is just a click away:
- 🎨A coloring page to download and print—this works as a planner page for your fabrics, too!
📋 General Instructions
⚡ PRINTING TIP: Need help printing this tutorial? Click here for easy instructions!
Several abbreviations are used on this page. They are:
- SA - seam allowance
- RST - right sides together
- HST - Half Square Triangle
- QST - Quarter Square Triangle
- BW - Brave World units
- FG - single Flying Geese units
- FG-Var - Flying Geese variation units
A 1/4" SA is used through this tutorial.
✅ KEY TECHNIQUE: PRESSING PAPER PIECED PATCHES
To streamline the instructions, it is assumed that you ALWAYS press with your iron after adding each patch.
First press it in the closed position as it came off your sewing machine. This sets the seam, melding the fibers of the threads into the fabric. Then press the patch open. In paper piecing, all SAs are pressed toward the last patch added.
Double check ✅✅to make sure you haven't inadvertently pressed a tuck in along the SA. Once you've sewn across both ends of a seam, it's virtually impossible to get that tuck out.
If we're pressing to simply keep something out of the way, you'll be instructed specifically to fingerpress.
📥 Download and print the paper piecing patterns
To download the pattern, use the most current version of Adobe.
For accurate results, on Adobe's Print Menu page, under 'Page Size and Handling' set 'Custom Scale' to 100%. Then print.
Click here to see what it looks like on the Print Menu page.
Choose your finished block size from the chart below. Print the corresponding number of pages for a total of 4 units of each type: single Flying Geese, the Flying Geese Variation, and Brave World.
Download and Print the Paper Piecing Patterns | ||||||
|---|---|---|---|---|---|---|
| Finished Block Size | FG - Variation 2 | Brave World | FG Singles | |||
| # of Copies | Download | # of Copies | Download | # of Copies | Download | |
| 8" | 1 | 2" x 4" | 1 | 2" | 1 | 1" x 2" |
| 12" | 2 | 3" x 6" | 1 | 3" | 1 | 1½" x 3" |
| 16" | 2 | 4" x 8" | 2 | 4" | 2 | 2" x 4" |
| 20" | 4** | 5" | 4 | 5" | 4 | 2½" x 5" |
**This pattern must be printed on 8½" x 14" paper. It doesn't fit on 8½" x 11".
After printing, use the 1" square graphic on the printed page(s) to double check that your patterns printed at the correct size.

Not sure which paper to use?
Take a look at my review of several of the most popular brands available to us quilters on the market.
You want a super-easy paper to tear away—less stress on the stitches.
New quilt fabrics to tickle your fancy...
Click the images below to see the full collection. We share any commercial and/or free patterns that showcase them, too. (For inspiration, of course!)
✂️ Cut the patches for your Garden Castle block
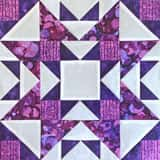
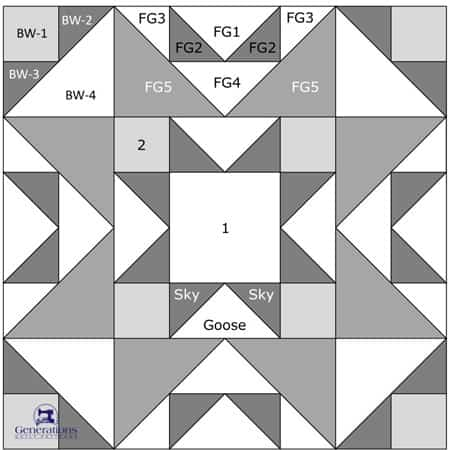 Castle Garden patchwork design
Sample Block Size: 12" finished / 12½" unfinished
Grid: 8x8
Attribution: Nancy Cabot
Design Type: Star | Paper Piecing | Uneven 9-patch
📝 Just like labeling your seedlings, give each patch its proper name—it's the secret to paper piecing without the headaches!

 | Cutting Chart for a~ Includes Paper Piecing ~ | ||||||
|---|---|---|---|---|---|---|---|
| Patch | Fabric | Qty | Finished Block Size | Sub Cut | |||
| 8'' | 12'' | 16'' | 20'' | ||||
| BW-1 | Light | 4 | 1¾'' x 1¾'' | 2¼'' x 2¼'' | 2¾'' x 2¾'' | 3¼'' x 3¼'' | --- |
| BW-2&3 FG2, Sky | Dark | 12 | 2⅜'' x 2⅜'' | 2⅞'' x 2⅞'' | 3⅜'' x 3⅜'' | 3⅞'' x 3⅞'' | |
| BW-4 | Bac | 2 | 3⅜'' x 3⅜'' | 4⅜'' x 4⅜'' | 5⅜'' x 5⅜'' | 6⅜'' x 6⅜'' | |
| FG1, FG4 Goose | Bac | 3 | 3⅝'' x 3⅝'' | 4⅝'' x 4⅝'' | 5⅝'' x 5⅝'' | 6⅝'' x 6⅝'' | |
| FG3 | Bac | 4 | 2⅜'' x 2⅜'' | 2⅞'' x 2⅞'' | 3⅜'' x 3⅜'' | 3⅞'' x 3⅞'' | |
| FG5 | Medium | 4 | 3⅜'' x 3⅜'' | 4⅜'' x 4⅜'' | 5⅜'' x 5⅜'' | 6⅜'' x 6⅜'' | |
| 1 | Bac | 1 | 2½'' x 2½'' | 3½'' x 3½'' | 4½'' x 4½'' | 5½'' x 5½'' | --- |
| 2 | Light | 4 | 1½'' x 1½'' | 2 '' x 2 '' | 2½'' x 2½'' | 3 '' x 3 '' | --- |
| Unfinished Block Size | 8½'' | 12½'' | 16½'' | 20½'' | na | ||
| Grid Size | 1'' | 1½'' | 2'' | 2½'' | na | ||
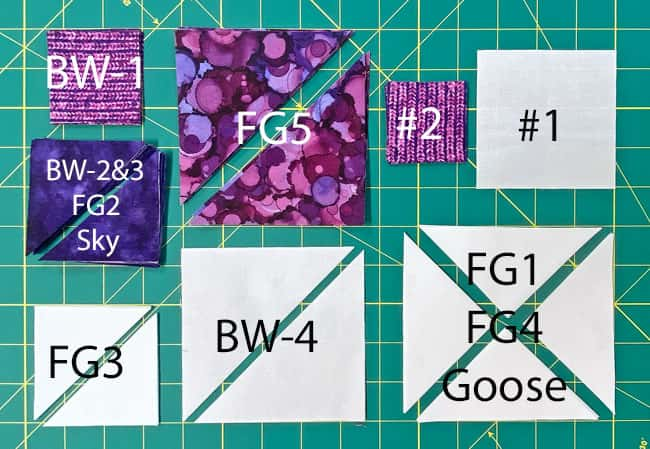
✂️✂️ Subcutting
BW-2&3, BW-4, Sky, FG2, FG3, and FG5 are subcut once on the diagonal to create HST shapes.
FG1, FG4, and Goose are subcut twice to make QST shapes.
🪡 Assemble the units for your Castle Garden quilt block
Our first batch of piecing is all paper piecing. To save time, let's get the gluing out of the way first.
Each pattern has solid stitching lines and dashed placement guides within the edges of each unit. Use these dashes to help you quickly and accurately position the first patch, i.e., BW-1, Goose.1 and FG1.
Use a teeny dot of Elmer's Washable Glue Stick to hold the patch in place, with the backside of the fabric to the unprinted side of the pattern. This glue-job only needs to last until you stitch the second patch.
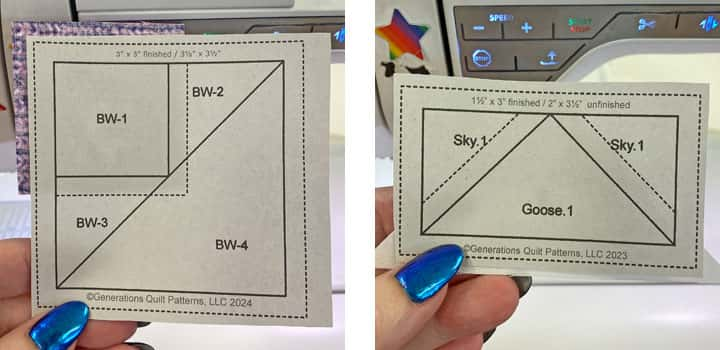 BW-1 and Goose.1 are in position
My Light fabric choice is a directional print (a stripe) and I want that pattern to line up the same for all four BW-1s in the sample Castle Garden.
Two are glued on with the stripe running left to right, and two from top to bottom.
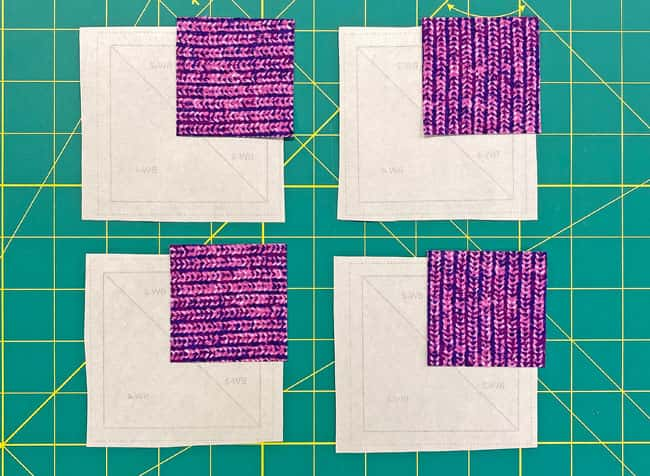 The glue-sticked BW-1 patches from the fabric side of the pattern
Finally, here is the FG1 in glued into position.
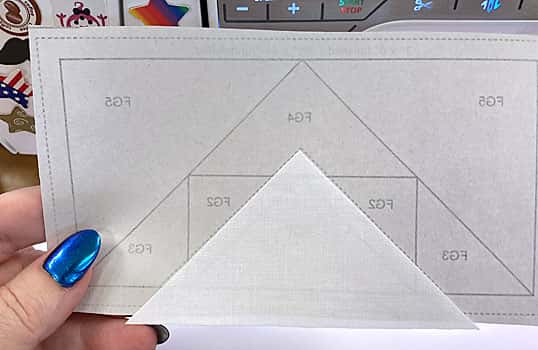
If you're new to paper piecing or a bit rusty on the technique, use the following instructions to set up your sewing machine.
We need to make a few adjustments to our sewing machine settings to paper piece.
- Reduce your stitch length to 16–20 stitches per inch (1.3-1.6 mm). This perforates the paper and stabilizes the seam when you remove the pattern. [Learn more about stitch length here.]
- Reduce your machine's speed or just plain slow down. Sew only as fast as you can AND stay on the solid stitching line.
- Install an open toe appliqué foot (sometimes called an 'embroidery' or 'satin stitch' foot) if you have one (it makes it easier to see where you're stitching).
- Use a larger needle (90/14) IF you have problems removing the pattern. Personally, I use an 80/12 Microtex Sharp for paper piecing without any issues.
BW Unit
Make 4
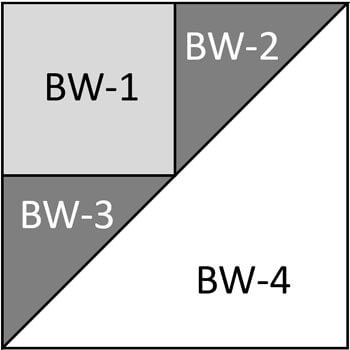 Brave World unit
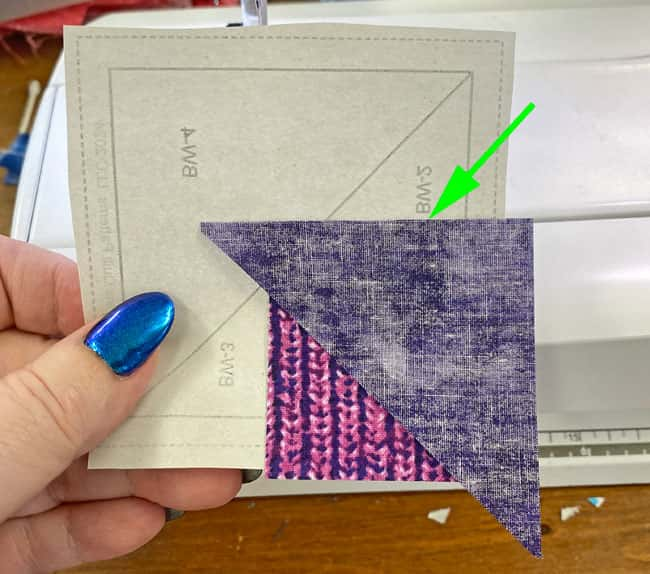
With RST, match a short edge of BW-2 with BW-1 (green arrow). It's super easy to get this patch wrong. Do take a sec to open it up before stitching to make sure it's positioned correctly.
Sew the seam.
✅ KEY TECHNIQUE: ALL PAPER PIECED SEAMS
ALL the seams in paper piecing are stitched by starting a generous 1/4" before the solid line between patches and ending a generous 1/4" after that line ends. The next line of stitches that cross this seam secures the ends—just like in traditional piecing.
If the seam begins/ends at the outside edge of the block, start and stop your stitches past the outside dashed line surrounding the block.
Use this technique every time you sew a seam.
The only time I might use backstitches is at the outside edges, but never inside the block or unit. I find the shorter stitch length with good thread tension holds my stitches quite well.
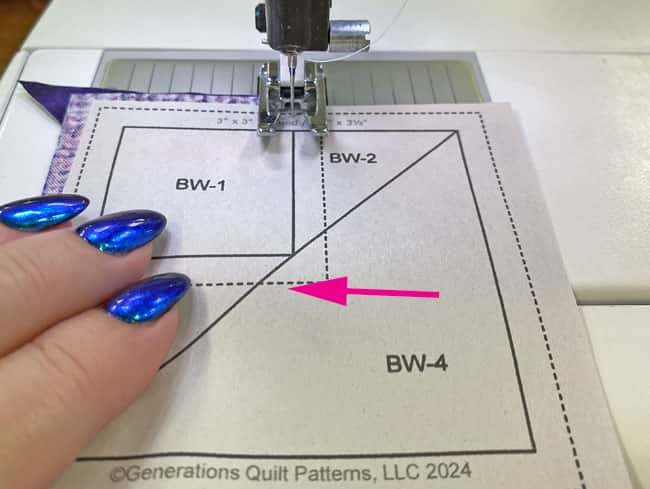 Your stitches should end roughly at the point of the pink arrow
Position and stitch BW-3.
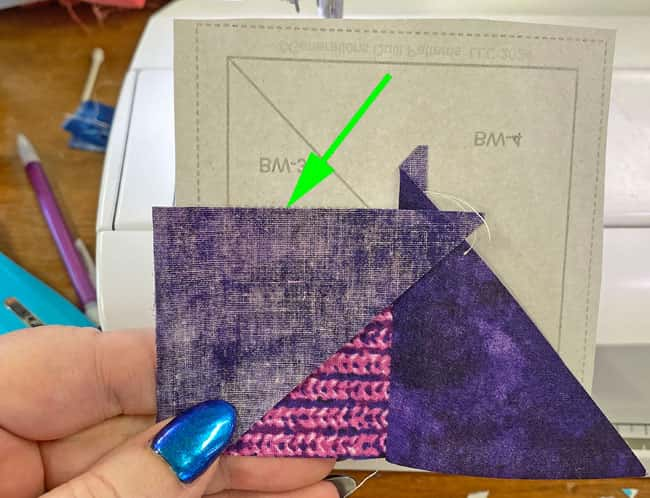
Time to trim to create the perfect placement line for positioning BW-4.
On your cutting mat, pattern side up, pull the stitches away from the paper at the BW-4 seam line.
The paper will tear a bit. If it tears too much for you, use a piece of Scotch Brand Magic Tape® to repair the printed side of the pattern. (Never iron directly on the tape—use a press cloth—as it will crap up the bottom of your iron.)
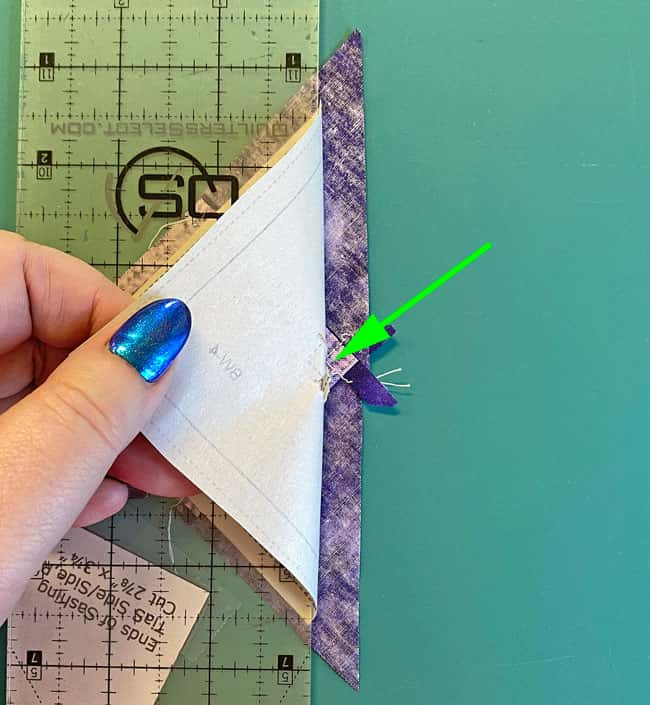
Place the edge of your ruler on the solid line through the center of the BW and crease the paper on the fold with your thumbnail.
Remove the ruler and fold the pattern back on itself along the crease.
Place the 1/4" mark on your ruler directly over the fold (green arrow) and trim away the excess.
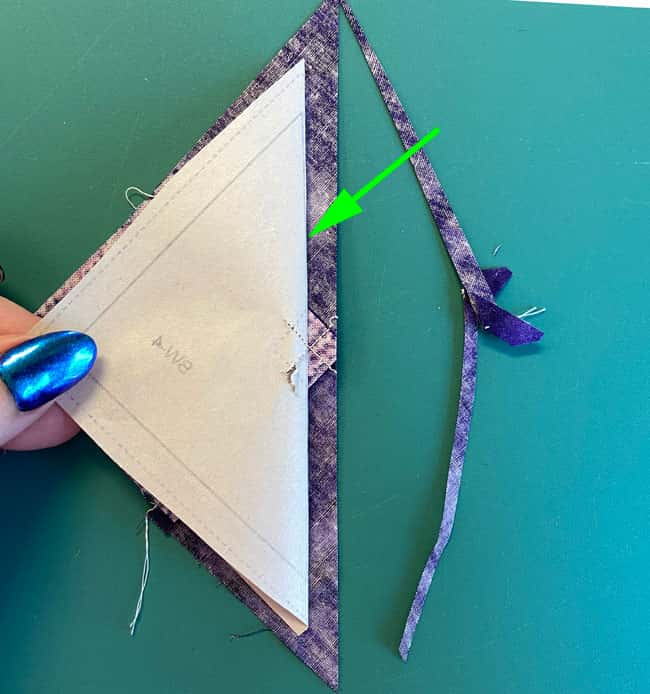 After trimming, you've got the perfect 1/4" seam allowance and placement line for the BW-4 patch
With RST, match the long bias edge of a BW-4 with the freshly cut edge of BW-2/BW-3. Since our background BW-4 patch is so much lighter that those underneath, nudge the edge over a couple of threads. (green arrow)
This prevents the darker fabric from shadowing through the lighter one.
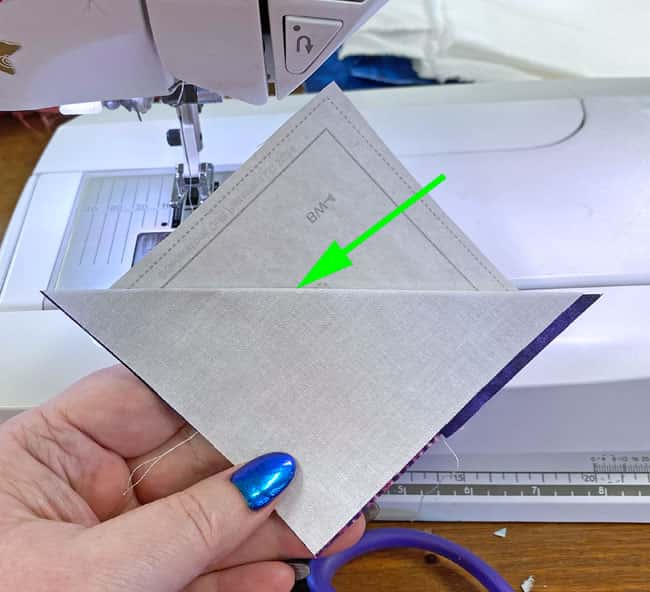
Stitch this last BW seam. It runs from one outside edge to the other, so it can be chain pieced to save a bit of time.
[Learn more about chain piecing here.]
Complete all four BWs and set aside for now.
FG Variation Unit
Make 4
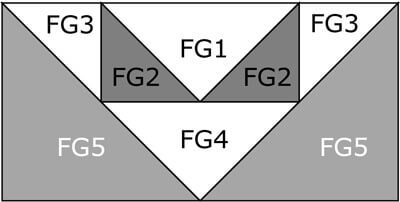 Flying Geese Variation
With RST, match the long bias edge of an FG2 with one side of FG1.
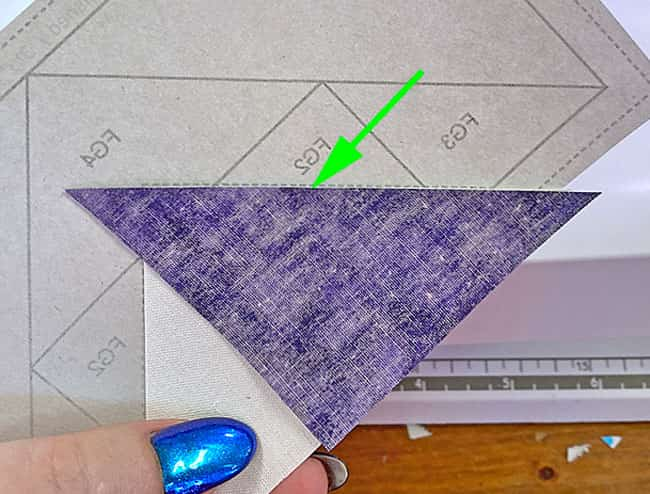
Sew.
Repeat for the second FG2.
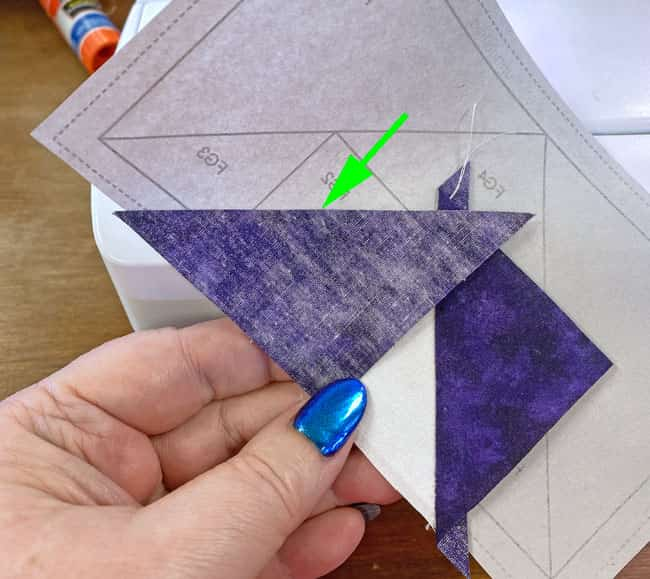
At your cutting mat, pattern side up, pull the stitches away from the paper between the FG2s and FG3. (This is so you can fold the pattern in the next step.)
Once they're free, lay the edge of your ruler on one of the solid lines between FG2 and FG3. (blue arrow)
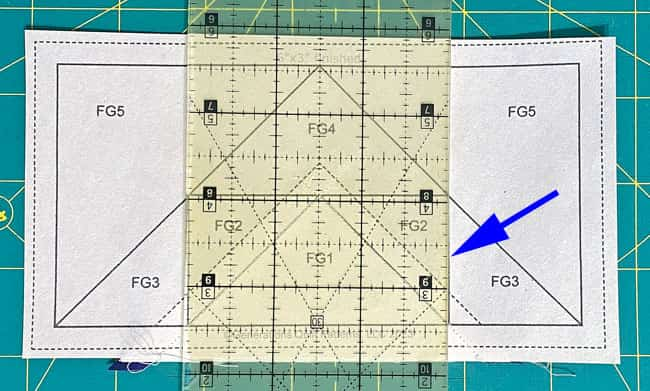
Use the edge to crease the paper with your fingernail.
Remove the ruler. Fold the pattern back on itself at the crease.
Line up the 1/4" markings on the ruler with the folded edge (blue arrow) and cut away the excess fabric.
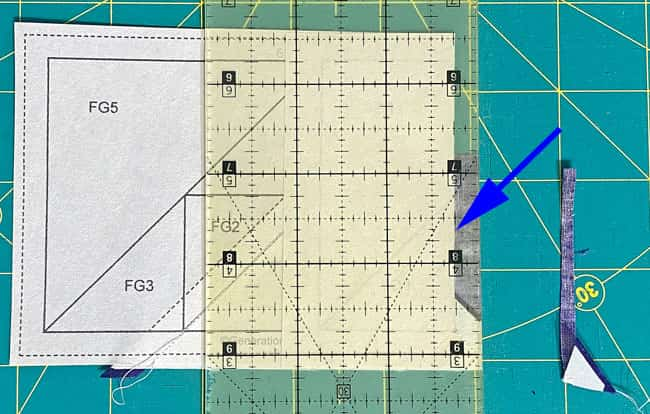
Repeat for the opposite side.
You've just created the perfect placement line for your FG3s.
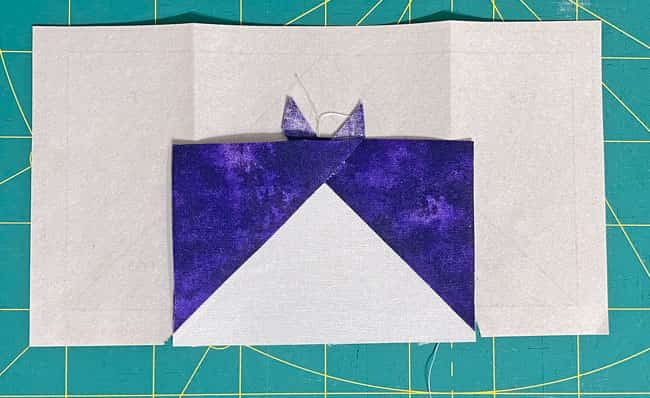
With RST, match a short side of an FG3 to an FG2.
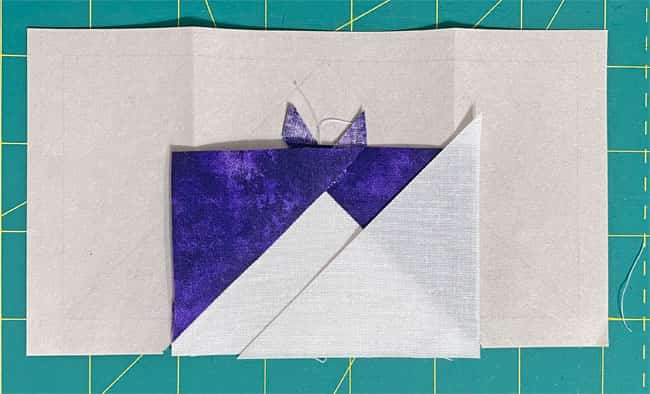
Stitch,
Repeat for the other side.
Return to your cutting mat and trim to create the placement line for FG4 (just like we did for the FG3s).
With RST, line up the long edge of FG4 with the freshly trimmed FG2s. Nudge it over a few threads, again, because our background fabric is so much lighter than the dark one.
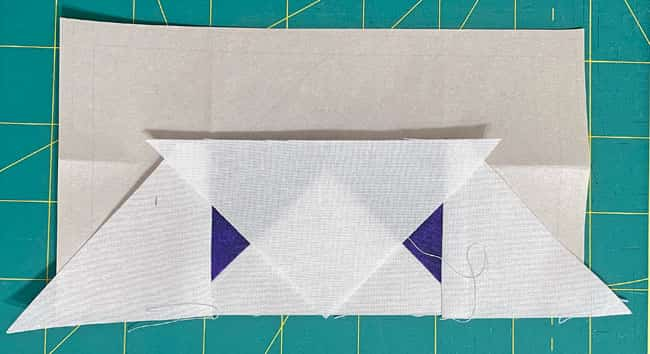
Stitch.
Before adding the FG5s, trim the FG3s and FG4 to create the placement line.
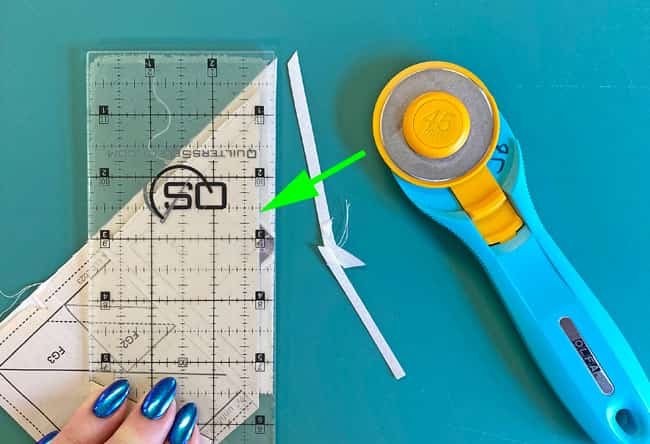 Position 1/4" ruler mark over the folded edge of the pattern (green arrow). Cut away the excess FG4.
Trim the other side. We're ready to add the FG5s to this unit.
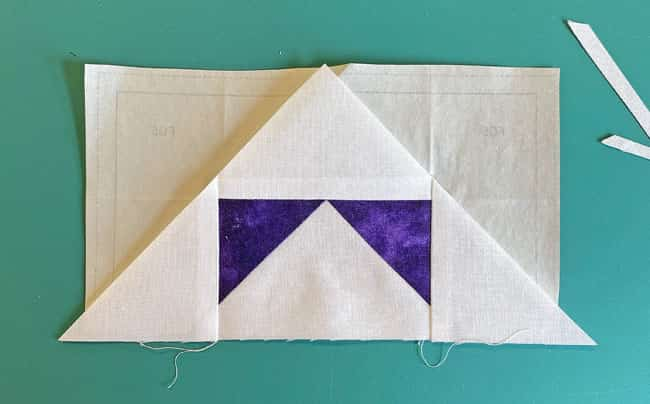 After trimming both sides of the FG3/FG4
To complete our FG-Var, position the long bias edge of an FG5 with one freshly cut edge. (green arrow)
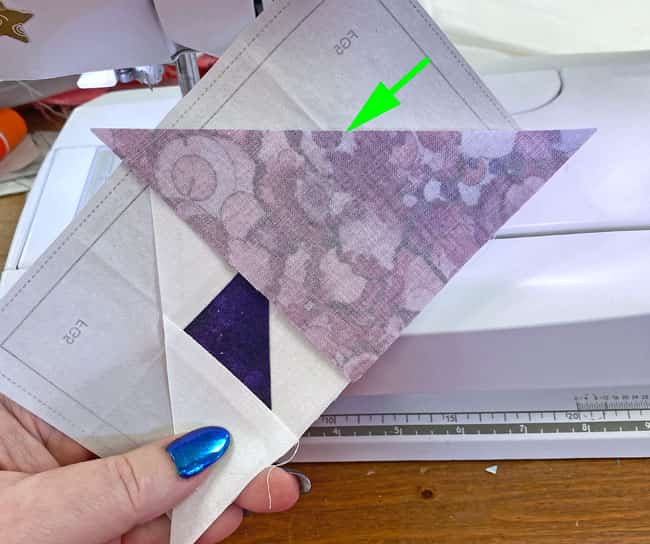
Sew the seam.
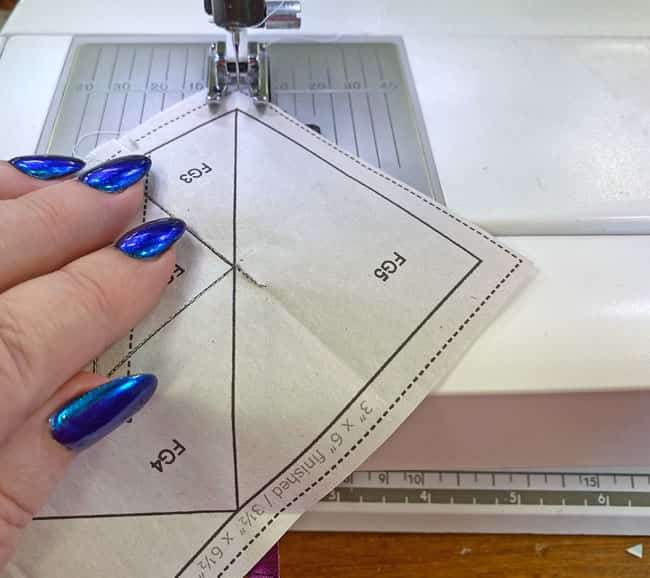 Start and end this seam past the outside dashed lines that surround the block
Repeat for the second FG5.
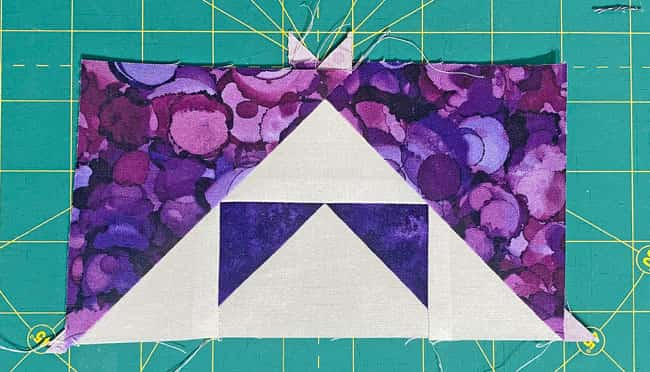
Complete the remaining FG-Vars. Set them aside. We'll trim all the paper pieced units at once they're all stitched.
Single FG - (to be used later for the Center)
Make 4
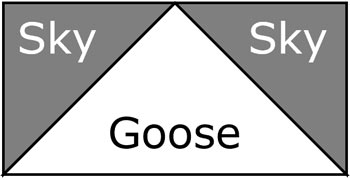
With RST, match the long bias edge of a Sky.1 with one side of Goose.1.
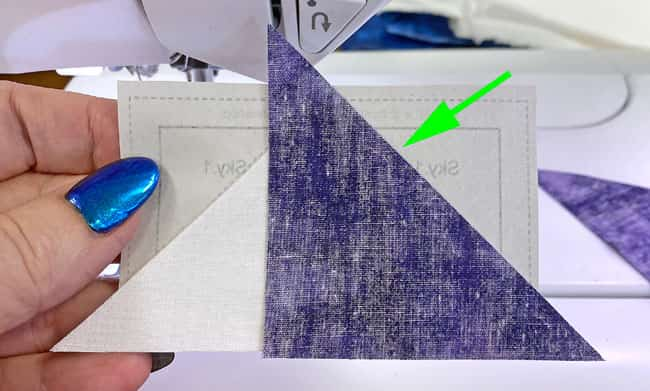
Stitch. The seams in this FG can both be chain pieced because they run from one side of the block to the other. If you choose not to chain piece, your stitches should end roughly at the point of the green arrow.
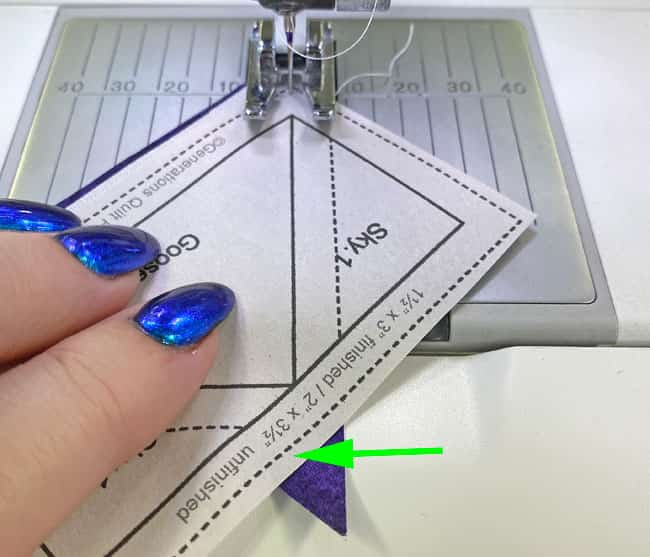
Press.
Repeat for the second Sky.1.
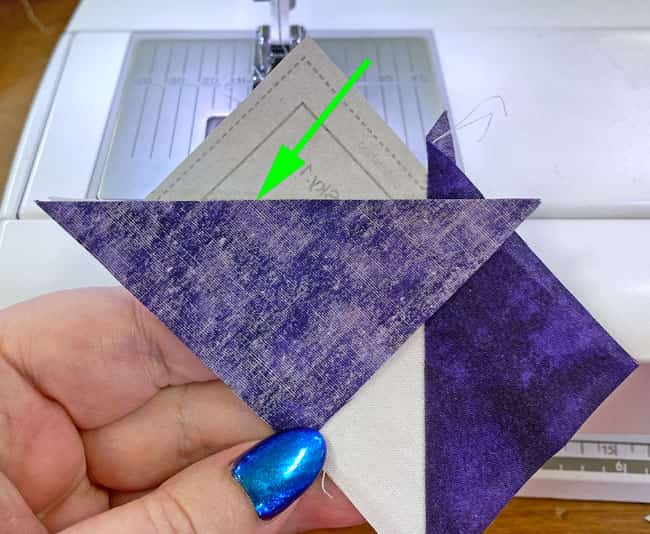
Press. Repeat for all four FGs.
Trim your patches to perfection
At your cutting mat, pattern side up, lay the 1/4" marking on your ruler directly over one side of the solid line that surrounds the block. (green arrow)
Trim away the excess pattern and fabric with your rotary cutter.
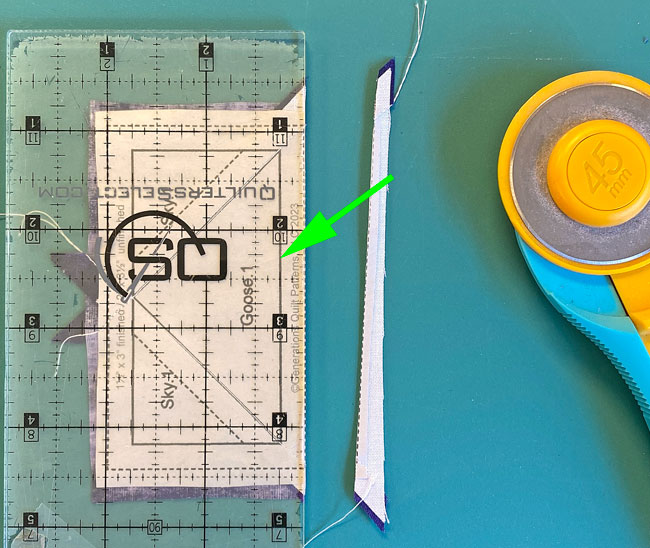 Trimming the first FG unit
Here's a FG before and after it's trim-job with the waste, i.e., the cost of perfection, to the side.
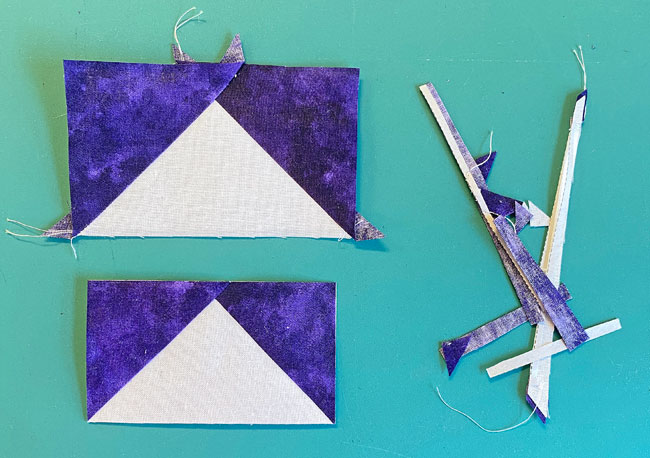 Untrimmed (top), trimmed (bottom), and the waste on the right side
Repeat these steps for all the paper pieced units.
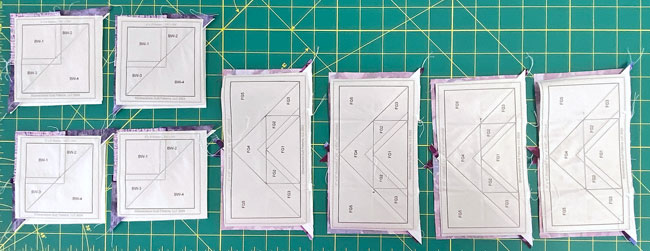 The BW and FG-Var are lined up and ready to be trimmed assembly-line style
Taking the time to precut our patches means all our outside edges are on the straight of grain—just like any block you'd traditionally pieced—and very stable.
That means we can remove all the paper now. It has served its purpose.
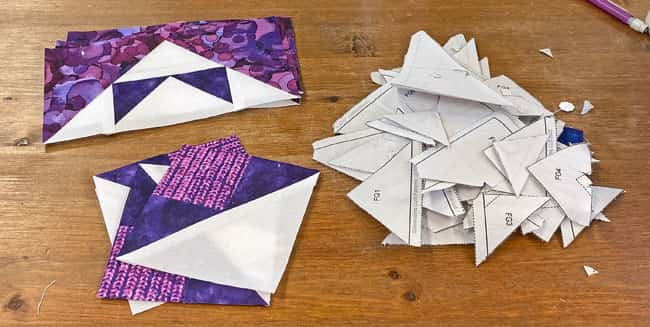 All that's left is to remove the paper from the FGs
The paper piecing is complete. From this point forward, return your stitch length to the one you regularly use for piecing and install your favorite 1/4" presser foot.
Center
Make 1
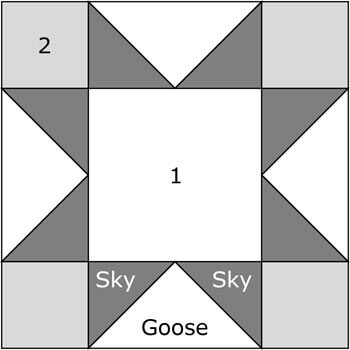 A Sawtooth Star is used for the center
Arrange your patches to form a Sawtooth Star design. Notice I've arranged the patches so the stripe in the corner squares runs from top to bottom.
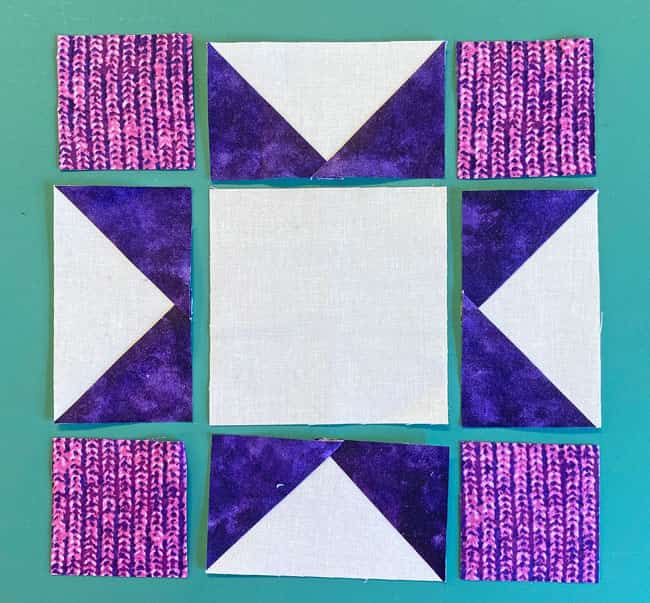
Stitch the units in each row together. Press using the arrows in the photo below for guidance.
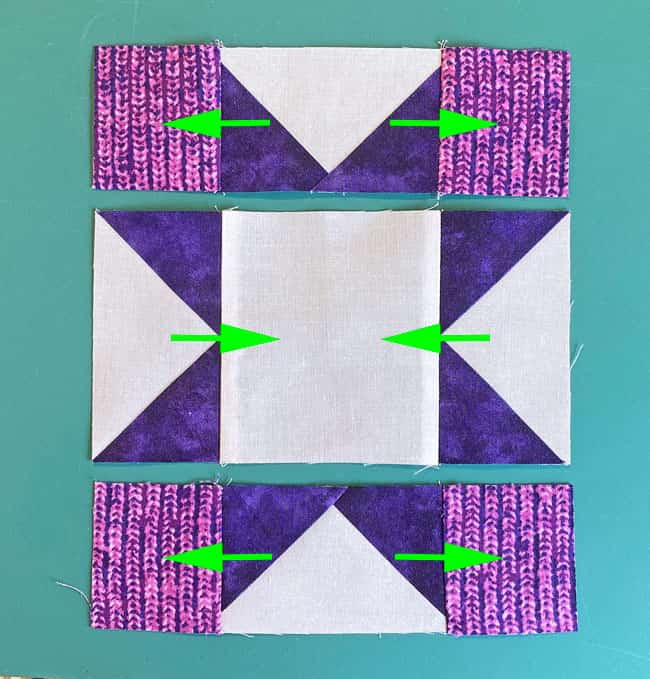 Press SAs away from the FG to minimize bulk
Sew the rows together, pinning as needed to hold the edges and matched seams together.
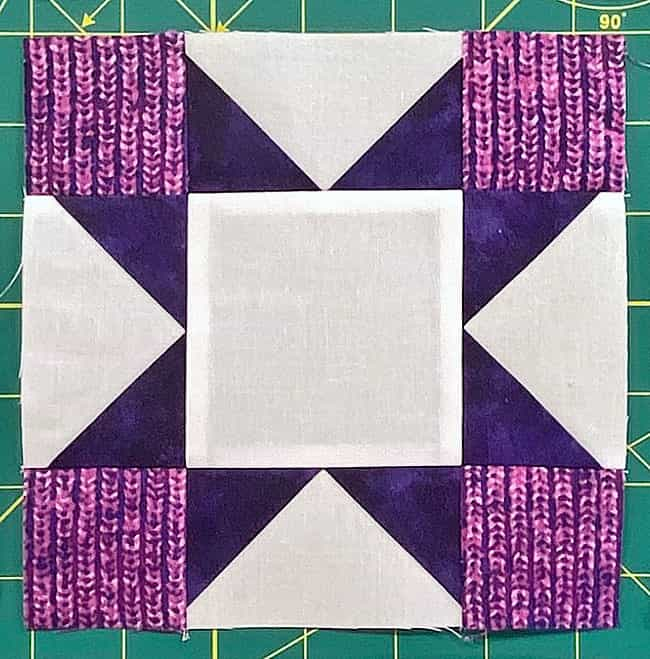
Check for accuracy
Use the table below to check the accuracy of your star.
After sewing, the Center measures... | |
|---|---|
| Finished Block Size | Edge-to-edge Measurement |
| 8" | 4½" x 4½" |
| 12" | 6½" x 6½" |
| 16" | 8½" x 8½" |
| 20" | 10½" x 10½" |
🧩 Assemble your Castle Garden quilt block
Time to arrange all our piecing into the Castle Garden patchwork design.
BWs are in the corners—the BW-1 squares in the outside corners. The FGs has background fabric on the outside edge.
If you've used a directional print and pieced so that the design runs in all the same direction (the 'knitted' looking small squares), double check they're positioned the way you intend.
Sew the units in each row together. You'll notice that the diagonal seams in the BW and FG-Var are pressed in the same direction and don't nest. (marked with red lines).
This is one quirky aspect of paper piecing—that seams can only be pressed towards the last patch added.
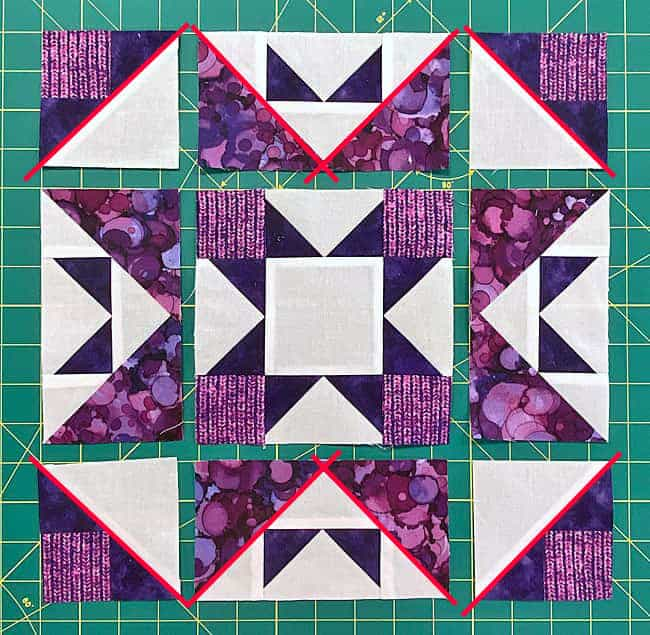
When this happens, I use a bit of 'diagonal pinning' (green arrows) and my fingernails to line up the seams. The other pins hold the edges even for sewing.
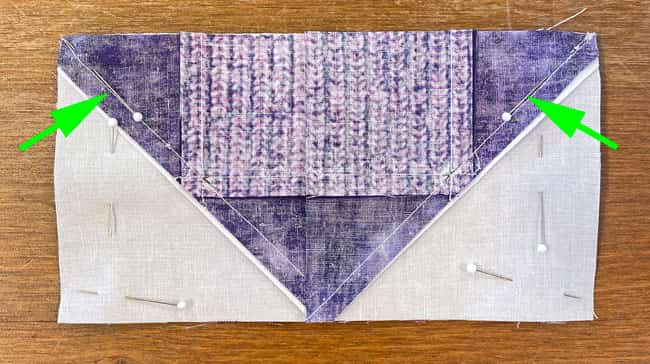 A FG-Var has two BWs pinned to it on the underside. The green arrows point to the diagonal pins used to line up and hold those seams togetherl
Press these seams away from the FG-Var units.
We have this same issue with the diagonal seams when we stitch the rows together. I've marked them with red again.
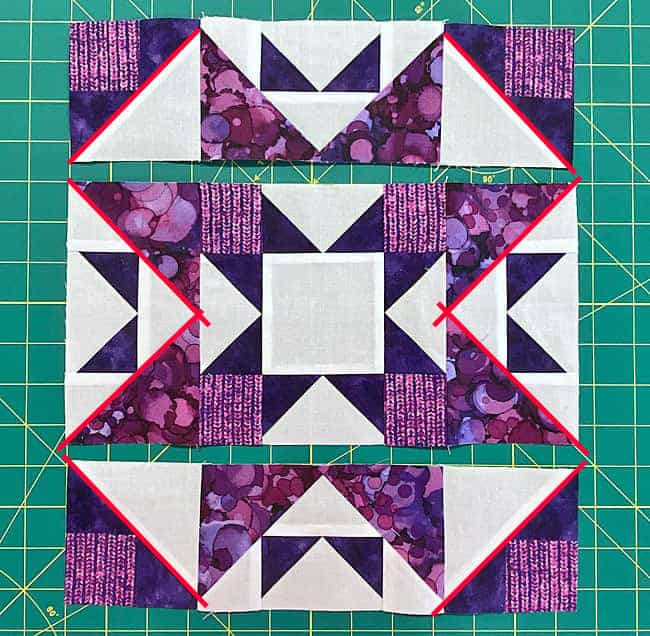
I've used diagonal pins again (green arrows) to match those SAs.
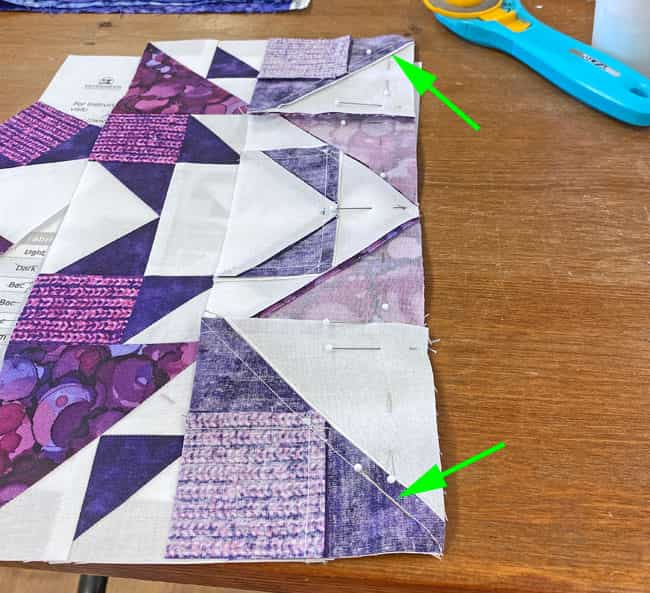
Press these final two seams away from the center.
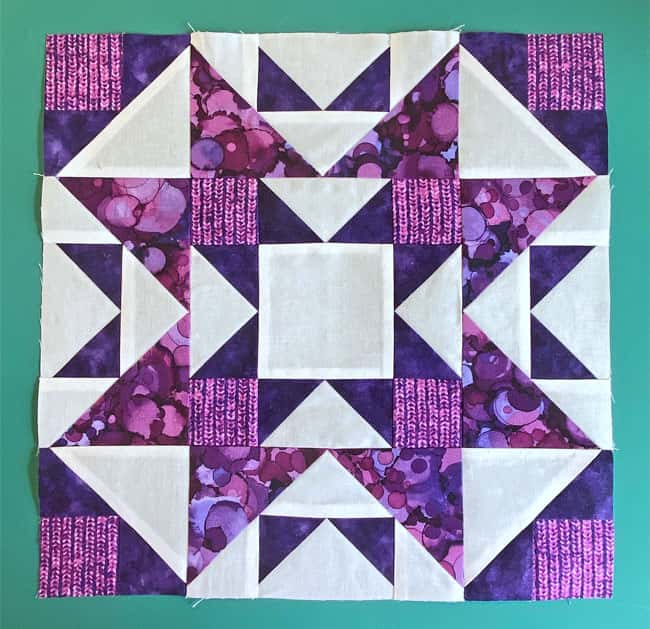
From the backside, you can see how all the SAs fit together.
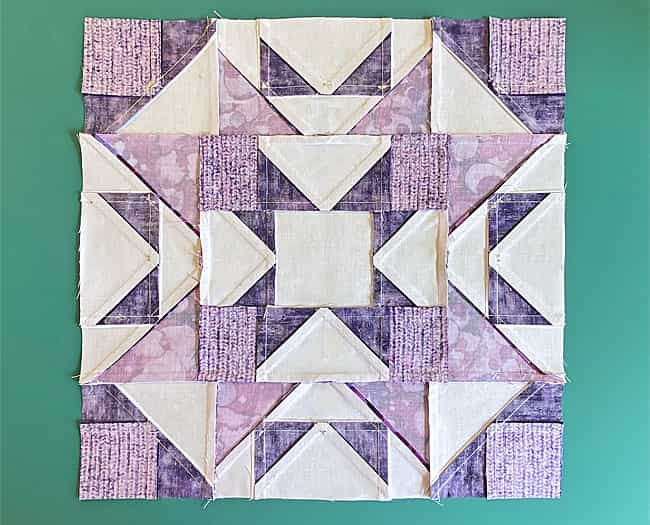
Ready to see your Castle Garden block in action? 🌸
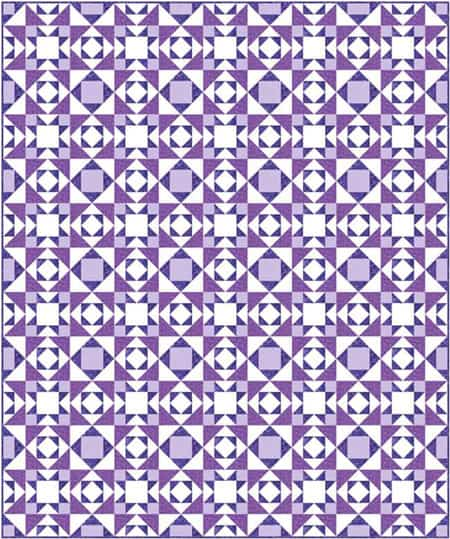
Note: In the quilt imaged below, I've removed the lines are the patches and blocks so as not to distract from the overall design.
First up are our Castle Garden quilt blocks set edge-to-edge.
This is a straight setting of 5 blocks across and 6 down.
And now in a diagonal set of 4 across, 5 down. To complete this design, there are 4 corner triangles (1/4 blocks) and 14 setting triangles (1/2 blocks) to make.
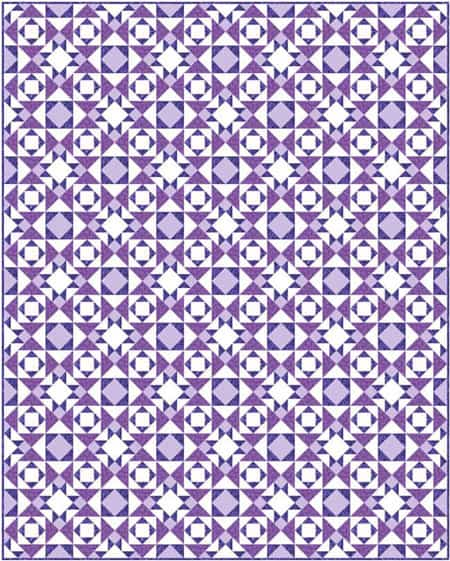
Both are interesting with lots to look at, but the Castle Garden design almost disappears.
If I chose either of these settings, I'd completely redo the piecing and use paper pieced Economy and Twelve Triangles blocks (click either name to see the tutorial on this site and grab those free paper piecing patterns to download and print). I'd use the piecing instructions on this page for the Sawtooth Stars.
This change would eliminate a lot of the points that would need matching between the blocks.
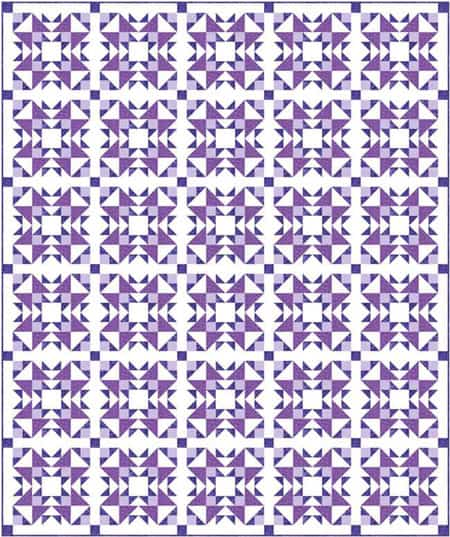
For this next pair of quilt ideas, a simple, non-pieced sashing (background fabric) and a dark cornerstone are added.
Not only does this type of sashing simplify piecing of the quilt top—the only thing you need to match are the ends of the sashing strip and block—but the Castle Garden block design no longer gets lost. A real win-win for us Quilters.
In the diagonal setting, we reap the same benefits.
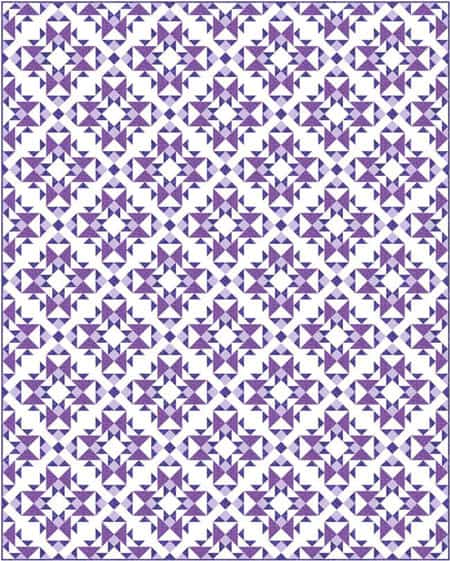
To make these designs really pop, be sure that there is sufficient contrast between your light and medium, medium and dark, and background and light fabrics. \\
Use the old cellphone trick if you need help.
Take a picture of your fabric choices. In your phone's photo editing function, then look for 'filters'.
Use a black and white or grayscale filter to remove the color and leave just the value behind. If you can't tell if they're different, then they aren't. Choose another fabric with more contrast.
🌺 Bloom Where You're Planted (and Pieced!)
Amazing work on your Castle Garden block! 🏆
You've taken a design with lots of moving parts and turned it into something absolutely stunning. Every Brave World unit, every Flying Geese variation—they all came together perfectly because you trusted the process and your growing skills!
Until next time, may your quilting time be pieceful, and your finished blocks be stunning. 🌹
📌 Pin Now, Piece Later
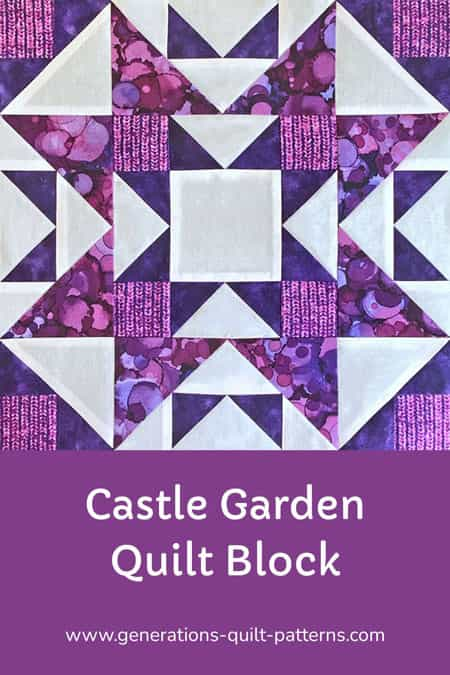
Don't let this beautiful Castle Garden block tutorial get lost in the digital weeds! Save it to your quilting board so you can find it easily when you're ready for your next paper piecing adventure.
🔭 Looking for something truly stellar?
You've finished your star quilt block, and you're ready for more!
Browse our collection of 70 stellar star quilt block patterns. All have instructions and cutting charts in multiple sizes. If templates or paper piecing is used in the tutorial, there's a free download for you of those materials.

Eeny. Meenie. Miney. Moe.
Which star quilt block will you sew?
For a star-studded quilting experience, choose from 100+ bedazzling star quilt patterns—for beginners and beyond—click here.
For even MORE blocks to make… 🧩🎨

...visit our Free Quilt Block Pattern Library, with over 260+ blocks to choose from in multiple sizes.
Free downloads are included in all sizes for any blocks require paper piecing patterns or templates.
- Home
- Free Quilt Block Patterns
- Castle Garden Quilt Block
