- Home
- Free Quilt Block Patterns
- Card Trick Quilt Block
Card Trick Quilt Block Pattern
From our Free Quilt Block Patterns Library
This post contains affiliate links, for which I receive compensation.
Skill Level: Confident Beginner
A Card Trick quilt block is made completely of half and quarter square triangles.
In fact, it's a perfect choice if you've just gone through our Beginning Quilt Block Patterns series!
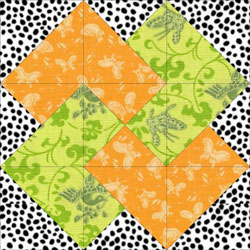
With traditional color placements, you'll need 4 fabrics plus a background to achieve the look of layered 'cards'.
Choose four different colors based on a focus fabric, or use the 'cards' to showcase a favorite collection, i.e. fruit, flowers or even bugs!
If this block looks familiar, you may know it as the 'Winning Hand'.
On this page are rotary cutting and assembly instructions for 4-1/2", 6", 9" and 12" blocks as well as a downloadable Color/Fabric Placement page.

For the adventurous, there's two more coloring options shared, too.
Let's get started!
General Instructions
Due to the construction methods, you're frequently stitching on a bias edge.
To tame the bias and minimize its stretch, consider starching your fabrics—either before you start or as you piece. Just remember that the starch must be washed out when your quilt is complete.
Click here for more information on starching.
All seam allowances (SA) are 1/4". If you are having trouble stitching an accurate 1/4", take the Sewing Test to help correct it.
I strongly urge you to print a line drawing of a Card Trick quilt block and note your patch placements. It's very easy to get the patches mixed up if you don't.
Use Adobe for the download.
If you don't have Adobe, click here and follow the download instructions for the program. (Adobe allows you to access PDF files and it's free! This link opens in a new window.)
Finally, several common abbreviations are used through this page. They are:
- SA - seam allowance
- RST - right sides together
- HST - half square triangle(s)
- QST - quarter square triangle(s)
We're ready.
The newest quilt fabrics to tickle your fancy...
Click the images below to see the full collection. We share any commercial and/or free patterns that showcase them, too. (For inspiration, of course!)


Step 1: Cut patches for your Card Trick block

If you sew a perfect quarter inch SA, use the dimensions in the cutting chart below.
Personally, I like to start with over-sized patches. Then after stitching, trim the HSTs and QSTs to the perfect size. I add an extra 1/4" for HSTs (Patches 1-5) and an extra 1/2" for QSTs (Patches 6-10).
Further along in our Card Trick block instructions, you'll find charts when you need them with the needed sizes of the HST or QST you have stitched. Trim or adjust as needed.
Choose whichever method works best for you.


After the all the Card Trick squares are cut you have this:
 Hard to tell the difference between the two different sizes, isn't it?!!!
...and after sub-cutting as instructed, you have this:
 Don't forget to mark these patches—it's too easy to mix them up!
Keep the two different sizes of triangles separate and labeled.
After cutting it's VERY EASY to get them mixed up. They look different here, but at the machine I had to re-measure to make sure I was stitching the correct patches and sides together.
And finally after the block is stitched you'll have 2 each of the subcut 7A, 8B, 9C and 10D triangles leftover. That's because it's easier to cut QST patches from a square than from a right triangle.
Step 2: Assemble the HSTs
With RST align one background triangle #5 with one #1A triangle.
Stitch together along the long bias edge.
Repeat for triangles #2B, 3C and 4D.
Press the units flat and then open with the SA towards the background fabric.
Use the chart below to check that your HST are the correct size. Trim if needed.
| Finished Block Size | Trim HST to... |
|---|---|
| 4 1/2" | 2" |
| 6" | 2 1/2" |
| 9" | 3 1/2" |
| 12" | 4 1/2" |
The four HST units look like this:

Step 3: Assemble the 3-patch QSTs
To make these you'll need triangles sub-cut from both sizes of squares.
Patches 1-5 are subcut once on the diagonal to create HST patches.
Patches 6-10 are subcut twice on the diagonal for the QSTs.
From the triangles cut from the larger squares, with right sides together (RST) match one background #6 with one #7A triangle.
With the background #6 on top and the flat edge feeding into your sewing machine first, stitch along the short side as shown in the photo below.
These edges are both bias. Do not pull on the patches as you stitch. Just guide them and let the sewing machine do the work.
 The arrow points to the anchor cloth that I stitch on first to insure that my sewing machine doesn't eat my patches
Press each unit flat to set the seam...

...and then open with the SA towards the darker fabric.
 Press with the fabric on top that you want to press your seam allowance towards. Then you won't have to flip your patch over for this step.
Now align the long edge of this pressed unit with the long edge of a #3C subcut from the smaller square.
It can get pretty confusing, pretty fast. If you've marked all your patches, then use this chart to group them together correctly.
| Sew this... | ...to this |
|---|---|
| 6+7A | 3C |
| 6+8B | 1A |
| 6+9C | 4D |
| 6+10D | 2B |
Stitch. The pieced unit is on top with its SA towards you. (There's less chance for it to flip in the wrong direction this way.)

Follow your placement chart to assemble the remaining three unique 3-patch QSTs.
After stitching, press each 3-patch QST flat to set the seam and then open with the SA towards the larger triangle.
Use the chart below to check that your QST are accurate. Trim if needed, remembering to measure out from the center.
QST Dimensions | ||
|---|---|---|
| Finished Block Size | Center/Midpoint Measurement | Trim QST to… |
| 4½” | 1” | 2” |
| 6” | 1¼” | 2½” |
| 9” | 1¾” | 3½” |
| 12” | 2¼” | 4½” |
After trimming they look like this:

If you need a refresher on trimming QSTs to size, click here to review this technique in Quarter Square Triangle, Technique #1, Steps 6-7. The center or midpoint measurement for the 12" block made in this tutorial is 2-1/4".
Step 4: Assemble the 4-fabric QST
Use one triangle each of 7A, 8B, 9C and 10D to construct the center QST.
With RST, sew a #8B triangle to a #7A with #7A on top. Feed the blunt edge into your machine first, just like you did with the QSTs above.
With RST, sew a #9C triangle to a #10D with #10D on top, again feeding the blunt edge first.
Press the units flat and then open with the SAs toward the #8B or #9C fabric.
With RST, sew these two units together. The seams nest to help you match them.
Press flat to set the seam.
Then 'twirl' or 'pinwheel' the seam allowance by giving a little tug on the seams at the center.
A few of the stitches will give way and you will be able to press this last seam in two directions as pictured below. Note that they are all pressed counterclockwise.
 By twirling this seam allowance, all the seams will nest during assembly which makes matching seams much easier.
This QST should measure the same as the four QSTs you've already completed.
After trimming (if needed), it looks like this:
 The finished center of our Card Trick quilt block
Again, if you need it click here for a review this trimming technique (Steps 6-7). The center measurement this 12" sample is 2-1/4".
Step 5: Assemble the Card Trick Quilt Block
Layout your Card Trick units according to your placement chart.
 Layout the units for your Card Trick quilt block
Stitch the units in each row together. Press the SAs as indicated by the arrows below. Use pins as needed to help you match the seams.

Stitch the rows together, using pins as needed.
One final press and your Card Trick quilt block is finished! (For a super flat block check out our Best Pressing Technique.)
 Voila! The finished Card Trick block.
Common Variations
A Card Trick quilt block can also be designed with two fabrics instead of the four that we used in our example. Such a block would look like the one to the left.
Just be sure there is enough difference in the 'card' designs so that they don't blend together into a lump.
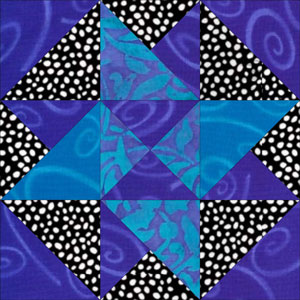
While it doesn't look it at first glance, the color placement in this variation shows that the roots of our Card Trick are deep within the Ohio Star.
The star appears more clearly with this placement blue fabrics. Use your Color Placement page to create your own star formations.
What about a different quilt block?
For a list of all the 220+ quilt block patterns on this site, start here.
If you know the name of the block, shorten your search by using these links:
Click here if you're looking for blocks with at least some paper piecing.
Click here if you're looking for the basic building blocks of quilting, i.e., Flying Geese, half square triangles, quarter square triangles, etc., along with several techniques to make each.
And finally, use these links to find blocks in these finished sizes:


Yummy fabrics
to drool over
Click any image below to see the full collection and find pricing and ordering information.


By Julie Baird
Copyright © 2008-2026 Generation Quilt Patterns, LLC
All Rights Reserved
Generations-quilt-patterns.com does not sell any personal information. (See Privacy Policy)