- Home
- Free Quilt Block Patterns
- Use It All Quilt Block
Use it All Quilt Block Tutorial: 8", 10", and 12" finished blocks
From our Free Quilt Block Patterns Library
This post contains affiliate links, for which I receive compensation.
Stop searching, start sewing. Add some serious star power with our Use it All quilt block tutorial.
Download the cutting charts in three sizes, a block design page for coloring and planning your fabric placements, and detailed step-by-step instructions.
This Sawtooth Star variation is constructed with a Square in a Square and 3-patch quarter square triangles that are paper pieced—for the most accurate results.
The design is finished off with 4-patches in the corners.
Ready? Time to Cut and Sew!

Use these links to quickly find these free downloads:
No time to quilt right now? Pin or bookmark this tutorial to stitch later.
General Instructions
This page uses several abbreviations. They are:
- SA - seam allowance
- RST - right sides together
- HST - half square triangle
- QST - quarter square triangle
- SiaS - Square in a Square unit
- SS - Strip set
A 1/4" SA is used throughout this tutorial.
Highlighted in yellow, pressing instructions are easy to spot.
To press, first press the patches in the closed position as they came off your sewing machine. This sets the seam, melding the fibers of the threads into the fibers of the fabric.
Then press the SA to the dark unless otherwise noted.
New quilt fabrics to tickle your fancy...
Click the images below to see the full collection. We share any commercial and/or free patterns that showcase them, too. (For inspiration, of course!)


Download and print the paper piecing pattern for the Quarter Square Triangles and Square in a Square
You'll need the most current version of Adobe installed on your computer to download the pattern.
On the Adobe Print Menu page, under 'Page Size and Handling' set 'Custom Scale' to 100% before printing for accurate results. Click here to see what it looks like on the Print Menu page.
Choose your finished block size from the chart below and print the corresponding number of pages for a total of four each of the 3-Patch 'A' and 'B' patterns, and one SiaS.
Print Patterns for 3-Patch QST and SiaS | ||
|---|---|---|
| Finished Block Size | 3-Patch QST Print 2 copies 'A' and'B' finished sizes | SiaS Print 1 copy Finished Size |
| 8" | 2" | 4" |
| 10" | 2½" | 5" |
| 12" | 3" | 6" |
After printing, use the 1" square graphic on the printed page(s) to double check that your patterns printed at the correct size.

Not sure which paper to use?
Have a look at my review of several of the most popular brands available to us quilters on the market.
My personal preference is for a super-easy paper to tear away—less stress on the stitches.
Step 1: Cutting patches for a Use It All quilt block
 Use It All patchwork design (This view is from the front of the block)
Sample Block Size: 12" finished / 12½" unfinished
Grid: 8x8
Design Type: Uneven 9-patch-large center | Star
Please label all your patches. We use their numbers throughout this tutorial.
For this tutorial, our fabric choices are:
- Bac - Background - a creamy muslin
- Light - Turquoise
- Medium - Green
- Dark - Kaffe Fassett 'Paperweight' with a black background
Filed under 'you live and you learn'...
If I were to make this block again, I'd lighten up the Light (turquoise) fabric in comparison to the Medium (green). In the photos there's not quite enough contrast for my taste—another good reason to plan to make a sample block when you begin a new quilt!
To print a copy of the block design and cutting chart to use at your cutting table, click here.
 | Cutting Chart for a~ Paper PLUS Traditional Piecing ~ | |||||
|---|---|---|---|---|---|---|
| Patch | Fabric | Qty | Finished Block Size | Sub Cut | ||
| 8'' | 10" | 12'' | ||||
| SS1 | Light | 1 | 1½'' x 13'' | 1¾'' x 15'' | 2'' x 17'' | --- |
| SS2 | Bac | 1 | 1½'' x 13'' | 1¾'' x 15'' | 2'' x 17'' | --- |
| Center.1 | Bac | 1 | 3⅜'' x 3⅜'' | 4⅛'' x 4⅛'' | 4¾'' x 4¾'' | --- |
| C.2, C.3 C.4, C.5 | Dark | 2 | 3⅜'' x 3⅜'' | 3⅞'' x 3⅞'' | 4⅜'' x 4⅜'' | |
| QST.1 | Bac | 2 | 3¾'' x 3¾'' | 4¼'' x 4¼'' | 4¾'' x 4¾'' | |
| QST.2.A | Light | 1 | 3¾'' x 3¾'' | 4¼'' x 4¼'' | 4¾'' x 4¾'' | |
| QST.2.B | Medium | 1 | 3¾'' x 3¾'' | 4¼'' x 4¼'' | 4¾'' x 4¾'' | |
| QST.3 | Medium | 4 | 3⅜'' x 3⅜'' | 3⅞'' x 3⅞'' | 4⅜'' x 4⅜'' | |
| Unfinished Block Size | 8½'' | 10½'' | 12½'' | --- | ||
| Grid Size | 1" | 1¼" | 1½'' | --- | ||
Step 2: Assemble the units for your Use It All block
Our SiaS and QSTs are paper pieced, so we'll stitch them up first.
General Sewing Machine Setup for Paperpiecing
- Reduce your stitch length to 16–20 stitches per inch (1.3-1.6 mm). This perforates the paper and stabilizes the seam when you remove the pattern. [Learn more about stitch length here.]
- Reduce your machine's speed or just plain slow down. Sew only as fast as you can stay on the stitching lines.
- Install an open toe appliqué foot (sometimes called an 'embroidery' or 'satin stitch' foot) if you have one (it's easier to see where you're stitching with one installed).
- Use a larger needle (90/14) if you have problems removing the pattern.
- If your machine has a needle stop up, use it. The stitching goes faster when you don't have to lift the presser foot with every seam.
- As you stitch each seam, start and stop a generous 1/4” before and after the solid stitching lines. ALWAYS. Future lines of stitching secure the ends.
After adding each patch, press the unit as it was sewn to set the seam and then open. The SA is automatically pressed towards the last patch added.
Before adding the next patch, take a look to make sure the one you just added covers the space plus seam allowance that it is supposed to.
Steam is optional and usually curls the pattern.
If that bothers you, don't use steam. Sometimes I do. Sometimes I don't.
It truly depends on my mood.
Remember, as you follow this paper piecing tutorial, the printed and the fabric sides of this block are mirror-images of each other.
At last!
Let's sew!
Square in a Square Unit
Make 1

Use the dashed placement guides to quickly position the large #1, backside to the unprinted side.
Use a couple of tiny dabs of an Elmer's Washable Glue Stick (goes on purple, dries clear) to hold the patch in position.
 You can just make out the shadow of the #1 on the unprinted side of this pattern.
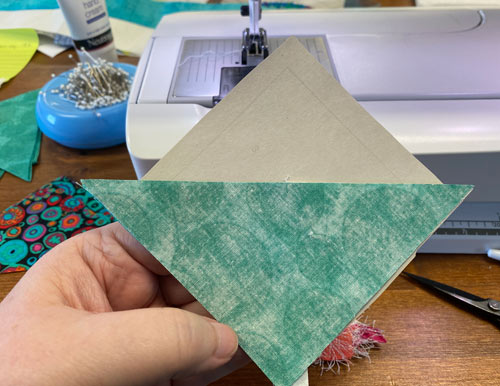
With RST, center the long bias edge of a #2 triangle even with one edge of the #1. The point of the triangle is directly opposite the printed solid corner lines on the pattern. at the top of the photo.

Hold everything together. Fingers or pins—Flower head pins are great for this job because their heads are flat and don't distort that pattern as much.
Sewing from the printed side of the pattern, start and end your stitches 1/4" before and after the solid line between #1 and #2.
Press.
Repeat for the opposite side.
For this 6" sample SiaS, it's big enough to add both the C.2 and C.3 patches before pressing. I prefer to minimize the jumping up and down to iron, as long as I get a good press job on those SAs.
 C.2 is stitched, C.3 is in position to sew next
Press.
Repeat for the C.4 and C.5 patches.
After the stitching is complete, the SiaS looks kind of like a hot mess...but we're close!
 After all the corners are stitched, our SiaS needs a good trim job!
Trim by lining up the 1/4" mark on your ruler (red arrow) with one side of the solid square that surrounds the block.
Trim away the excess.
Repeat for the remaining three sides.
 After trimming all four sides of our SiaS
We are left with an accurately sized block whose points are exactly 1/4" from the edge.
This will be a cinch to piece into our Use It All quilt block.
 Our SiaS, trimmed to perfection.
3-Patch QSTs
Make 4 of each version
 Version A (left) and Version B (right)
To make it easiest to construct this unit, I've created an A and a B version of the QST paper piecing pattern.
In A, the smaller triangles move clockwise around the unit from the finished side. In B, they move counterclockwise.
Since the unit is asymmetrical, the pattern from the printed side is the mirror image of the finished unit.
It's a bit disconcerting when you first come across this in your quilting. I suggest working on all the 'A' QSTs first, then the 'Bs'.
That way you've only got the patches within reach that go with that particular version of the QSTs.
On all eight of the QST patterns, position a background QST.1 on the unprinted side of the pattern.
Use a dab of Elmer's Washable Glue Stick to hold it in place.
 This QST.1 is the same for both the A and B versions
For the A QSTs, with RST, layer a light (turquoise) QST.2.A on top, matching the cut edges.
 Add QST.2.A to all the A QSTs
Sew on the line between QST.1 and QST.2, starting and stopping a generous 1/4" before and after the solid line. Repeat for all 4 A's.

For the B QSTs, with RST, layer the medium (green) QST.2.B unit on top of the QST.1 background, matching the raw edges.
 Add QST.2.B to all the B QSTs
Sew the seam as before and repeat for all four B's.
Press all 8 units.
And finally, all 8 of the QSTs you're making for your Use It All block get the same medium QST.3 added to them.
With RST and aligning the long edges, sew this second seam the same as before, starting and stopping past the outside dashed edges of the printed block pattern.
Since the seam runs from edge to edge, this is a candidate for chain piecing.
Press.
Your pairs of QSTs will look like this.

At your cutting mat, align the 1/4" line on your ruler with the solid line of the outside square and trim away the excess. You now have a perfect 1/4" SA.
Repeat for all sides of all the QSTs.
A trimmed pair looks like this.


The paper piecing is complete. From this point forward, return your stitch length to the one you regularly use for piecing and install your favorite 1/4" presser foot.
Since all the outside edges—for both the QSTs and Sias—are on the straight of grain and there is no bias or stretch to worry about, you can remove the paper pattern now.
Sides
Make 4

Each side unit is made up of one of each QST that you made in the previous steps.
None of the seams we're matching nest, so this is a time to pin—even if you're not a regular pinner.
I use a pin in the seam (red arrows) there to hold things in position and have had good luck with this technique.
WARNING: Because this pin is at a diagonal to our sewing line, it's a much bigger target to hit with our needle. Don't want to do that!
Remember to stop with your needle down in the patches just before you come to the pin, remove the pin, then continue stitching.

Why don't we sew over pins?
The answer is twofold:
- You can break a needle and send the shaft flying. Dangerous for your eyes, and a pain to have to go looking for the damaged remnants of your needle.
- If you hit the pin, the chances of screwing up the timing of your sewing machine go way up. If your timing's off, the stitches won't form correctly. It means an appointment at the repairman to get it fixed.
For more on this topic, click here.
Do the best you can to avoid sewing over pins!
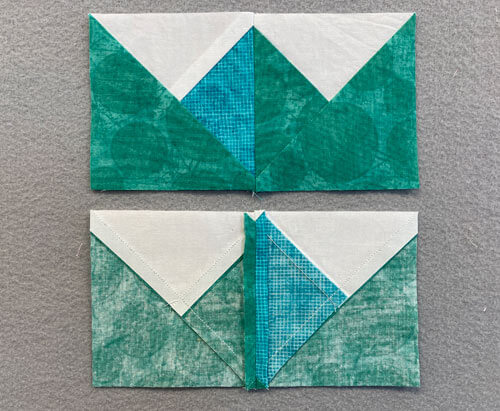
This is the completed Side from the front (top) and the back (bottom) with the SA pressed open to reduce bulk.
4-Patch Units
Make 4

With RST, sew the SS1 and SS2 strips together along one long edge.
 My favorite 1/4" presser foot is this one with a flange on the right side and a movable needle position
Press.
Use the chart below to check the accuracy of your sewn stripset. Make any adjustments before moving to the next step.
StripSet Widths | |||
|---|---|---|---|
| Finished Block Size | Stripset Width after stitching | SubCut Width | Edge-to-Edge Dimensions of 4-Patch |
| 8" | 2½" | 1½" | 2½"x 2½" |
| 10" | 3" | 1¾" | 3" x 3" |
| 12" | 3½" | 2" | 3½" x 3½" |
From the chart above, find the 'Subcut Width' that corresponds with your chosen Finished Size.
For our 12" finished sample block, the Subcut Width is 2".
Square up one short side of your strip set, and then subcut 8 units from it.
 After subcutting, I've arranged the four units as they'll be stitched. Waste from the strip set is to the right.
From these patches, stitch together four 4-patch units. The seams nest which makes matching a breeze. Feed the patches through your sewing machine with the darker patch on top, moving under the presser foot first.
To reduce bulk, undo the stitches in the center of the 4-patch so that you can twirl or fan the SAs clockwise around the patch. DO NOT clip away these threads that you undo. They preserve the integrity of the SA.
 Twirling or fanning the SAs creates super flat units
After twirling these SAs you should have a tiny four-patch in the center on the backside (above, right).
Step 3: Assemble the Use It All quilt block
Arrange the cut center and stitched units to create the Use It All quilt block design.
A background square in the 4-patch is in the outside corner. On the sides, the background is on the outside edge, too.
 The sewn patches ready to be stitched together
Sew the units into rows. SAs in the top and bottom rows are pressed toward the 4-patches. In the middle, they are pressed towards the center.
 Press the SAs in the direction of the arrows
Sew the rows together.
These last two seams are pressed away from the center.
Our Use it All quilt block from the front side...
 A finished Use It All quilt block
You get a good look at how the seams joining the QSTs looked after pressing them open and the fanned or twirled SAs on the 4-patches.
 The view from the back of our Use It All quilt block
🔭 Looking for something truly stellar?
You've finished your star quilt block, and you're ready for more!
Browse our collection of 70 stellar star quilt block patterns. All have instructions and cutting charts in multiple sizes. If templates or paper piecing is used in the tutorial, there's a free download for you of those materials.

Eeny. Meenie. Miney. Moe.
Which star quilt block will you sew?
For a star-studded quilting experience, choose from 100+ bedazzling star quilt patterns—for beginners and beyond—click here.
For even MORE blocks to make… 🧩🎨
...visit our Free Quilt Block Pattern Library, with over 260+ blocks to choose from in multiple sizes.
Free downloads are included in all sizes for any blocks require paper piecing patterns or templates.
- Home
- Free Quilt Block Patterns
- Use It All Quilt Block


Yummy fabrics
to drool over
Click any image below to see the full collection and find pricing and ordering information.


By Julie Baird
Copyright © 2008-2026 Generation Quilt Patterns, LLC
All Rights Reserved
Generations-quilt-patterns.com does not sell any personal information. (See Privacy Policy)