How should I
quilt a Streak of Lightning quilt?
This post contains affiliate links, for which I receive compensation.
Log Cabin quilts—including the Streak of Lightning quilt design—have a real soft spot in my heart.
My first attempt at quilting was a Log Cabin. It's a great beginner block.
It's my go-to pattern when I crave needle time at my sewing machine.
So when this question appeared in my inbox...Seriously?...How could I resist?!!!
On this page you'll find the original question and my thoughts on quilting a Streak of Lightning qult.
Additional links—I couldn't help myself...I love Log Cabins that much— are here to help you construct blocks for your own Streak of Lightning:
- A coloring page for a Streak of Lightning layout for a block with 5 rounds
Let's begin!
 Don't forget to Pin it for later
Check out "...the rest of the story..." at the bottom of this page!
The Question
Cindy from Florida writes asking...

I'm so new to quilting it's sad, but I'm desperate to get a specific answer. If I send you a picture of a quilt would you possibly be able to tell me how the quilting was accomplished? :D
Thanks in advance - A desperate beginner, Cindy
I asked her to send a picture of the patchwork she was talking about and she graciously did with the following note...
Because I am a NOVICE I'm assuming the diagonal stitching is following the flow of the design. I just need to know how to accomplish it.
If you are not familiar with this particular design it's called Streak of Lightning.
This quilt is responsible for pushing me over the edge to learn to quilt. I've been sewing and machine embroidering for years and resisted as long as I could??. I love everything about this design. The pattern. The quilting.
I MUST DO IT!
I feel ready to tackle this.
FYI I contacted the person who posted this in social media but she was not interested in divulging information?
THANK YOU
And Cindy sent an image, too. Unfortunately, because I don't know the originator of the image, I don't feel it's proper to display it here without attribution.
But never fear!
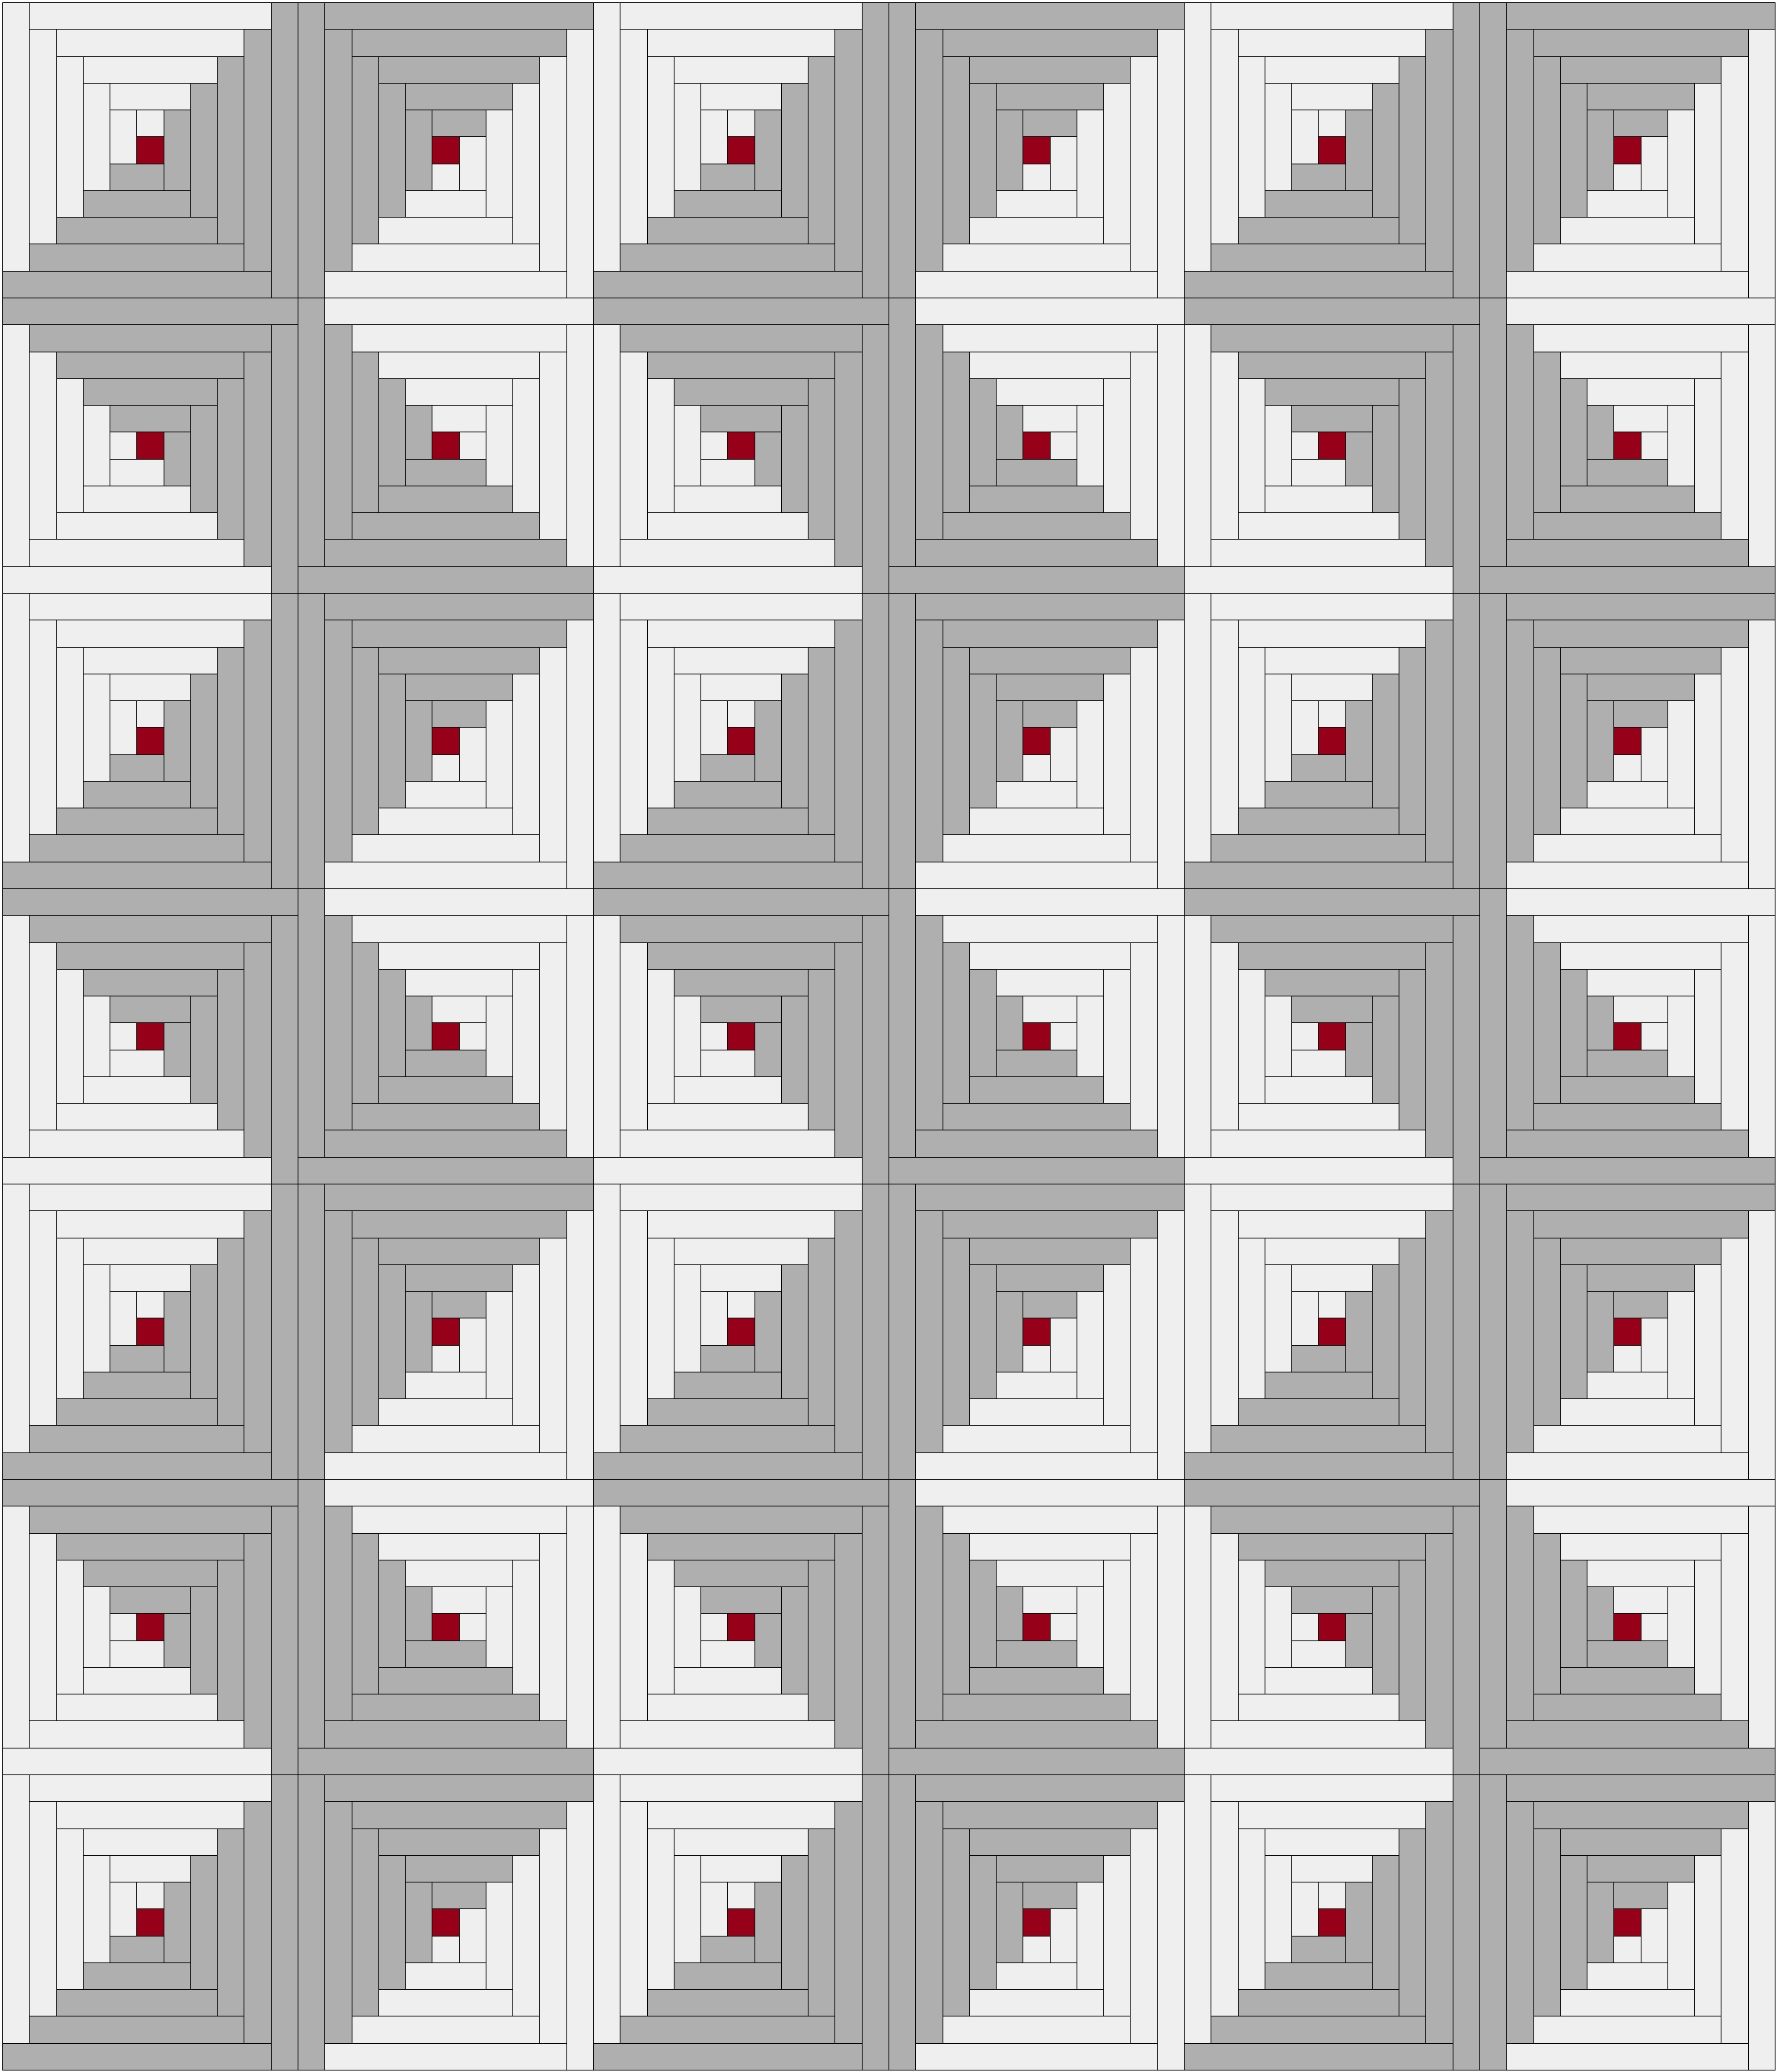
This traditional layout of Log Cabin blocks is called 'Streak of Lightning' or 'Zig Zag'. This is what the design looks like.
6x7 blocks
Don't those red centers make it easy to count the number of blocks in the rows and columns?
You can find more layouts using Log Cabin blocks in the article "Log Cabin Quilt Designs" found here on this site under 'Design Inspiration' on the navigation bar.
Quilting a Streak of Lightning Quilt Design
In the photo that Cindy sent, the lines of the quilting follow the pattern created by the dark 'zigzag'.
I've recreated them below in red. Not all of them are included—the drawing gets too distracting—just enough so that you can see just how much the stitching transforms the design.
 Quilting diagram for Streak of Lightning quilt
6x7 blocks
Furthermore, because the stitching follows the piecing design, marking is SO MUCH EASIER. (big happy quilting face!)
Since all the lines are straight and you don't need to turn the entire quilt under the needle, you'll be able to use your walking foot.
This is perfect for the beginner quilter.
You can focus solely on maneuvering the quilt sandwich under your needle. Let your sewing machine worry about the evenness of your quilting stitches.
Since the corners of the blocks can be used to mark the design, I would sandwich my quilt first and mark as I go with a chalk pencil. Either the Bohin mechanical chalk pencil or Clover's ChacoLiner.
Click here to read more about these marking tools.
As always, it's a good idea to test your chosen marker on a sample of your fabrics.
I do this when I begin the piecing. Once it's pieced, I then remove the marks from the sample fabric—figuring it'll take at least as long to piece as to quilt.
If there's a problem removing any of the marks, I can change my marker and avoid a problem on the finished quilt. (Us, quilters, are smart cookies!)
Line up your ruler with the diagonal corners of a block and mark the stitching line. Alternate the direction as you work your way down a 'Streak of Lightning'.
Quilt that line.
Then layout the sandwich flat and mark the next line.
Be aware that it's possible that not every corner will have quilting lines running through it. That depends on the distance between them. In the drawing above, there's one through every place where four corners meet simply because it was easy to do.
How much quilting you ultimately decide to do will be dictated by your choice of batting (and it's recommendation for maximum quilting distance) and your personal preference.
Marking alternatives
Some quilters may prefer to mark the entire quilt top with a washout marker.
Remember to test the marker on a sample just like the chalk markers. You'll also need to wash out the marks after the quilt is finished to completely remove the ink.
Best advice?
Follow the manufacturer's instructions to the letter. Seriously. Exactly as they recommend.
Some will choose to mark the first line and then use a quilting or channel guide (see your sewing machine manual to see if your machine has one and how to install it). This way there's only one streak of lightning line to mark.
Still others will choose to eyeball the quilting lines.
The smallest block that I've provided cutting instructions for finishes at 11". While quilting through the diagonals of the blocks has a lot of seam junctures to aim for, quilting through other areas of the block won't.
And finally, some may choose to use a blue painters tape and tape from corner to corner.
The downside is that sometimes the tape can stretch. Or you accidentally sew through the tape and need to pull out and redo some of your stitching. Not a big deal. Just something to be aware of.
Ultimately the choice of how you mark is up to you!
Preparing to quilt your Streak of Lightning quilt
All the planned quilting is on the diagonal. Your stitching will put a bit of extra stress on the bias of your patches. Bias wants to stretch a bit if not controlled.
To compensate, I have two suggestions:
- Use plenty of safety pins when you baste. My recommendation is that you should feel at least one safety pin under your palm when you lay it flat on the basted sandwich. (Learn more about layering and basting here.) Up that to at least two for this project. As always try to avoid pinning directly the first planned lines of stitching.
- Add a couple of lines of 'removable quilting' both horizontally and vertically through the quilt sandwich before starting the zigzag stitching (shown below).
 Baste through the center—vertically and horizontally—of your Streak of Lightning for added stability. These lines of quilting will be removed before quilting over them.
The quilting represented by the blue lines can be added by machine with a basting-sized stitch or by hand. It does not need to be 'in the ditch'. There's no reason for any extra fussiness because it's only temporary. You'll want to remove it once the quilt is finished.
Either way, the idea of this basting is to contain any puffiness that might occur during quilting to one quadrant instead of letting it spread throughout the quilt.
Don't sew over the basting lines, remove them as you come to them so that the thread doesn't need to be picked out later from under your quilting stitches. (I know from personal experience what a total pain that is.)
After testing my chosen quilting threads on a practice quilt sandwich made from leftover scraps, I'd begin quilting to establish the pattern below.
Stabilize your Streak of Lightning quilt first
Start with the two 'lines' closest to the center and then work out to the sides. (If you've used a different number of blocks, your initial lines of quilting will be correspondingly more or less.)
 Add the first lines of quilting using the corners of the blocks as your guides.
Remove safety pins and basting that are in your way as you go.
The purpose of getting some quilting throughout the sandwich like this is to stabilize as much of it as you can. It just makes the rest of the quilting easier.
Now you can fill in between the lines at the distance that you chose.
Personally I would use a ruler and chalk marker/pencil to mark the individual stitching lines as I went. Sometimes those pesky, but useful, safety pins will be in the way.
Move or remove as necessary.
Just remember that for as long as the quilt is only lightly quilted, those pins are really holding the three layers together evenly.
Watch out at the corners
When you reach the 'corner' of each zigzagged path, stop with the needle down in your quilt.
Raise the presser foot and carefully turn your patchwork.
Then make sure that the sandwich is flat and even on your sewing machine's bed before starting to stitch again.
It is at these 'corners' where you have the possibility of creating tucks in the back of your quilt.
After each line of quilting, I suggest you inspect that back to make sure that you don't have any noticeable tucks.
Honestly.
Tucks in the backing don't destroy your quilt. They happen to every quilter at one time or another. They've happened to me, too. Even when I thought I was being vigilant.
The point is to learn from each quilting opportunity. Fine turn your technique to what works best for you.
Final comments on the Streak of Lightning quilting
I would suggest using a thinner rather than a thicker batting. The quilting in the original Streak of Lightning quilt looked to be about an inch apart.
That's a lot of quilting.
Thinner batting will help prevent the quilt from feeling 'stiff'.
There's always more than one way to get things done in quilting.
Stitching a Streak of Lightning Quilt
Cindy, in my desire to be helpful, I'm providing more information than you asked for. I hope that's OK—like I said, I've got a serious soft spot for the Log Cabin quilt pattern.
 Streak of Lightning
6 x 7 blocks
Layout
In the drawing, the 'dark' streak of lightning is my focus. In order to create complete 'zigzags' the rows must contain even numbers of blocks.
In the columns, here with an odd number (7) the ends of the 'zigzags' are aligned. If I'd chosen an even number, the ends of the rows would be heading in opposite directions.
As the designer of the quilt, YOU get to choose the look for YOUR quilt.
Construction tips for more accurate piecing
I've written about two of the best tips for accurate piecing—having a reliable, accurate 1/4" seam and cutting logs on the lengthwise grain—in my article "Perfecting Log Cabin Quilt Blocks".
In piecing my own quilts, I am a HUGE fan of heavily starching my fabric before cutting. Yes, it does take extra time to do and you must wash out starch after the quilt is finished. Nonetheless, I find the benefits outweigh this work. You can read more about starching fabric here.
The next tip is to measure as you go.
In the tutorial for making a Log Cabin block, a chart provides the measurement of the Log Cabins after each round is added so you can do just that.
Blocks that are all the same size are so much easier to put together when it's finally time to assemble the top.
And finally, I like having my seam allowances nest when I put blocks together. It makes matching seams so much easier.
In the Streak of Lightning design, if you've pressed your seams out from the center, a handful of blocks will need to have their last seam pressed in the opposite direction (i.e. in towards the center) so that seams match.
And last, but not least...
For my readers, please share your suggestions in the Facebook comments below. If you'd like to share your own Streak of Lightning quilt, please add them to our Show and Tell section to share your knowledge with your fellow quilters.
Cindy, this was a great question. Thank you for asking. I hope you find my comments helpful.
Welcome to the Wonderfully Wacky World of Quilting!
Piecefully,
Check out the "...rest of the story..." here.
To learn how to make the blocks for your own Streak of Lightning quilt go to the Log Cabin quilt block tutorial.
For more on Log Cabins, check out:
- Log Cabin Quilt Designs—ideas for YOUR Log Cabin quilt patterns
- Log cabin quilts can be paper pieced—try it for yourself
- How to quilt a Streak of Lightning quilt—a Log Cabin quilting suggestion


By Julie Baird
Copyright © 2008-2026 Generation Quilt Patterns, LLC
All Rights Reserved
Generations-quilt-patterns.com does not sell any personal information. (See Privacy Policy)