- Home
- Free Quilt Block Patterns
- Louisiana Quilt Block
Gumbo
of Geometrics: Mastering the Louisiana Quilt Block, Part 2
Using traditional piecing methods with 4-at-a-time Flying Geese...
This post contains affiliate links, for which I receive compensation.
You've chosen to use traditional methods (instead of paper piecing) to make your Louisiana quilt block.
As promised, the cutting chart and directions for piecing your block this way using your every day rulers are below.
If you have't already, download the coloring page and print a copy to use to plan your fabric or for your young 'Quilters-In-Training' to design their own version.
Several abbreviations are used in this tutorial. If you need help with them, click here for the list.
Time to cut up and sew!
New quilt fabrics to tickle your fancy...
Click the images below to see the full collection. We share any commercial and/or free patterns that showcase them, too. (For inspiration, of course!)


Step 1: Cutting for a traditionally pieced Louisiana quilt block
 The numbering differs from the paperpieced version
For the traditionally pieced block, there's no subcutting. No triangles. No bias edges to mess with our Four-at-a-Time technique.
All you need are three different-sized squares/rectangles.
 | Cutting Chart for a~Traditional Piecing | |||||
|---|---|---|---|---|---|---|
| Patch | Fabric | Qty | Finished Block Size | |||
| 4" | 6" | 7" | 8" | |||
| 1 | Dark | 1 | 3½" x 3½" | 4½" x 4½" | 5'' x 5'' | 5½" x 5½" |
| 2 | Med | 4 | 2¼" x 2¼" | 2¾" x 2¾" | 3" x 3" | 3¼" x 3¼" |
| 3 | Bac | 4 | 1½" x 2½" | 2'' x 3½" | 2¼" x 4'' | 2½" x 4½" |
| Unfinished Block Size | 4½" | 6½" | 7½" | 8½" | ||
| Grid Size | 1" | 1½" | 1¾" | 2'' | ||

Step 2: Traditional Piecing w/FG 4-at-a-time

Sample Sizes: 7" finished / 7-1/2" unfinished
Grid: 4x4
Attribution: Hearth and Home
For this sample, I've changed fabrics from our paper pieced version—I ran out of the orange fabric! :)
Still using another of my favorite Kaffe fabrics for the background, this time the Roman Glass in blue.
We're using a method to make Flying Geese (FG) 4-at-a time. Usually, this technique is shown with patches cut exactly to size.
However...
...it's my experience that most quilters (myself included) achieve more accurate results with patches cut a bit bigger and then trimmed down to perfection.
Now, I just don't believe you should have to buy any specialty rulers to make one Louisiana block.
However, if you're a Gadget Gal, there are a number of rulers on the market for this trim job. You can read my review of the Wing Clipper and Wing Clipper II here (they're some of my favorites!) if you're interested.
Follow along below and I'll show you how to trim to perfection with your plain ol'square rotary ruler.

With RST layer your #1 square (green) with two #2 squares (blue) in opposite diagonal corners.
At your cutting mat, with your 1/2" ruler (here I used my Quick Quarter), draw two parallel lines, each a 1/4" away from the center diagonal as shown below.
If you don't have a Quick Quarter, use your everyday rotary ruler to mark a line 1/4" from both sides of the center diagonal. The resulting marks are the same.
 These first two lines run from upper left to lower right.
Use this little trick to get rid of the bulk at the tip of your FG before it happens.
Draw a third, very short, diagonal line in the opposite direction as the first two—just on the #2 squares (blue fabric) as shown above (red arrow).
Use a pair of scissors to cut on this short line to remove the excess fabric.

Pretty slick trick, eh?!!
There'll be a short gap in the lines on one of the #2 squares. You can redraw the line if it helps you.
I do use pins to help hold things in place as I stitch. Keep the pins away from the drawn lines so you don't have to remove them as you sew.
Stitch both seams.
 It's easier to see the gap in the markings here.
Press to set the seams.
Cut the square in half between the two lines of stitching. Press again, this time with the SA towards the smaller #2/#3 squares.
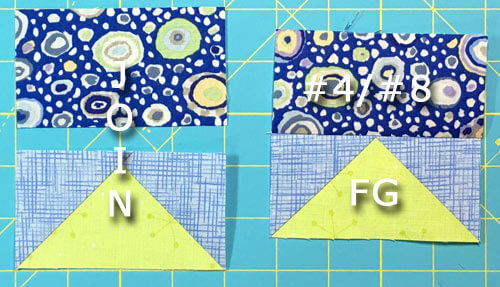
 On the left are patches where I've trimmed away the excess. On the right, I omitted the trimming. The untrimmed version leaves an extra 2 layers of fabric right at the point of the Goose. Not Good!
With your 1/2" ruler (again the Quick Quarter), mark the same two diagonals 1/4" from the center diagonal on the backside of the remaining two #2 squares.
With RST position one of them in the corner of the #1 patch with the ends of the lines in the corner.
Stitch on the lines. Cut in half between the stitching as shown below.
 and after another press, two FG ready to be trimmed.") Cut in half between the markings (left). After a quick press (right).
Cut in half between the markings (left). After a quick press (right).Repeat for the second #1/#2 (green and blue) and #2 patch (blue). This gives you a total of four slightly oversized FG that need to be trimmed.
Make sure your FG are nicely pressed, SA towards the #2s.
Check out my favorite pressing technique for impeccably flat results.
Finally! It's time to trim to perfection.
Use the chart below to find the 'Center' measurement for your units. For my 7" finished sample it's 2", with a 'Trimmed to...' size of 2-1/4" x 4".
Louisiana Quilt BlockFlying Geese 4-at-a-time Measurements | |||
|---|---|---|---|
| Finished Block Size | Center | Trim FG to… | |
| Height | Width | ||
| 4" | 1-1/4" | 1-1/2" | 2-1/2" |
| 6" | 1-3/4" | 2" | 3-1/2" |
| 7" | 2" | 2-1/4" | 4" |
| 8" | 2-1/4" | 2-1/2" | 4-1/2" |
You need your square rotary ruler, the one with a 45° diagonal line through the corner.
At your cutting mat—with the Goose pointing toward you—position your ruler so that:
- The 'Center' measurement cuts the point of the Goose in half.
- The 45° diagonal line of your ruler is on top of the seam line.
- The Width measurement is on the seamline at the edge of the ruler (red arrow left side). That number is 4" for our sample.
- The point of the Goose is 1/4" in from the Height measurement (red arrow bottom). That number is 2-1/4" - 1/4" = 2" for our 7" finished sample.
This is how it looks.

Trim the top and right sides with your rotary cutter.
Turn your unit 180°.
Now position your ruler so that the Height and Width measurements on your ruler are lined up with the cut edges (red lines).
Check to see that the point of the Goose is still at the Center measurement.

Trim the remaining two edges.
Repeat for all four FGs.
Voila!
 PERFECTION!!!
With RST, layer a #3 with a FG.
Stitch along the long side with the Goose point. I like to have the Goose on top for this stitching so I can see where the point is.
The SA is pressed away from the Goose unit, towards #3 to eliminate bulk.
Repeat for a total of 4.
Next arrange two of these pairs as shown below.
 Create to half Louisiana quilt blocks
When you layer these pairs RST, the SAs nest where the corners of the Geese meet. That makes getting a good match pretty easy.
I do pin to hold things in place for stitching.
Repeat for a total of two halves.
From this point forward, construction of our Louisiana quilt block is the same whether you chose traditional or paper piecing.
Moving on...
Return to Part 1 for paper piecing instructions.
Click here for instructions to finish your Louisiana quilt block, regardless of which technique you use.
📌Don't let this block parade pass you by! 🥳
Pin now, sew later, and let the good times roll! 🎡 🎺

- Home
- Free Quilt Block Patterns
- Louisiana Quilt Block


By Julie Baird
Copyright © 2008-2026 Generation Quilt Patterns, LLC
All Rights Reserved
Generations-quilt-patterns.com does not sell any personal information. (See Privacy Policy)