- Home
- Free Quilt Block Patterns
- Goshen Star Quilt Block
Learn to Make a Goshen Star Quilt Block
A beginner friendly design
This post contains affiliate links, for which I receive compensation.
Skill Level: Beginner
The
Goshen Star quilt block is all sorts of pointy goodness...
...but can you believe it?
You don't need to cut a single triangle or sew a single bias edge!
This fanciful star is constructed using the 'connector corners', sometimes known as the 'sew and flip' technique.
Simple cutting.
Simple piecing.
A ultimate perfect beginner quilt block with anything but simple-looking results!
Let's see what's 'Goshen' on and get started!
📋 General Instructions
The open toe applique foot is the perfect presser foot for stitching on a drawn line because there's nothing between your eyes and the needle.
For piecing the units together, I prefer my quarter inch foot with a guide on the right-hand side.
This foot along with starched quilt fabrics and a quick seam allowance test are the perfect recipe for an accurate 1/4" seam.
These abbreviations are used throughout this tutorial:
- SA - seam allowance
- RST - right sides together
- HST - half square triangle
- Sq - square
SA are 1/4" unless otherwise noted.
The newest quilt fabrics to tickle your fancy...
Click the images below to see the full collection. We share any commercial and/or free patterns that showcase them, too. (For inspiration, of course!)
Step 1: Cut patches for a Goshen Star
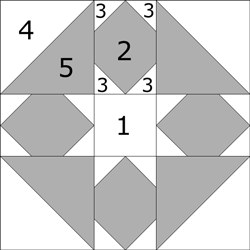 Goshen Star design
Sample Size: 8" finished / 8½" unfinished
Grid: 8x8
Attribution: Clara Stone
Design Type: Uneven 9-patch, small center | Star
I prefer to cut oversized patches for my half square triangles and then trim them to perfection after stitching. That's exactly what I've done with the 8" sample block in this tutorial.
I cut my #4 and #5 patches at 4-1/8" x 4-1/8"—a quarter inch larger than the 3-7/8"x3-7/8" listed in the cutting chart below.
I've marked these patches with **.
If your 1/4" seam is reliably accurate, use the dimensions in the chart.
The choice—to cut larger and then trim to size or rely on the accuracy of your seam allowance—is up to you!
 |
Cutting Chart for a~ Traditional Piecing with Connector Corners ~ | |||||
|---|---|---|---|---|---|---|
| Patch | Fabric | Qty | Finished Block Size | |||
| 8" | 12" | 16" | ||||
| 1 | Light | 1 | 2½” x 2½” | 3½” x 3½” | 4½” x 4½” | |
| 2 | Dark | 4 | 2½” x 3½” | 3½” x 5” | 4½” x 6½” | |
| 3 | Light | 16 | 1½”sq | 2”sq | 2½”sq | |
| 4** | Light | 2 | 3⅞” x 3⅞” | 5⅜” x 5⅜” | 6⅞” x 6⅞” | |
| 5** | Dark | 2 | 3⅞” x 3⅞” | 5⅜” x 5⅜” | 6⅞” x 6⅞” | |
| Unfinished Block Size | 8½" | 12½" | 16½" | |||
| Grid Size | 1" | 1½" | 2" | |||
| **These are for HST units. You may choose to cut them oversized. Then after stitching, trim to the correct size. | ||||||
Step 2: Create the units for your Goshen Star
HST

Make 4
We'll use the Quick Pieced Method to make our HSTs.
On the back side of the #4 squares draw a diagonal line with a pencil. Use a light touch. Draw just dark enough for you to see it.
With right sides together (RST) layer a #4 and #5 patch.
Install a quarter inch foot. Stitch a 1/4" away from the line on both sides for both pairs of patches.
 I use my standard quarter inch foot for this technique
Cut the pairs apart on the drawn line with a scissor or rotary cutter—whichever works best for you.
Each pair yields two HST (below). Press the units first flat to set the seam and then open with the SA towards the darker fabric.
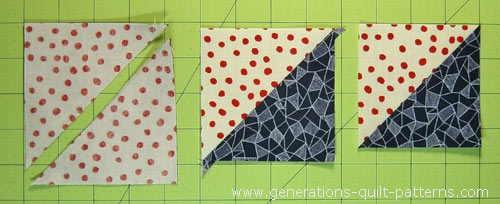
If you started with oversized patches like I did, you'll need to trim the HST to size(above, right). If you started with the exact size patches, your HST should equal the measurement in the chart below.
| Finished Block Size | Trim HST to... |
|---|---|
| 8” | 3-1/2” x 3-1/2" |
| 12” | 5" x 5" |
| 16” | 6-1/2” x 6-1/2" |
Click here if you want more detailed instructions for this Quick Pieced method.
Side Units
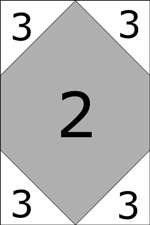
Make 4
On the backside of all sixteen #3 squares, draw a diagonal line. Again, only as dark as you need to see it.
With RST, layer a smaller #3 with a larger #2 square. The line touches two adjacent sides.
This time, stitch directly on the line. I've switched to my open toe applique foot because it's easier to see where the needle pierces the fabric.
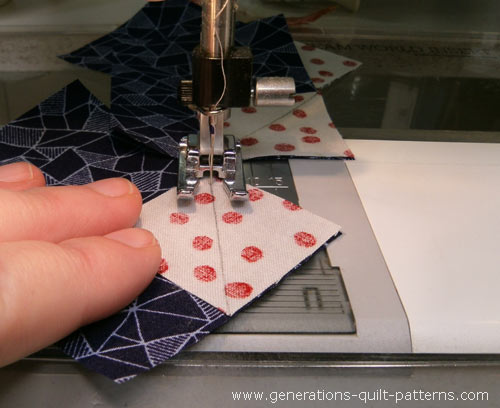
To be efficient with our sewing time, add a second #3 to the opposite corner of the #2 in the same manner. The #2 rectangles are large enough to do this without interfering with the first stitching line.

Now you have a decision to make—how to trim away the excess fabric before adding another patch. We must trim these first patches now because the seam of the remaining patches would make it impossible to trim away the excess later.
Below you can see where I've trimmed away just the extra #3 fabric leaving behind a 1/4" SA. (below, left) and then pressed the two corners into place (below, center).
Then the remaining two #3s were added (below right) and SA trimmed (arrows).
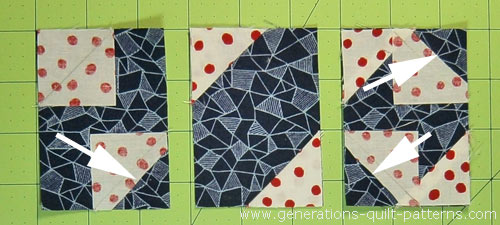 Trim, press and finally add the two remaining squares.
The alternative is to trim away both the #2 and #3 excess leaving behind a 1/4" seam (below, left).
 Trimming after adding the first two #3 (left). From the backside after all four #3 are stitched, trimmed and pressed (right).
One final consideration as to which method to use for handling the excess fabric is whether or not the #3 fabric 'shadows' or shows through the lighter #3.
In the photos, a couple corners look like there is some shadowing. In person, though, it isn't noticeable. I suspect it was the lighting for the photographs.
Repeat for the three remaining #2 rectangles.
Step 3: Assemble your Goshen Star quilt block
Arrange the units—both sewn and cut—into rows.
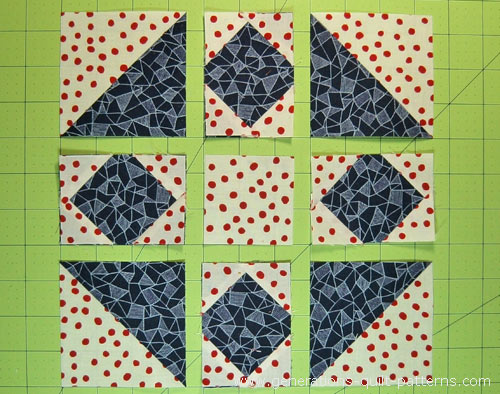
With RST stitch the units in each row together. SA are pressed toward the HSTs in the top and bottom rows and toward the center in the middle one.
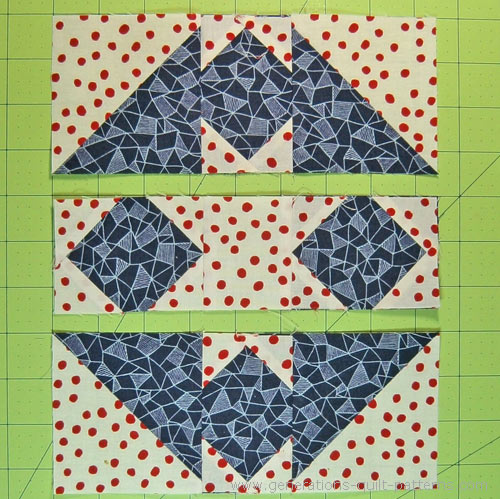 This Goshen Star is almost finished...
With RST, stitch the rows together.
 Seriously, I never met a Goshen Star block I didn't want to pin! :D
After stitching, give your finished Goshen Star quilt block one last press. If your block's a bit lumpy, try my favorite pressing technique.
It's even simpler than this block was to make!
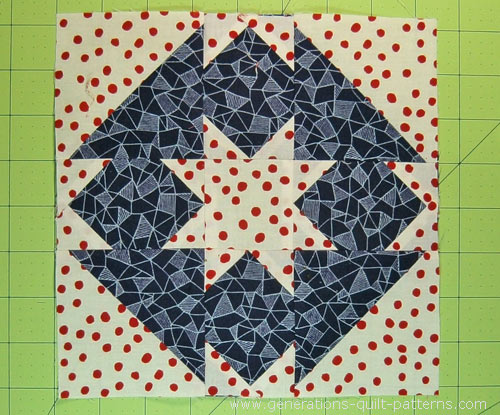 Voila! Our Goshen Star block is pointy perfection at its best!
🔭 Looking for something truly stellar?
You've finished your star quilt block, and you're ready for more!
Browse our collection of 70 stellar star quilt block patterns. All have instructions and cutting charts in multiple sizes. If templates or paper piecing is used in the tutorial, there's a free download for you of those materials.

Eeny. Meenie. Miney. Moe.
Which star quilt block will you sew?
For a star-studded quilting experience, choose from 100+ bedazzling star quilt patterns—for beginners and beyond—click here.
For even MORE blocks to make… 🧩🎨

...visit our Free Quilt Block Pattern Library, with over 260+ blocks to choose from in multiple sizes.
Free downloads are included in all sizes for any blocks require paper piecing patterns or templates.
Ready for More Blocks?

There's plenty more to keep you busy!
Just check out our Free Quilt Block Pattern Library to find blocks for your next quilting creation!
- Home
- Free Quilt Block Patterns
- Goshen Star Quilt Block

